
Dark Angels Intercessor — Painting Recipe
DARK ANGELS / 3RD COMPANY · AIRBRUSH + BRUSH
Green armor.
Bone details. Red weapons.
Weathered urban ground.
A squad painting recipe organized around shared colors. Complete each paint across the matching details—and across the squad—before moving on.
11 STEPS / 3 PHASES / ONE SHARED-COLOR WORKFLOW
THE FINISHED MODEL / FOUR VIEWS
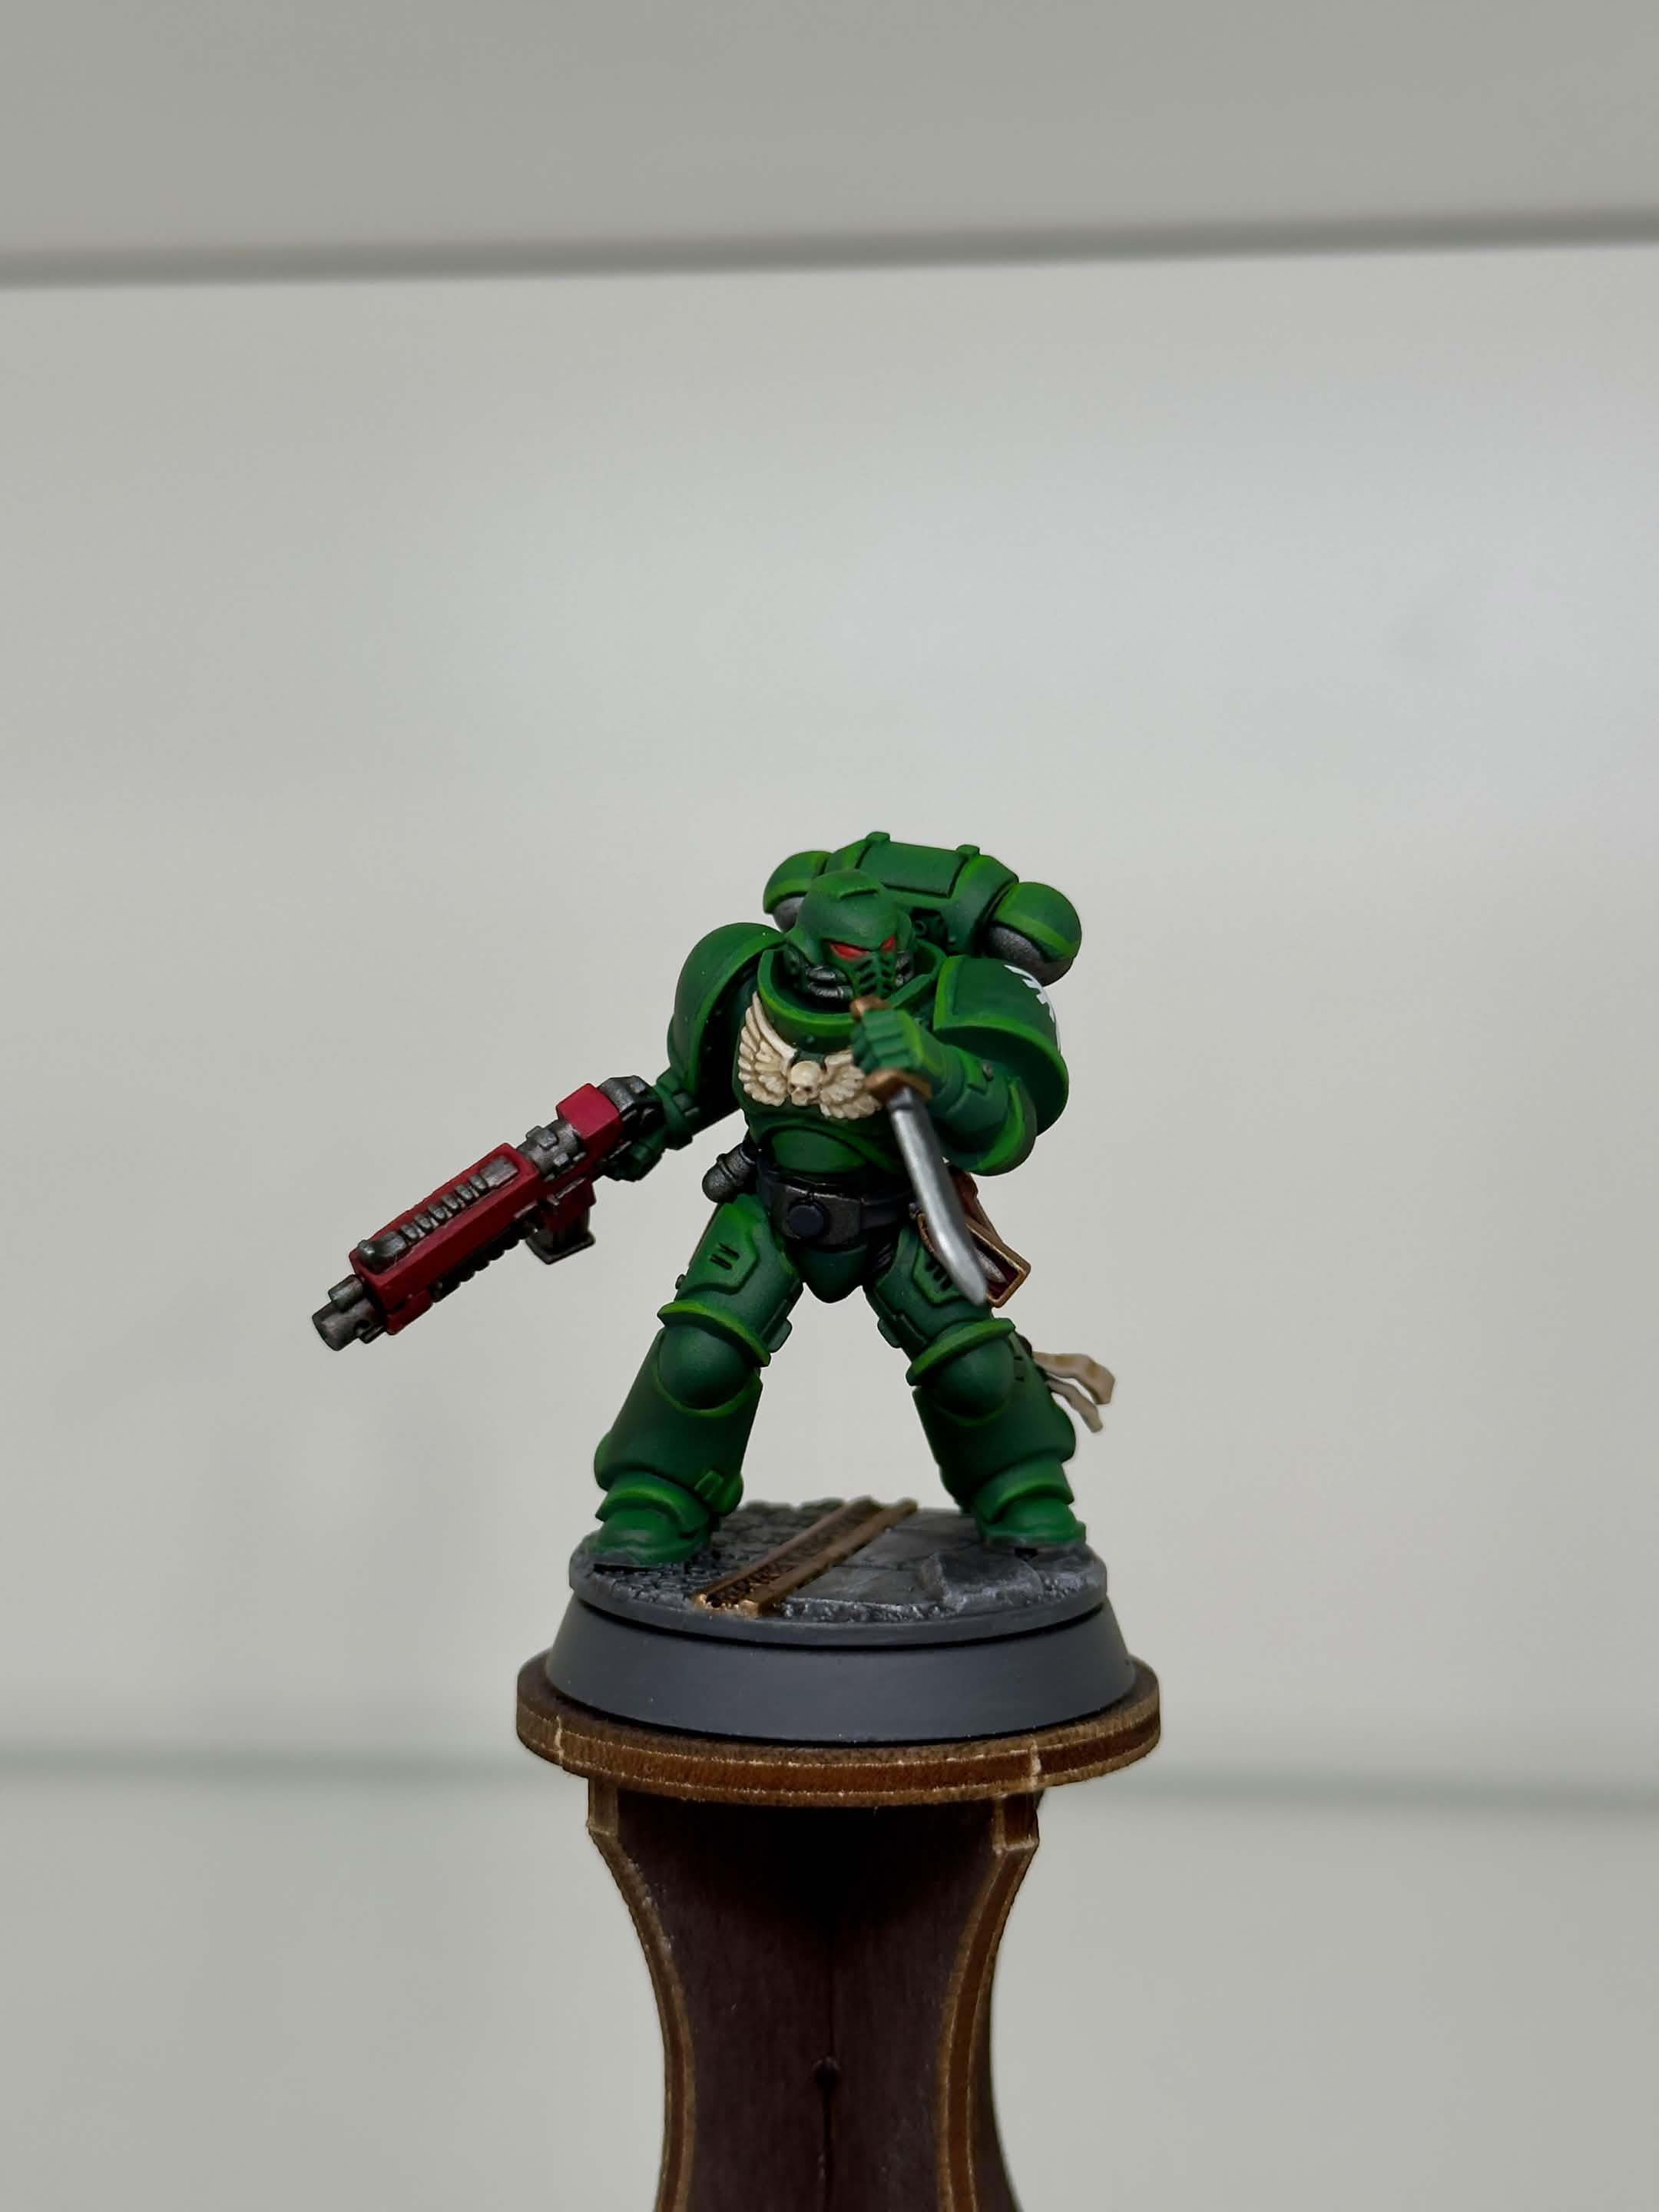
01 / Front
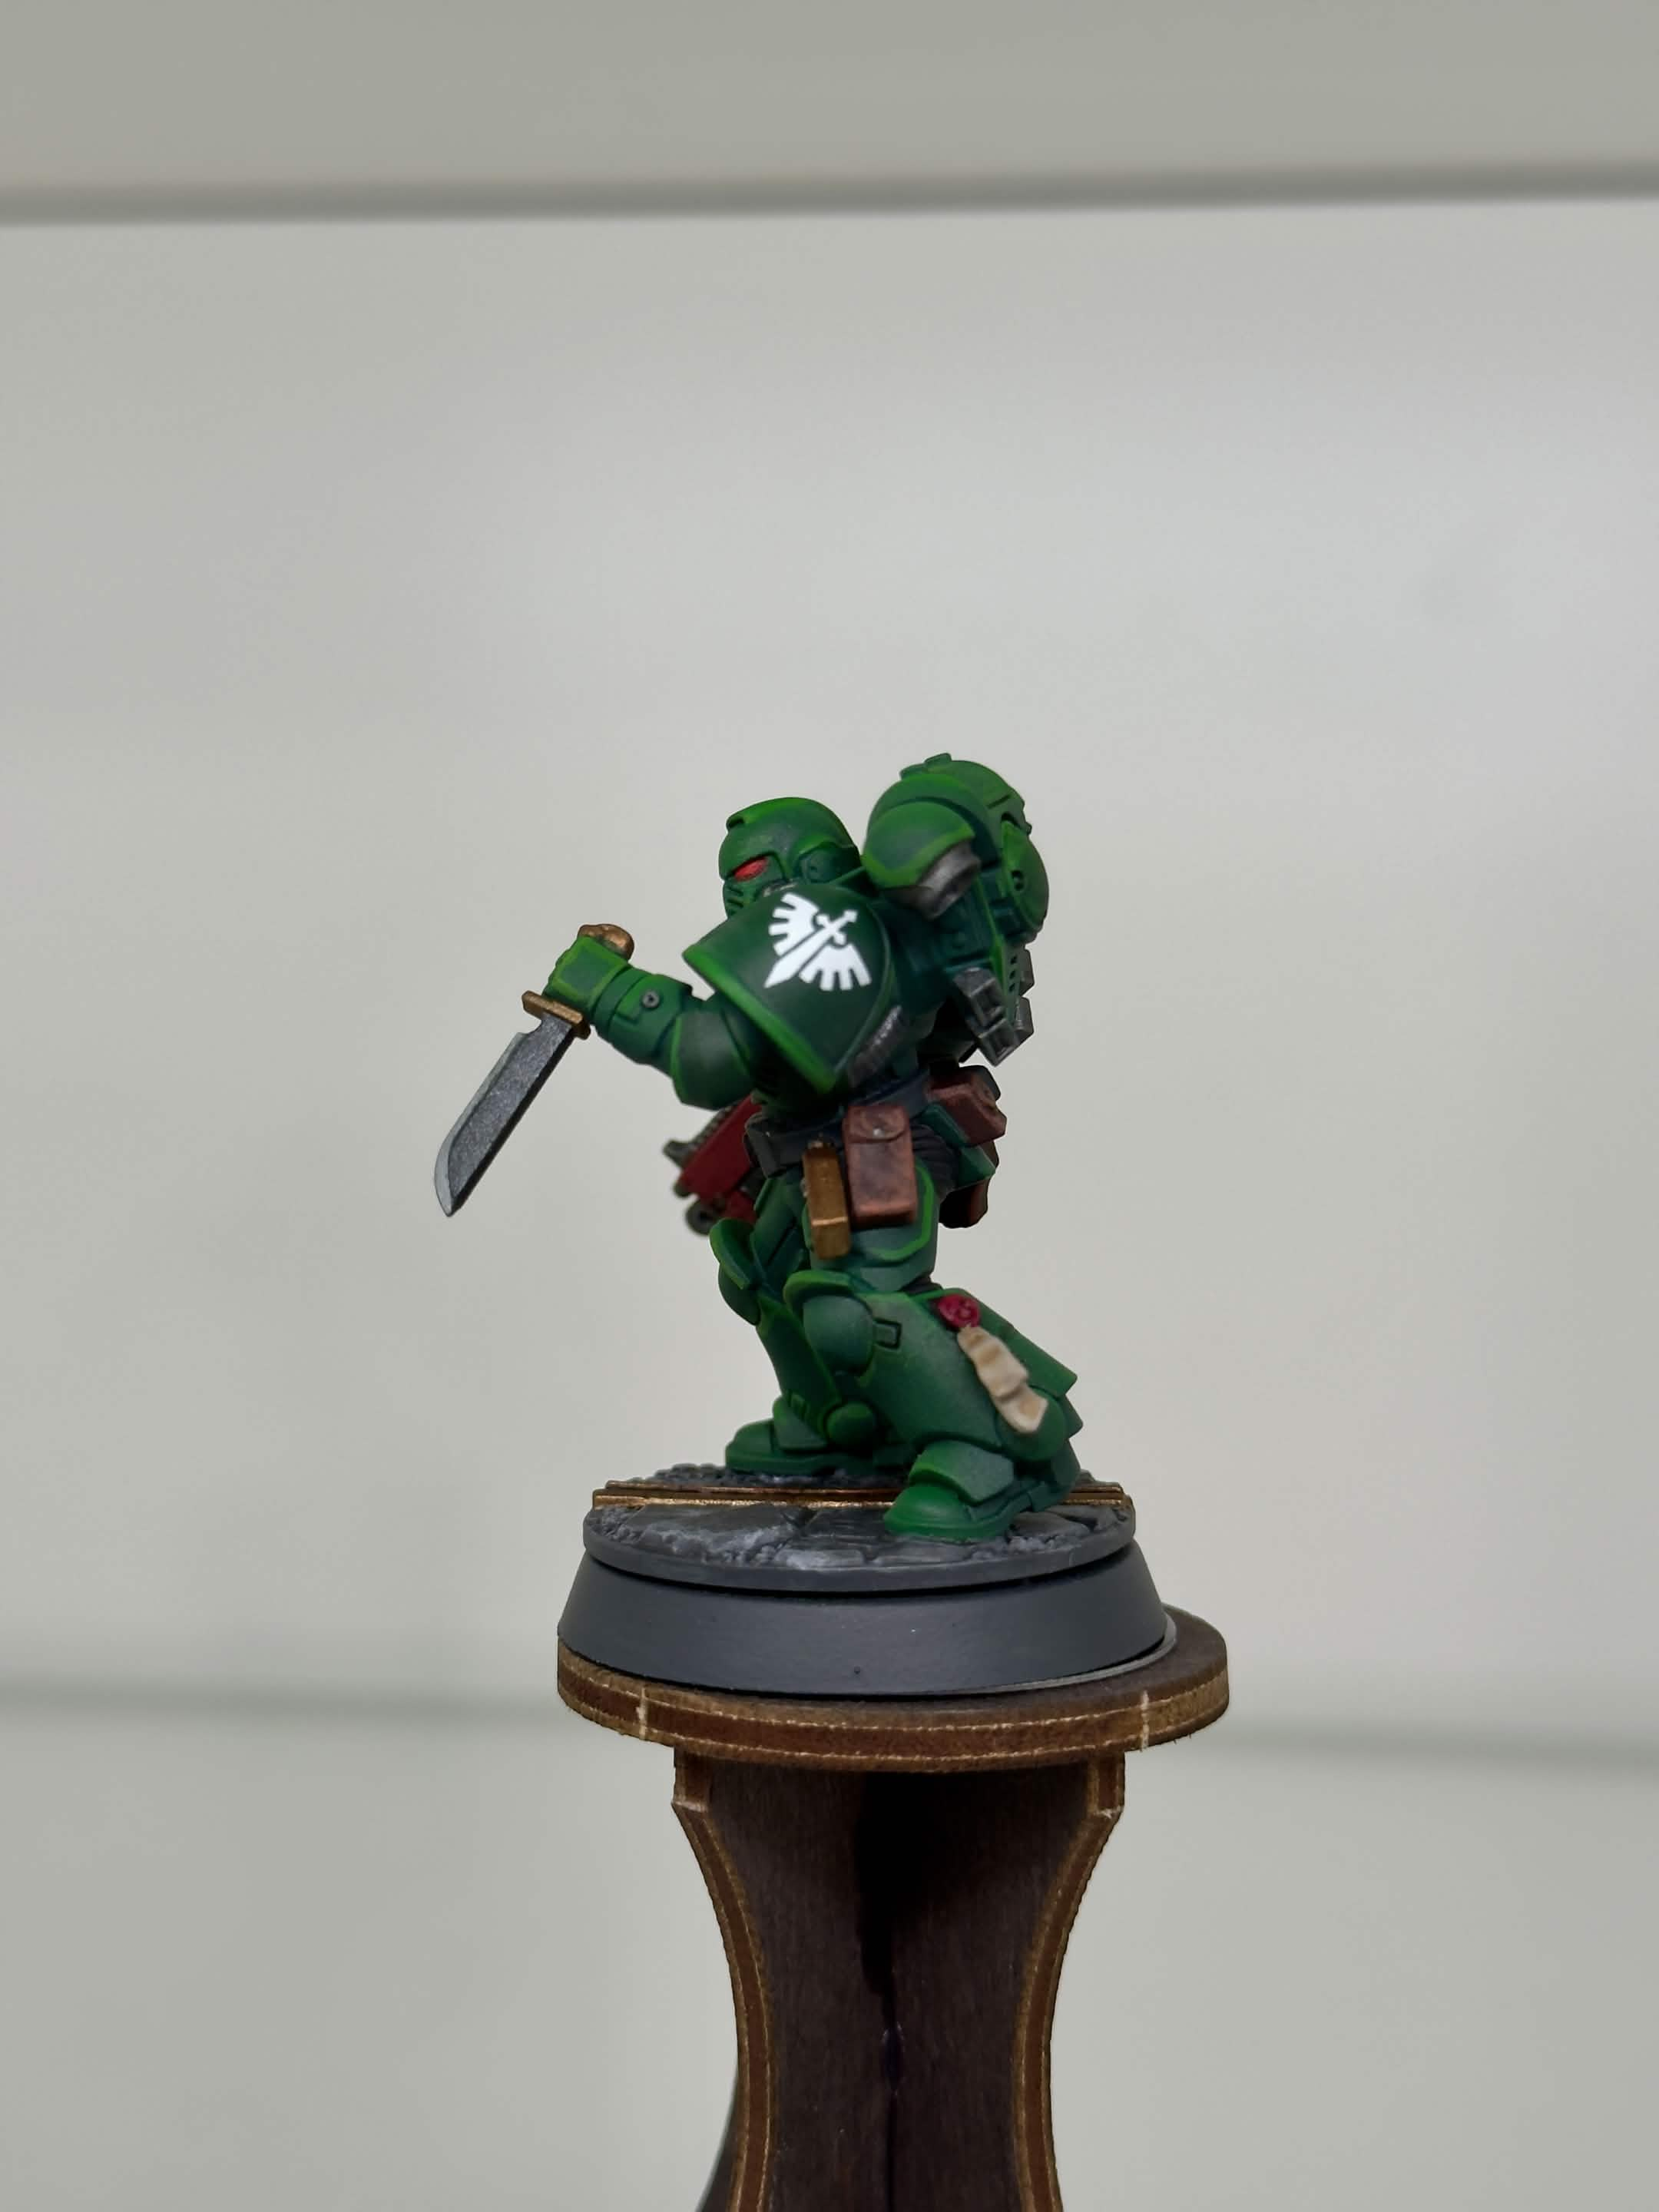
02 / Left
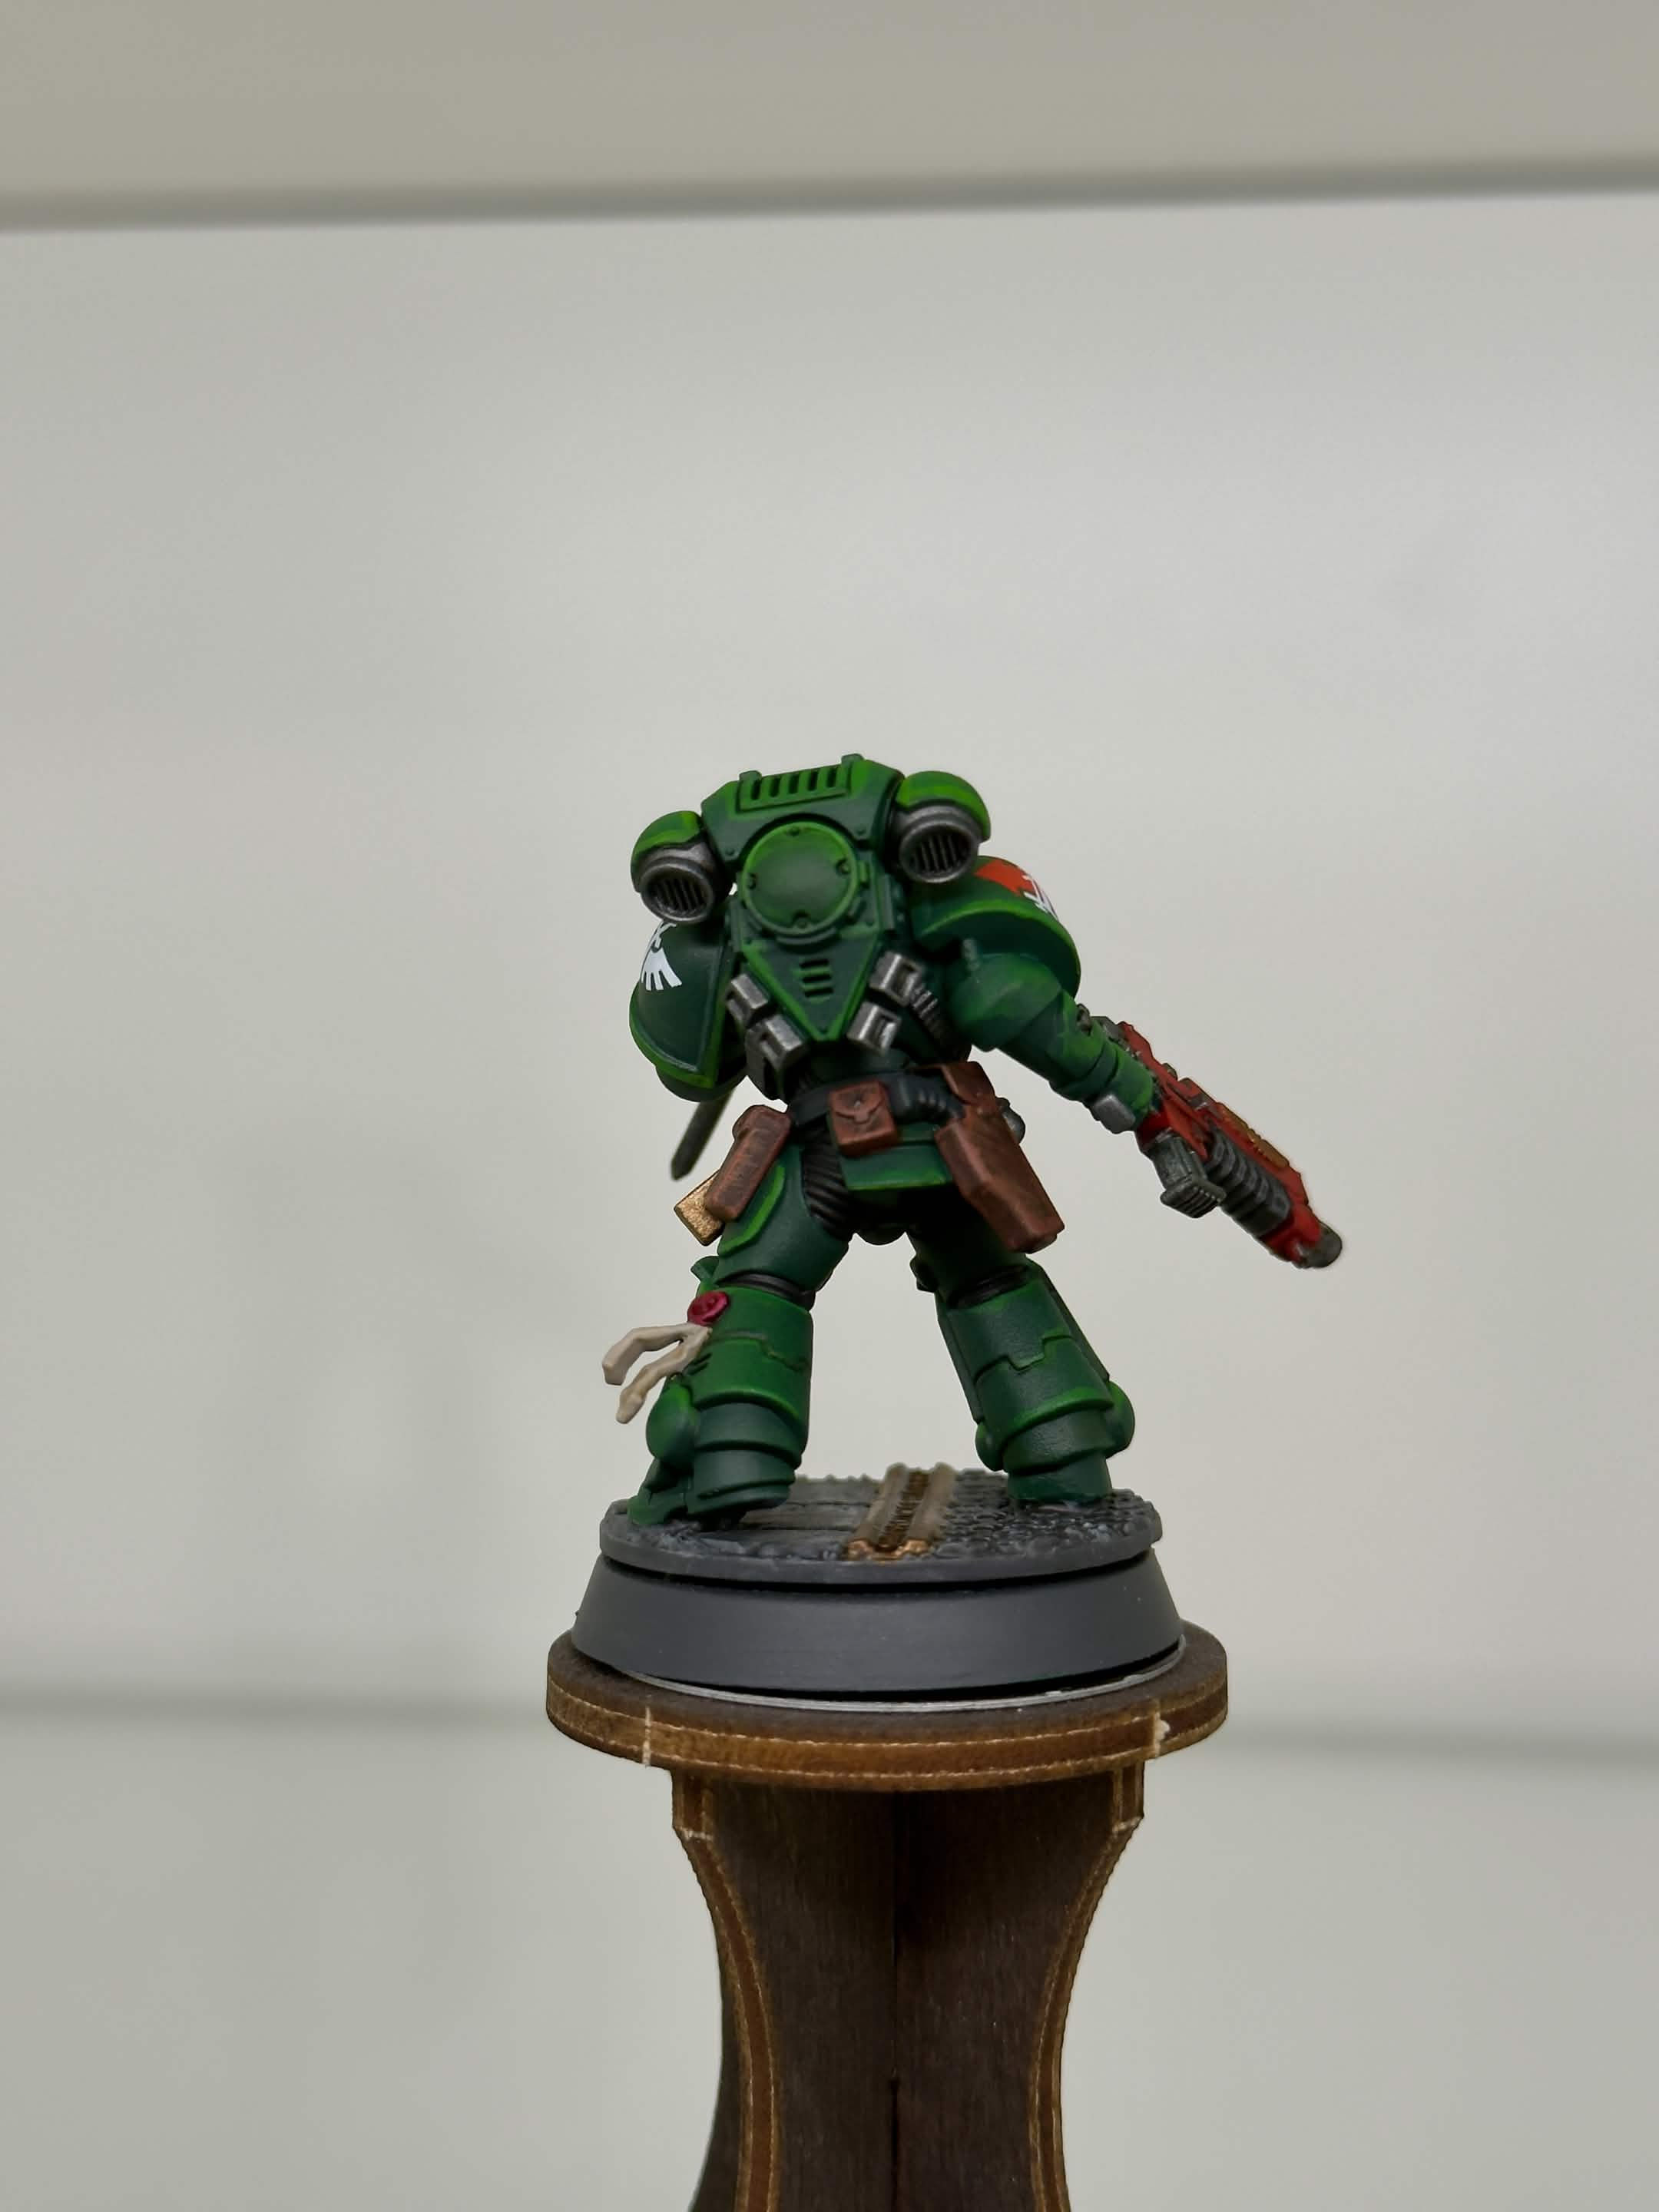
03 / Rear
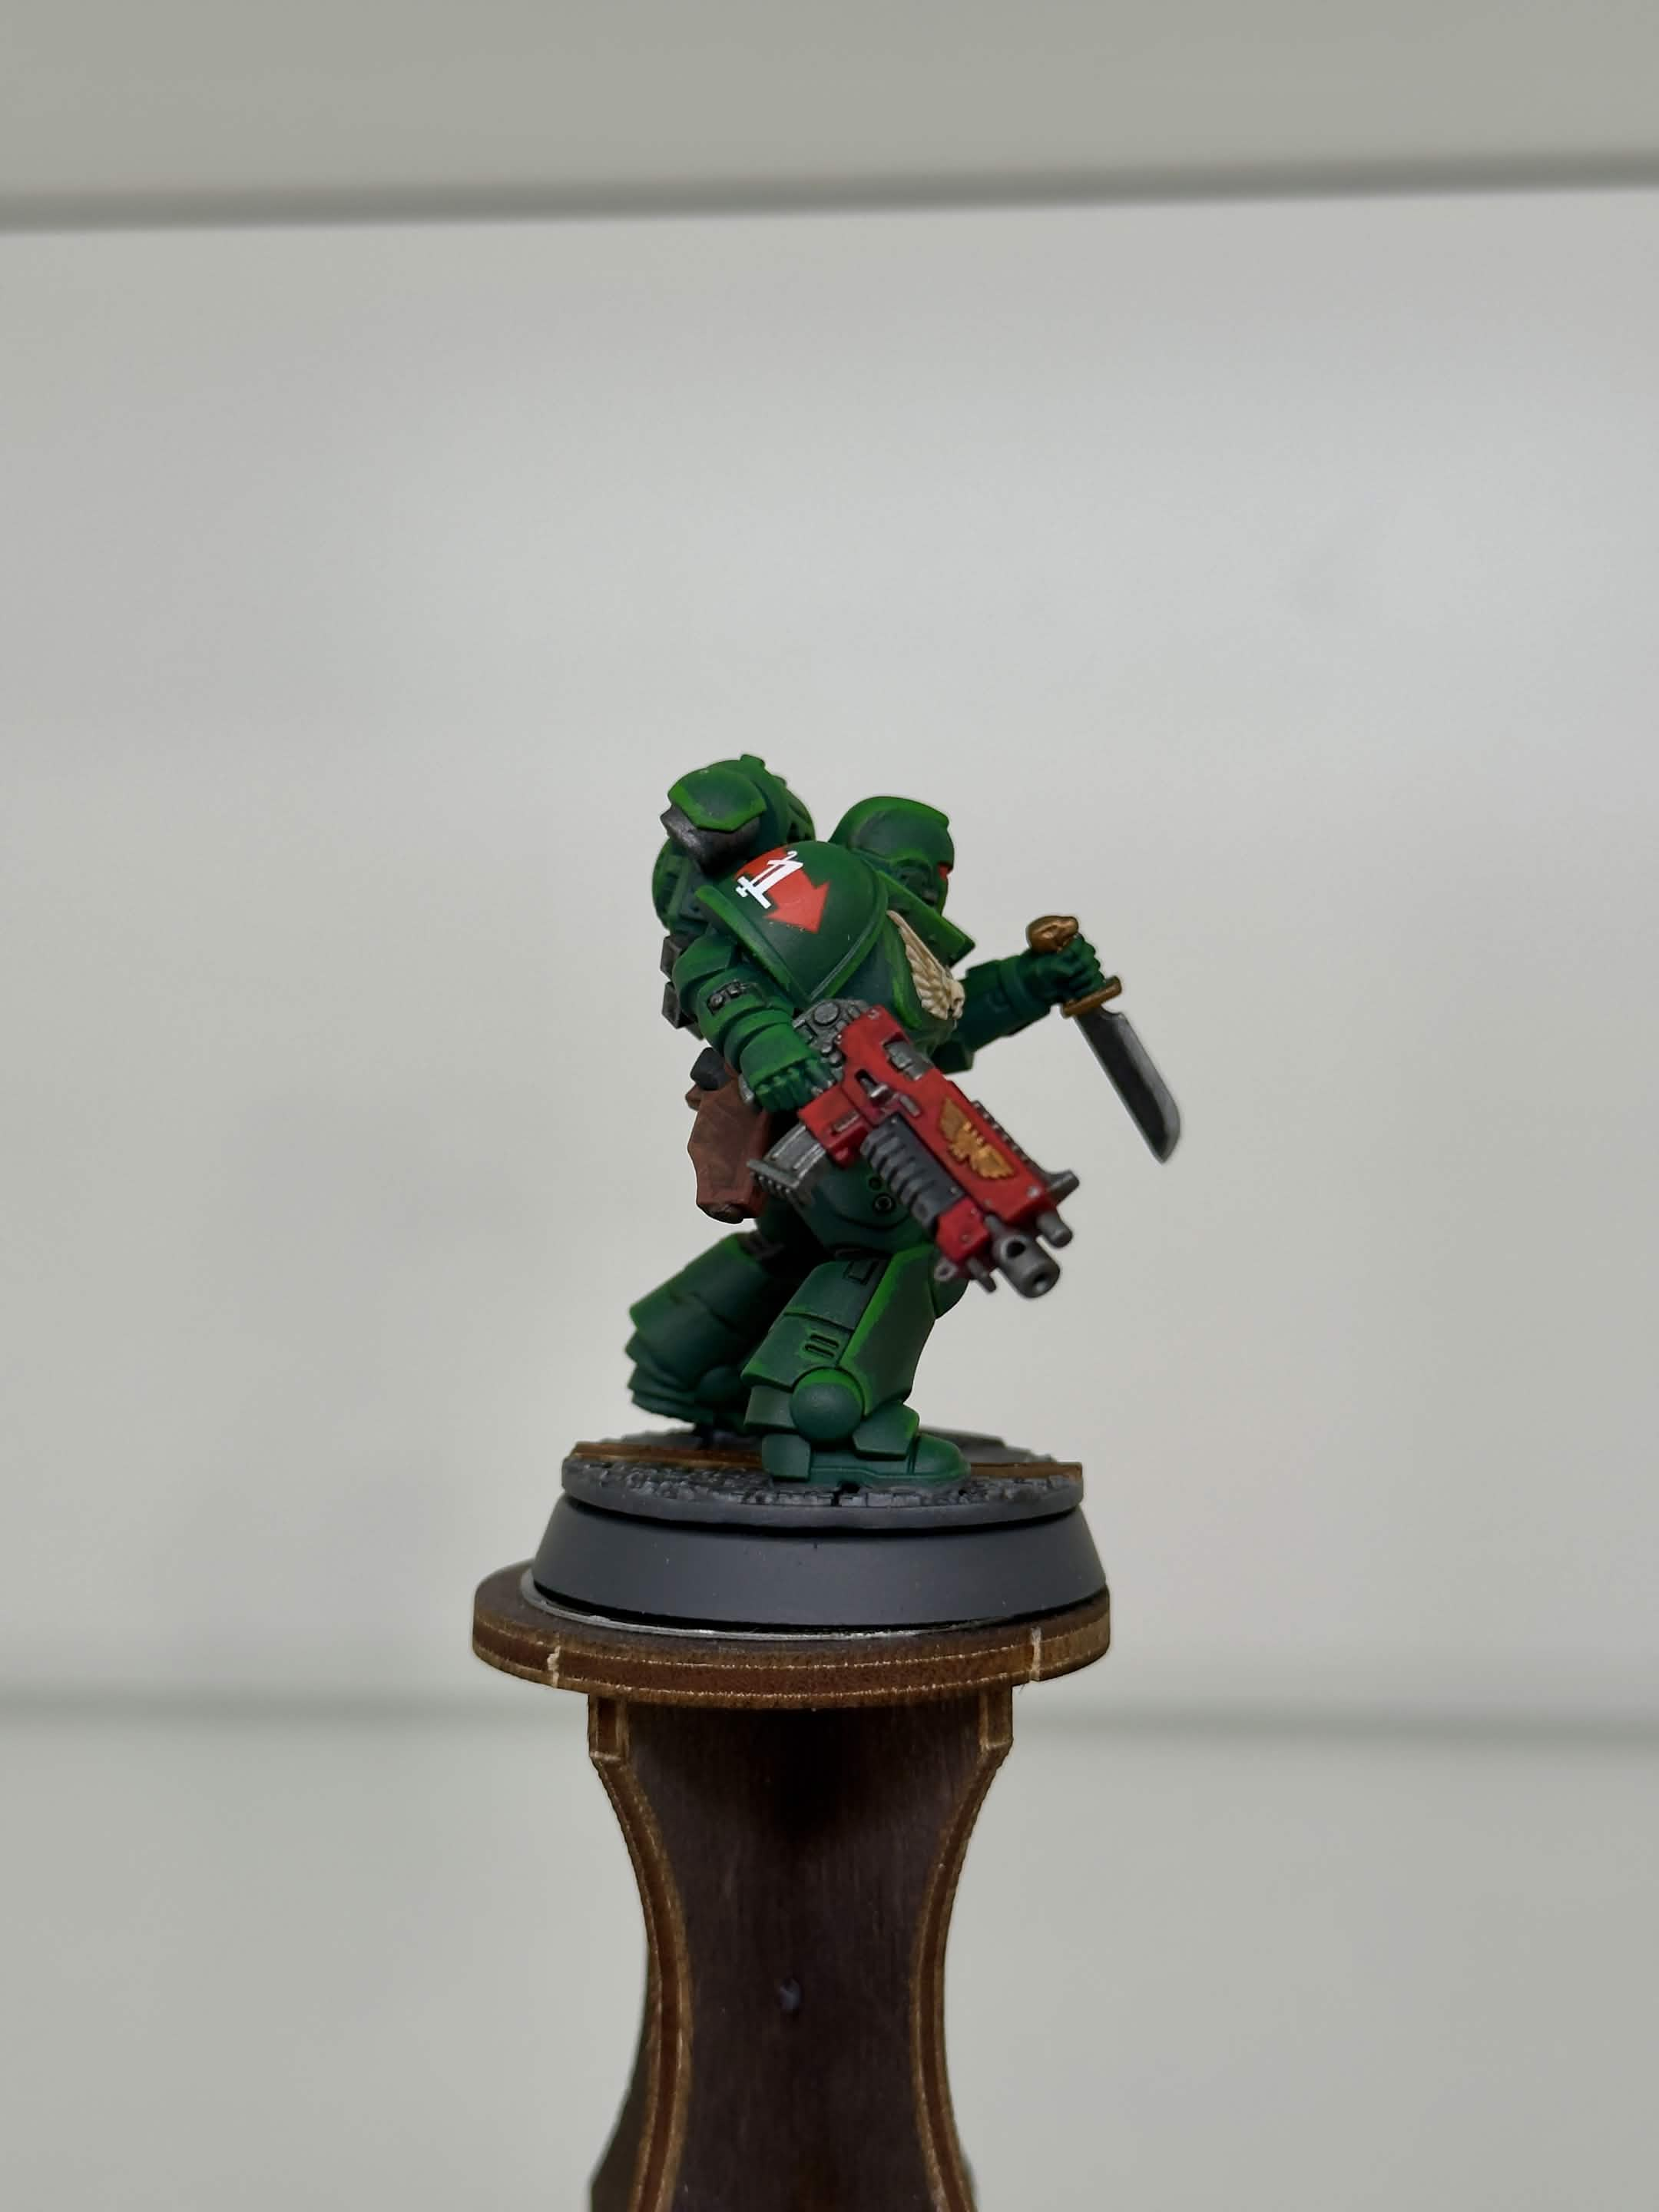
04 / Right
Reference model · Select a view to open the full photograph.
KEEP BESIDE THE PALETTE
Paint tray & bench reference
GREEN ARMOR
AK Interactive 3GEN Black Green → AK Interactive 3GEN Color Punch Greenskin Punch
BLACK & LEATHER
Citadel Contrast Black Legion / The Army Painter John Blanche Masterclass Ironclad Grey · AK Interactive 3GEN Hull Red
1:1
Airbrush colors
Paint : AK Interactive Airbrush Thinner
15–20 PSI
2:1
Bottled main edges
AK Interactive 3GEN Color Punch Greenskin Punch : AK Interactive 3GEN Color Punch Slime Green
1:1
Bottled sharpest edges
AK Interactive 3GEN Color Punch Greenskin Punch : AK Interactive 3GEN Color Punch Slime Green
Sergeant variation. The Army Painter John Blanche Masterclass Emperor Gold aquila, helmet ornament if present, and pauldron rims. Keep those rims gold during the green highlights.
Mixing ratios & airbrush notes
Ratios list ingredients in the order shown. The armor highlight mixes are already prepared in labeled bottles.
| Use | Recipe |
|---|---|
| Airbrushed acrylic colors | 1 part paint : 1 part AK |
| Armor recess wash | 1 part |
| Main armor highlight | 2 parts AK |
| Sharpest armor highlight | 1 part AK |
| Marine gold shade | 1 part Citadel Shade Reikland Fleshshade : 1 part Citadel Technical Lahmian Medium |
| Red weapon-casing shade | 1 part |
| Gold street shade | Undiluted Citadel Shade Reikland Fleshshade |
The default black for joints and grips is Citadel Contrast Black Legion. The Army Painter John Blanche Masterclass Ironclad Grey is an optional near-black grey alternative; choose by area and whether Citadel Contrast Black Legion’s extra flow is useful.
Use the 1:1 airbrush ratio for acrylic color layers. For varnishes, retain the thinning that works with the specific bottle and your airbrush; a varnish ratio has not been specified in this recipe.
Paint & equipment checklist
| Brand / range | Paints & products |
|---|---|
| Usual start: Renegade Green, followed by Salamander Green from above. Optional black start: Matt Black or Raven Black in place of Renegade Green; then the same Salamander Green pass. | |
| AK | Black Green; Hull Red; Silver Grey; Dirty Red; Carmine |
| AK | Greenskin Punch; Slime Green; Beast Brown |
| AK | Rusty Brass |
| AK | Old Gold |
| Citadel Contrast | Black Legion; Skeleton Horde; Doomfire Magenta; Flesh Tearers Red |
| Citadel | Eshin Grey |
| Citadel | Wraithbone (optional aquila undercoat) |
| Citadel Shade | Reikland Fleshshade |
| Citadel Technical | Lahmian Medium |
| Citadel Dry | Necron Compound (optional silver highlight) |
| Deep Grey; Ash Grey; Company Grey or Brigade Grey (brighter alternatives); Strong Skin Shade wash | |
| Warpaints Stabilizer | |
| Emperor Gold; Ironclad Grey (optional near-black alternative). Both use Fanatic formulations. | |
| Scale75 | Black Metal; Heavy Metal (optional silver highlight) |
| Black Wash; Bold Titanium White; Gloss Varnish | |
| Graphite Grey | |
| AK | Satin Varnish; Ultra Matte Varnish; Airbrush Thinner |
| Vallejo Pigment FX | Natural Iron Oxide |
| Microscale | Micro Set; Micro Sol |
| Other supplies | Optional flow improver; transfers |
| Tools | Airbrush; detail brushes; flat filbert brush; pigment brush; transfer-cutting tools; tweezers; soft brush or tightly wound cotton bud for positioning transfers |
PHASE I / STEPS 01–03
Foundation
PRIME · AIRBRUSH · URBAN BASE
01Prime & tabletop finish
The usual starting point is a dark green primer with a lighter green highlight.
USUAL PRIMER START
OPTIONAL BLACK START / EITHER PRIMER
- Usual starting point: prime with
TheColour ForgeCore RangeRenegade Green. - Spray
TheColour ForgeCore RangeSalamander Green from above to create a zenithal highlight, leaving lower surfaces darker.
Black-primer alternative: Use The Colour Forge Core Range Matt Black or The Colour Forge Core Range Raven Black instead of the initial green primer. Either works for this recipe; follow with the same overhead green primer pass.
This provides a green foundation suitable for tabletop use while the full paint job is pending. It is an intentional stopping point even though the later airbrush layers may cover much of the spray gradient.
02Airbrush & armor lining
Build the armor volume, then define only its recesses.
PALETTE / THIS STEP
AKGreen basecoat and volumetric highlights
- Airbrush AK
Interactive3GEN Black Green over the green armor, thinned 1:1 with AKInteractiveAirbrush Thinner, usually at 15–20 PSI. - Use AK
Interactive3GEN Color Punch Greenskin Punch, with the same thinning ratio, to add quick, restrained volumetric highlights.
Go lightly with AK Interactive 3GEN Color Punch Greenskin Punch: it has a blue-green appearance at this stage. The later edge-highlight mixes introduce the yellow-green emphasis of the finished scheme.
Targeted recess wash
- Mix
Monument HobbiesPro Acryl Black Wash and Citadel Technical Lahmian Medium 1:1. Optionally add 1–2 drops of flow improver to the prepared batch. - Apply carefully to armor panel lines and cavities to create near-black recess shadows.
- Do not apply this as an all-over wash. Keep it off the broad green panels so they retain their color.
- Skip the exposed rubber joints; they receive Citadel Contrast Black Legion or
TheArmy Painter John Blanche Masterclass Ironclad Grey, the optional alternative in Step 4.
This is the recipe's acrylic method for a freely flowing recess wash, without an enamel cleanup stage. Keep the lining neat and allow it to dry before handling the next areas.
03Urban ground & base rim
Finish the broad ground work before the small details.
PALETTE / THIS STEP
CitadelDo the broad base work before the fine model details. Leave the gold street features for the shared pale-undercoat and gold batches later.
- Apply an even coat of Citadel
LayerEshin Grey over the ground and stone features, including embedded metal features that will be repainted. Paint the base rim CitadelLayerEshin Grey in the same batch. - When dry, use a flat filbert brush to skim
TheArmy PainterWarpaintsFanatic Ash Grey over the upper ground surfaces. This is a controlled surface coat, heavier than a conventional drybrush, while retaining dark recesses. - Apply
Monument HobbiesPro Acryl 1-Step Graphite Grey over the prepared ground. Keep this treatment on the scenic top; the rim stays CitadelLayerEshin Grey.
If the ground reads too dark, replace The Army Painter Warpaints Fanatic Ash Grey with The Army Painter Warpaints Fanatic Company Grey or The Army Painter Warpaints Fanatic Brigade Grey for a brighter undercoat. These are alternatives, not mandatory extra layers. Avoid Citadel Base Wraithbone for the ground undercoat; it made this treatment too bright in previous tests.
The rim should need another coat only if later painting or weathering marks it.
PHASE II / STEPS 04–07
Shared color batches
BLACK · BONE · RED · METALS
04Black details & leather
Complete every matching joint, grip, strap, and pouch.
PALETTE / THIS STEP
Citadel ContrastBlack LegionBlack and near-black grey
Choose by area: use Citadel Contrast Black Legion when you want pure black or its extra flow makes the detail easier to paint. The Army Painter John Blanche Masterclass Ironclad Grey is an acceptable near-black grey alternative when a softer black suits the area. Choose separately for each part; batch together the areas using the same paint.
- Paint all exposed rubber armor joints, sword and knife handles, bolter grips, and foregrips with the chosen black or near-black grey.
- Where appropriate, highlight these black or near-black details with
TheArmy PainterWarpaintsFanatic Deep Grey.
Keep metallic fittings separate from these black grips.
Leather
- Basecoat all leather straps, belts, holsters, and bags with AK
Interactive3GEN Hull Red. - Add subtle highlights with AK
Interactive3GEN Color Punch Beast Brown. The restrained contrast is intentional.
05Bone, seals & lenses
Batch the pale foundations, then apply their separate tints.
PALETTE / THIS STEP
AKAK Interactive 3GEN Silver Grey — all matching foundations
Apply thin, opaque coats of AK Interactive 3GEN Silver Grey to:
- The chest aquila on standard marines.
- All purity-seal parchment.
- All purity-seal wax.
- The entire gold street feature on the base, including sides, recesses, and lettering.
Aquila alternative: Citadel Base Wraithbone may replace AK Interactive 3GEN Silver Grey on the aquila only. Keep AK Interactive 3GEN Silver Grey on the street features and purity seals.
Sergeants: Skip the bone aquila treatment; their aquila joins the batch of The Army Painter John Blanche Masterclass Emperor Gold in Step 7.
Build smooth coverage carefully, especially on the aquila, so thinned paint does not spill onto the green chest.
White eye foundations
Paint the eye lenses neatly with Monument Hobbies Pro Acryl Bold Titanium White and let them dry.
Tint the prepared details
- Apply Citadel Contrast Skeleton Horde to both the standard aquila and the purity-seal parchment. This creates the bone tone that complements the Deathwing scheme.
- Apply Citadel Contrast Doomfire Magenta to the seal wax.
- Apply Citadel Contrast Flesh Tearers Red over the dry white lenses.
- Leave the AK
Interactive3GEN Silver Grey street features ready for AKInteractiveQuick Gen Old Gold in Step 7.
06Red casings & company knees
Use one red batch for the weapons and 3rd Company markings.
PALETTE / THIS STEP
AK- Basecoat the weapon casings and 3rd Company marking on the model's left kneepad with AK
Interactive3GEN Dirty Red. - Highlight both with AK
Interactive3GEN Carmine. The weapon highlights can be broad and rough; keep the knee marking neatly defined. - Shade the weapon casings with a 1:1 mix of
TheArmy PainterWarpaintsFanatic Strong Skin Shade andTheArmy PainterWarpaintsFanaticEffectsWarpaints Stabilizer for a light, uniform result.
The knee uses the same AK Interactive 3GEN Dirty Red/AK Interactive 3GEN Carmine color pairing. The casing wash is not a required part of the knee recipe.
Paint the larger red casings before their metallic fittings to minimize later metal touch-ups. For company-marking placement, consult the supplied Dark Angels marking reference. Left and right refer to the model's own sides.
07Steel, brass & gold
Paint matching metals across the marine and scenic base.
PALETTE / THIS STEP
Scale75Scale75 Metal n’ Alchemy Black Metal
Apply an even coat of Scale75 Metal n’ Alchemy Black Metal to all appropriate exposed steel details:
- Gun barrels and metallic weapon hardware.
- Metal handles and fittings separate from the black or near-black grips painted in Step 4.
- Grenades, belt buckles, and similar metal details.
- Backpack lower vents and upper exhausts: paint the vent interiors and exposed metal around the rounded exhaust housings.
- Helmet tubes entering the mask and accessible ports at the rear of the helmet.
Keep the upper armor shell of each backpack exhaust green. Use the rear and side reference photos to identify this boundary.
Scale75 Metal n’ Alchemy Black Metal normally needs no additional shade in this recipe. If a sharper silver highlight is wanted, use Scale75 Metal n’ Alchemy Heavy Metal or Citadel Dry Necron Compound.
Blade and chainsword-tooth treatment: Exact basecoat awaiting confirmation; the proposed shared treatment is Scale75 Metal n’ Alchemy Black Metal with the optional silver highlights above.
AK Interactive 3GEN Metallic Rusty Brass
Paint bullet shells, magazines, and other projectile ammunition with AK Interactive 3GEN Metallic Rusty Brass.
The Army Painter John Blanche Masterclass Emperor Gold — all marine gold
Use The Army Painter John Blanche Masterclass Emperor Gold on:
- Knife and sword pommels and guards.
- Imperial symbols on weapons.
- Appropriate relics on the belt.
- Any other marine ornaments intended to be gold.
For sergeants only, add the chest aquila, helmet ornament or marking if present, and pauldron rims to this same batch. This is a deliberate variation in this collection's scheme.
The Army Painter John Blanche Masterclass Emperor Gold is the preferred gold for this recipe, even if it appears reddish brown in the bottle.
AK Interactive Quick Gen Old Gold — scenic-base details
Apply AK Interactive Quick Gen Old Gold over the AK Interactive 3GEN Silver Grey street features prepared in Step 5. Cover the full feature and let it dry.
Citadel Shade Reikland Fleshshade — two strengths in one session
- Use undiluted Citadel Shade Reikland Fleshshade on the base's AK
InteractiveQuick Gen Old Gold street features. Deep recess shadows help the gold lettering stand out. - Prepare a separate 1:1 mix of Citadel Shade Reikland Fleshshade and Citadel Technical Lahmian Medium and apply it lightly to all
TheArmy Painter John Blanche Masterclass Emperor Gold details on the marine. Avoid heavy pooling; this wash strongly tints the gold.
Keep the two strengths distinct: full-strength shade for the street, diluted shade for the marine.
PHASE III / STEPS 08–11
Highlights, markings & finish
ARMOR EDGES · TRANSFERS · VARNISH · WEATHERING
08Armor cleanup & edge highlights
Repair stray marks, then bring attention to the head and shoulders.
PALETTE / THIS STEP
AKRepair stray marks
- Correct mistakes in dark, lower armor areas with AK
Interactive3GEN Black Green. - In lighter areas, mix in AK
Interactive3GEN Color Punch Greenskin Punch to match the surrounding armor.
This cleanup is deliberately after the base and detail painting.
Main highlights — bottled 2:1 mix
Use the premixed 2 parts AK Interactive 3GEN Color Punch Greenskin Punch : 1 part AK Interactive 3GEN Color Punch Slime Green on upward-facing green armor edges and surfaces. Concentrate on the upper half of the model. Keep highlights narrow, crisp, and strong enough to read on the tabletop.
Include the green pauldron rims, upper helmet rim, tops of the helmet's ear details, and other upward-facing edges visible in the reference photos.
Sergeant exception: Keep gold pauldron rims gold; do not line them with the green mix.
Sharpest highlights — bottled 1:1 mix
Use 1 part AK Interactive 3GEN Color Punch Greenskin Punch : 1 part AK Interactive 3GEN Color Punch Slime Green sparingly inside previously highlighted areas. Concentrate these sharp accents on the upper quarter of the model to draw attention toward the head and shoulders.
09Waterslide transfers
Apply the symbol, layer the number, and seal the settled decals.
PALETTE / THIS STEP
This incorporates the layered-transfer workflow from the earlier Decal Application Guide discussion. The timing windows below are practical checkpoints; surface readiness determines when to continue.
Prepare with Monument Hobbies Pro Acryl Gloss Varnish
- Make sure the paint is dry and thoroughly mix the
Monument HobbiesPro Acryl Gloss Varnish. - Apply one thin, smooth coat over the complete shoulder face, inside the trim. Airbrushing is convenient for a squad; a brush works for an individual shoulder.
- Let the gloss become properly touch-dry and stable before adding decal solutions. Use the readiness that has worked with this combination; full-cure times are not automatic minimum recoat times.
Use Monument Hobbies Pro Acryl Gloss Varnish for both clear coats in this transfer stage. The current recipe retains its separate all-over satin protection and final AK Interactive Ultra Matte Varnish finish in Steps 10–11.
Place the Battleline or chapter transfer
- Cut the transfer out and wet its backing until it slides freely. About 10 seconds of soaking is a starting point, not a reason to force it off the paper.
- Apply a small amount of Microscale Micro Set, slide the transfer into place, and align it carefully.
- Gently wick away excess liquid. While positioning, a damp soft brush or tightly wound cotton bud can help settle it.
- Wait about 5–10 minutes, until the transfer is no longer floating or easily shifting.
Conform the first transfer
- Apply one light treatment of Microscale Micro Sol, using as few brush strokes as possible.
- Leave it alone while it softens. Do not press, reposition, or touch a softened or wrinkled transfer.
- Check after 30–60 minutes. Continue only when the transfer is dry, flat, and no longer soft. Repeat Microscale Micro Sol only where needed, allowing each application to dry.
Layer the squad number
For a squad number placed over the Battleline symbol:
- Apply a small amount of Microscale Micro Set and place the number directly over the settled lower transfer. No intermediate gloss coat is needed in this workflow.
- Position and wick gently without scrubbing the lower transfer.
- Wait about 5–10 minutes, until the number stops floating.
- Use Microscale Micro Sol only if needed to conform the number. Leave it untouched, and inspect after 30–60 minutes. Extend the wait if either transfer remains wet or soft.
Dry, clean if needed, and seal
- After the final decal solution, give the transfers a few hours before sealing when practical; 3–4 hours is a same-day checkpoint, not a guaranteed dry time. They must be completely dry, settled, and no longer soft.
- If visible adhesive or solution residue remains, gently remove it with a soft brush barely dampened with clean water. Do not rub across the transfers. Let the area dry completely; 30–60 minutes is a useful checkpoint after light cleaning. Skip this step if there is no residue.
- Apply one thin, continuous coat of
Monument HobbiesPro Acryl Gloss Varnish over the complete shoulder face to seal the transfers and even the surface. - Let the gloss dry normally and become ready for the next coat before the final finishing stages.
Use small amounts of Microscale Micro Set and Microscale Micro Sol rather than saturating the shoulder. Favor natural drying; if using a hairdryer or air blower, keep it low and gentle and do not let airflow disturb a softened transfer.
The Microscale Micro Sol instructions likewise emphasize leaving the softened decal undisturbed until dry.
10Protective satin
Check the rim and protect the painted finish before pigments.
PALETTE / THIS STEP
Citadel- Inspect the base rim. Touch up Citadel
LayerEshin Grey only if needed; the initial even rim coat was completed with the ground in Step 3. - Once the paint, transfers, and sealing gloss are dry enough for the next coat, apply an all-over coat of AK
InteractiveSatin Varnish. This is the protective layer beneath the pigment weathering. - Allow the satin to dry before applying pigments. About 10–20 minutes is this recipe's observed working pause in a humidity-controlled basement, with relative humidity kept below roughly 45–50%. Check that the surface is dry and no longer tacky before continuing. This is a working interval, not a claim of full cure.
11Battle dust & final matte
Tie the feet into the base and finish with a controlled matte coat.
PALETTE / THIS STEP
Vallejo Pigment FXNatural Iron OxideAK- Apply Vallejo Pigment FX Natural Iron Oxide to selected base areas to suggest dark battle dust, ash, and scorched debris.
- Add smaller amounts to the feet and shins to tie the marine into the base.
- Use gentle airbrush airflow to remove excess pigment until the armor color and weathering are balanced.
- Thoroughly mix AK
InteractiveUltra Matte Varnish and apply light, thin passes. Aim for an evenly wetted film: lightly wet, without soaking the model or leaving a dry, dusty spray. Preserve the pigment texture: use a light final application to secure the pigments and establish the matte finish. Avoid saturating the pigment or building a heavy varnish layer over it. Include the metallic areas: a subdued metal finish is intentional for these non-character models. Keep metallic painting and highlights in the shared paint batches before varnishing. - Let the finish dry, then leave the model until the next day—about 24 hours before gaming or transport in this workflow.
The model is finished.
Ready for the table.
Leave the finished model until the next day—about 24 hours before gaming or transport.
Batch map
Shared-color checklist
- Citadel
LayerEshin Grey: scenic base and rim together; conditional rim touch-up only. - Citadel Contrast Black Legion or
TheArmy Painter John Blanche Masterclass Ironclad Grey /TheArmy PainterWarpaintsFanatic Deep Grey: batch rubber joints and grips by the paint chosen for each area, then highlight where appropriate. - AK
Interactive3GEN Hull Red / AKInteractive3GEN Color Punch Beast Brown: all leather together. - AK
Interactive3GEN Silver Grey: standard aquila, parchment, wax, and street foundations together. - Citadel Contrast Skeleton Horde: standard aquila and parchment together.
- AK
Interactive3GEN Dirty Red / AKInteractive3GEN Carmine: weapon casings and 3rd Company knees together. - Scale75
Metal n’ AlchemyBlack Metal / optional silver highlights: matching weapon, armor, backpack, and helmet hardware together. TheArmy Painter John Blanche Masterclass Emperor Gold: every marine gold detail, including sergeant-only ornaments, in one batch.- Citadel Shade Reikland Fleshshade: street and marine gold in one session, keeping undiluted and 1:1 mixtures separate.
- Armor mixes: revisit green only for necessary cleanup and the final controlled highlights.