
Dark Angels Intercessor — Painting Recipe
DARK ANGELS / 3RD COMPANY · AIRBRUSH + BRUSH
Green armor.
Bone details. Red weapons.
Weathered urban ground.
A squad painting recipe organized around shared colors. Within each step, complete each paint across the matching details—and across the squad—before moving on.
11 CORE STEPS + 2 OPTIONAL FINISHES / 3 PHASES
THE FINISHED MODEL / FOUR VIEWS
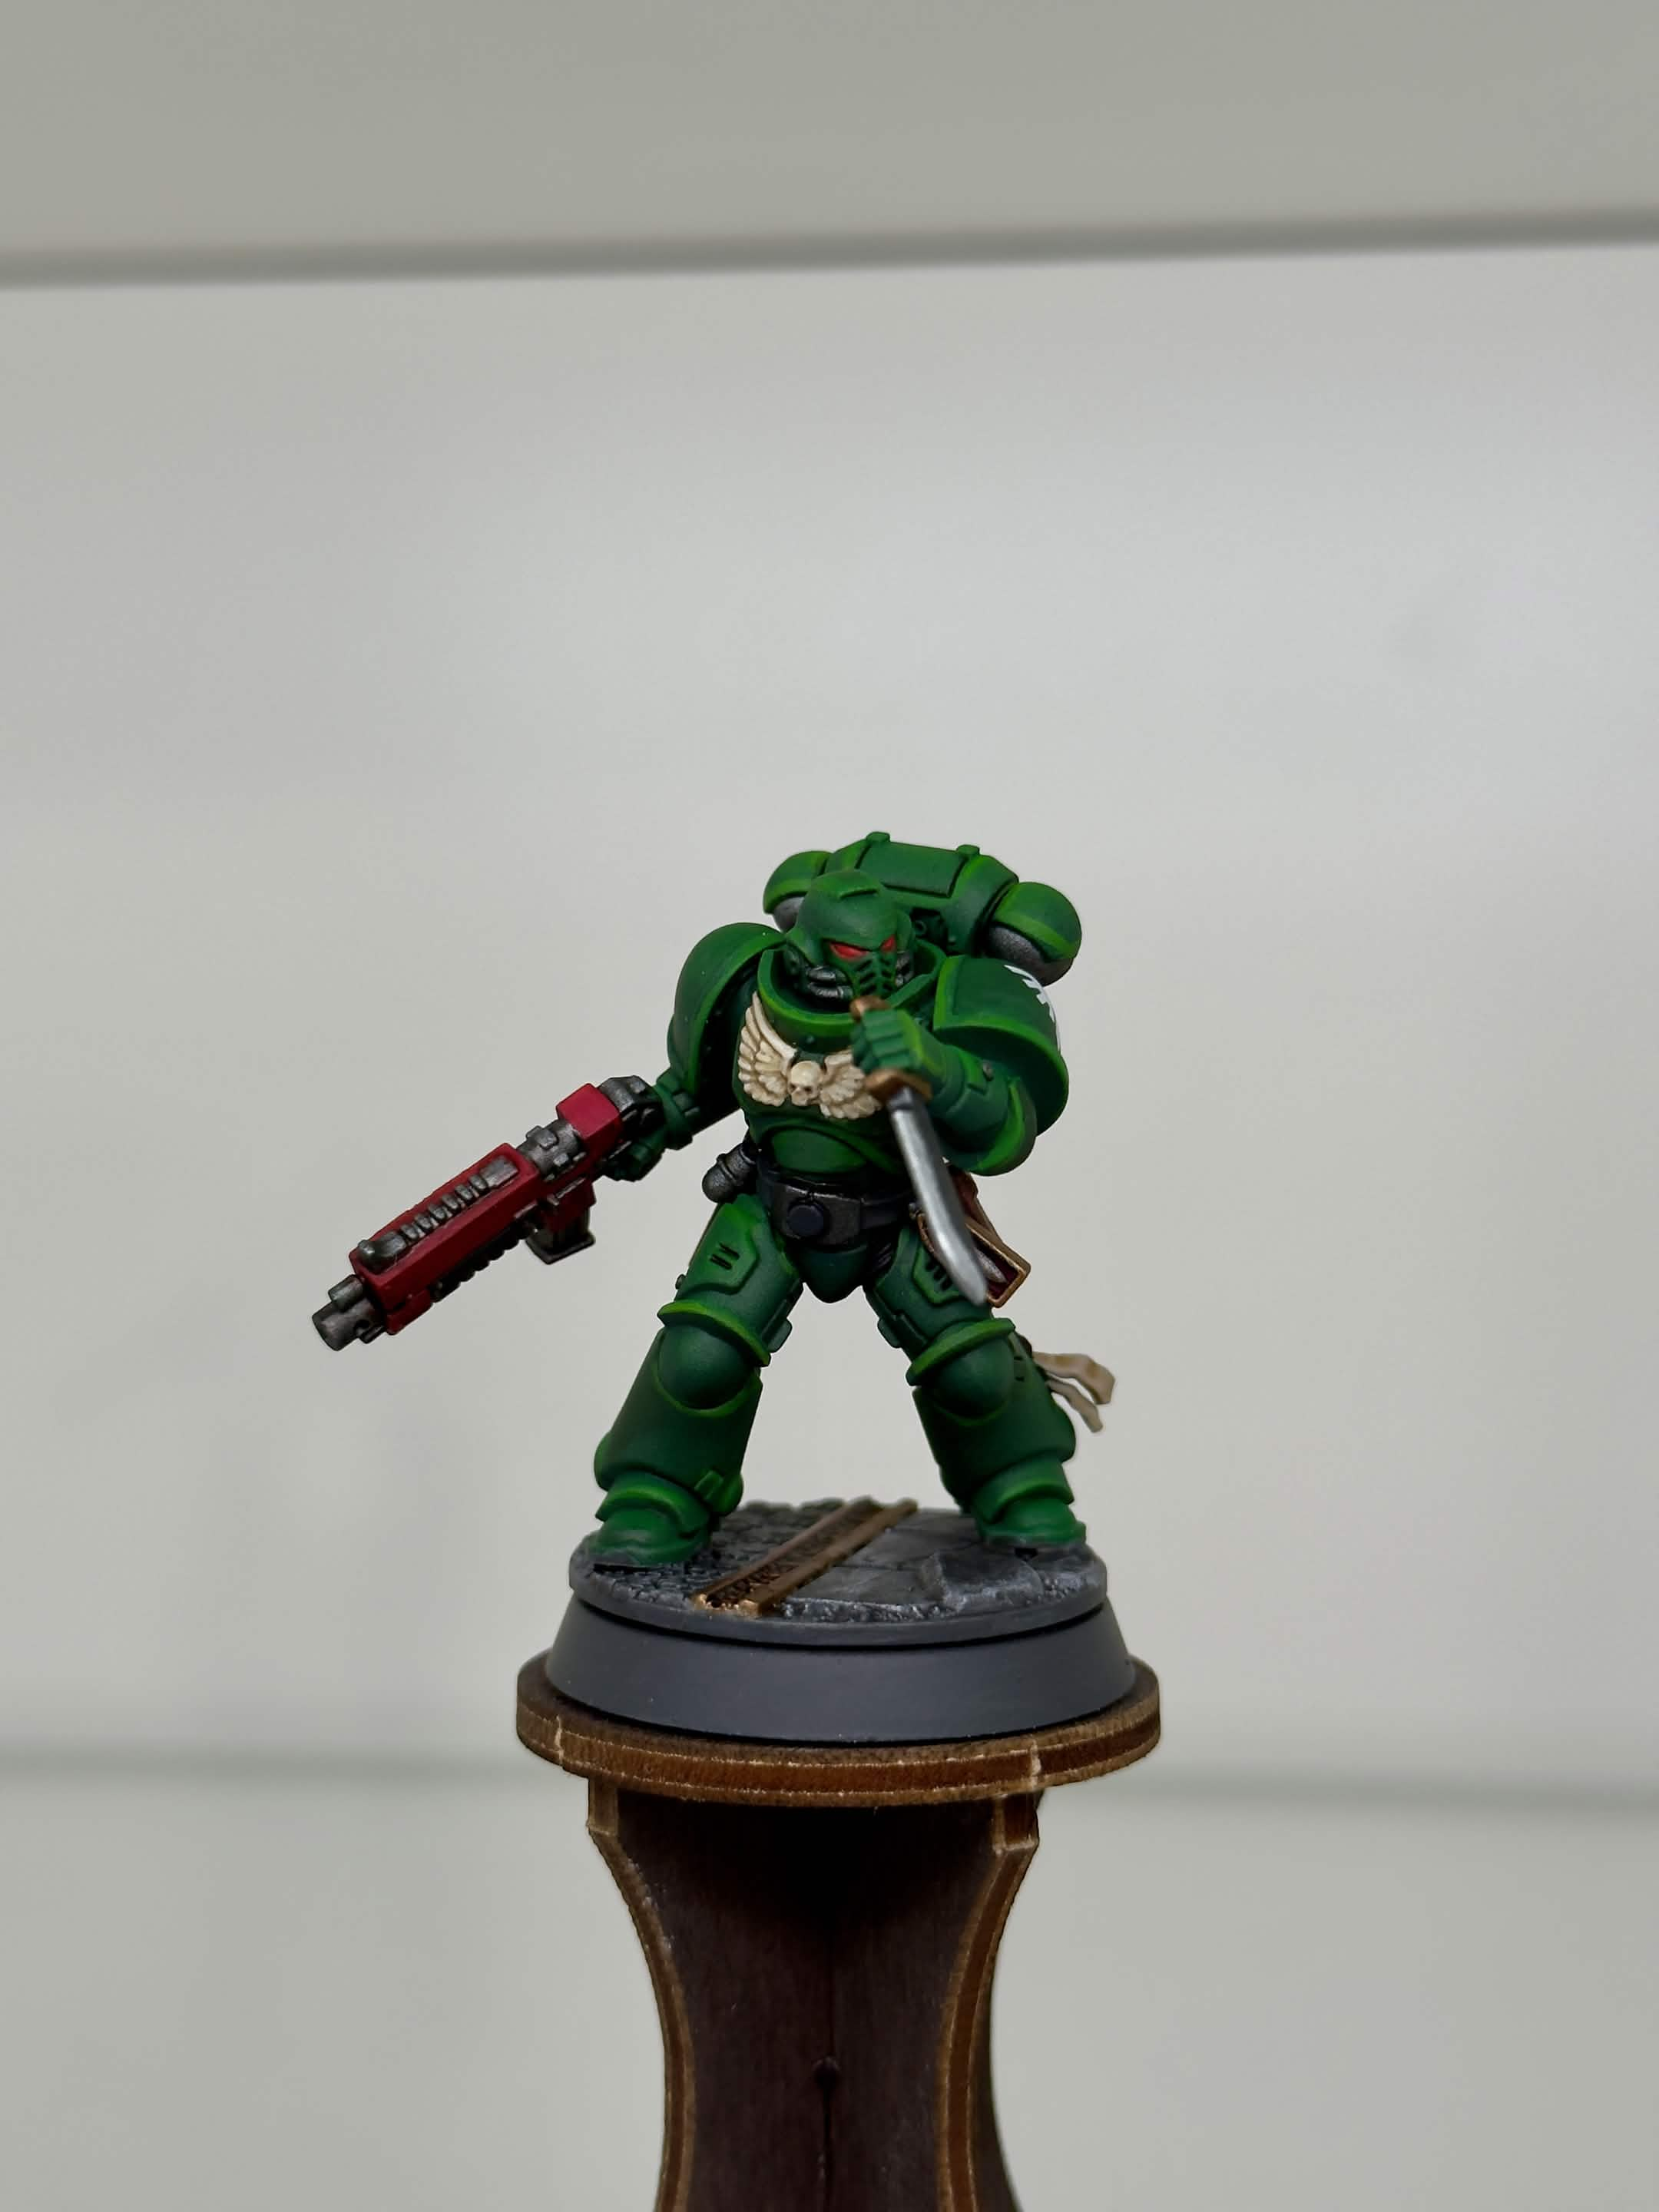
01 / Front
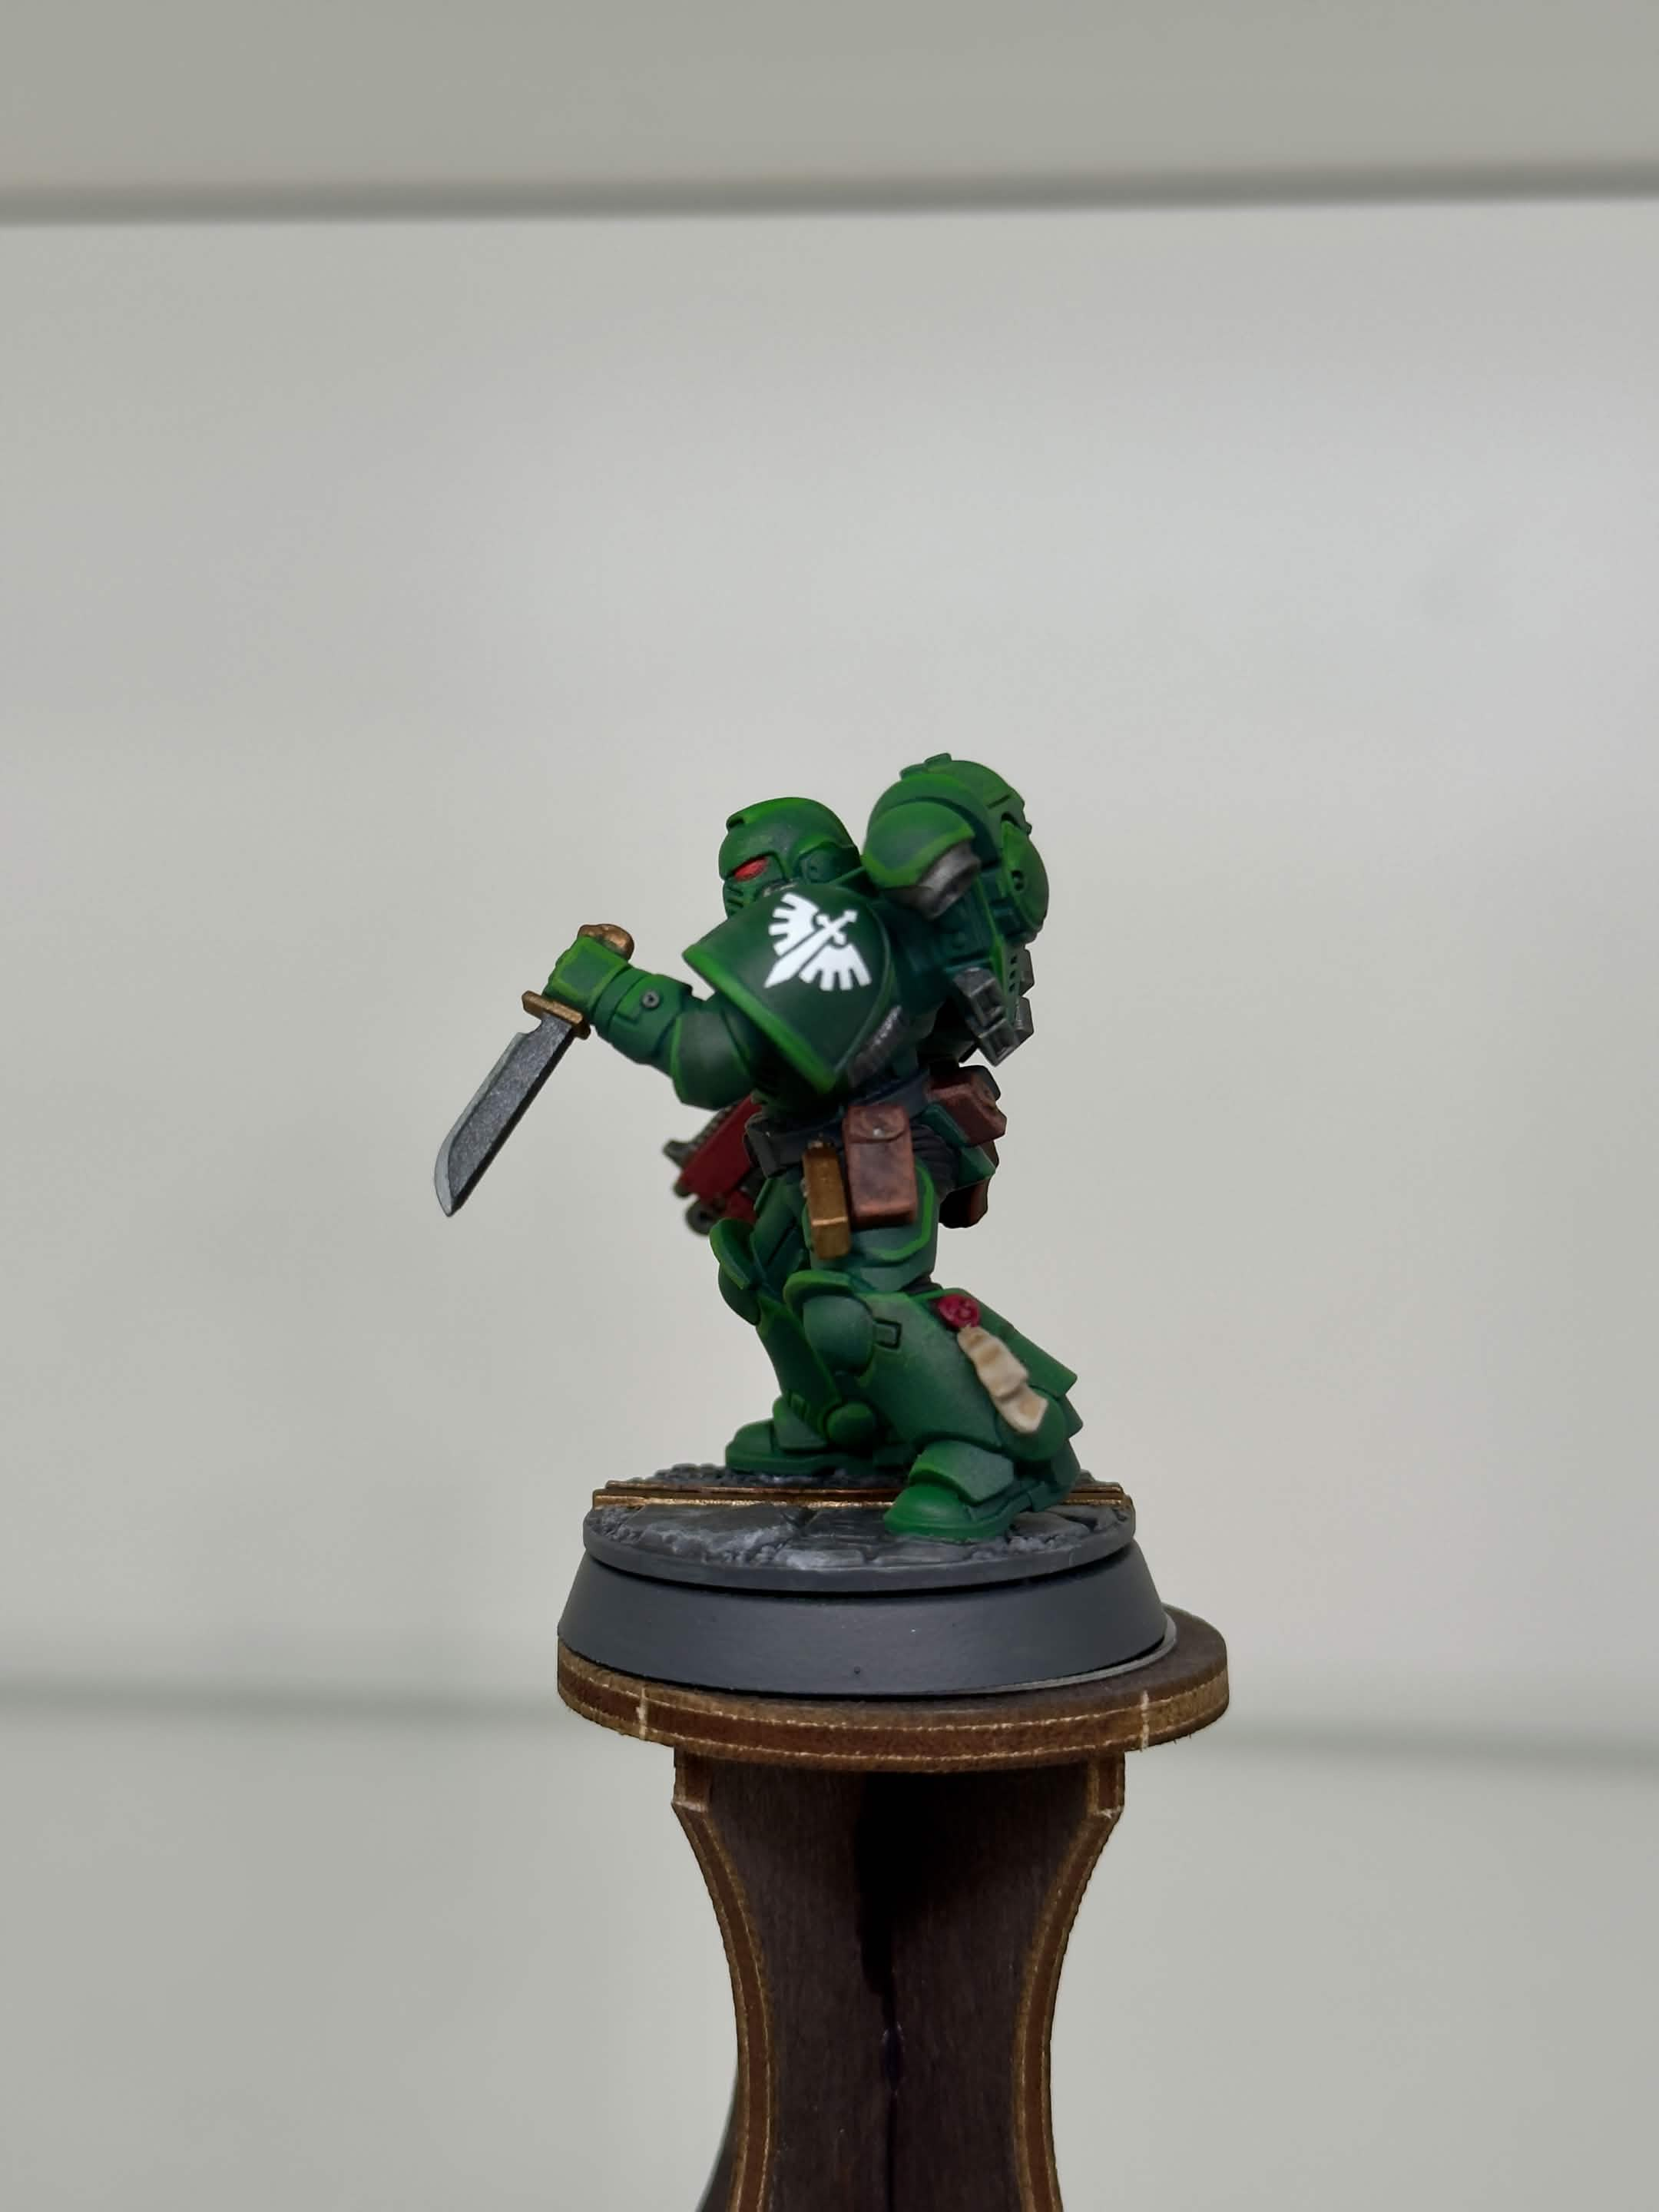
02 / Left
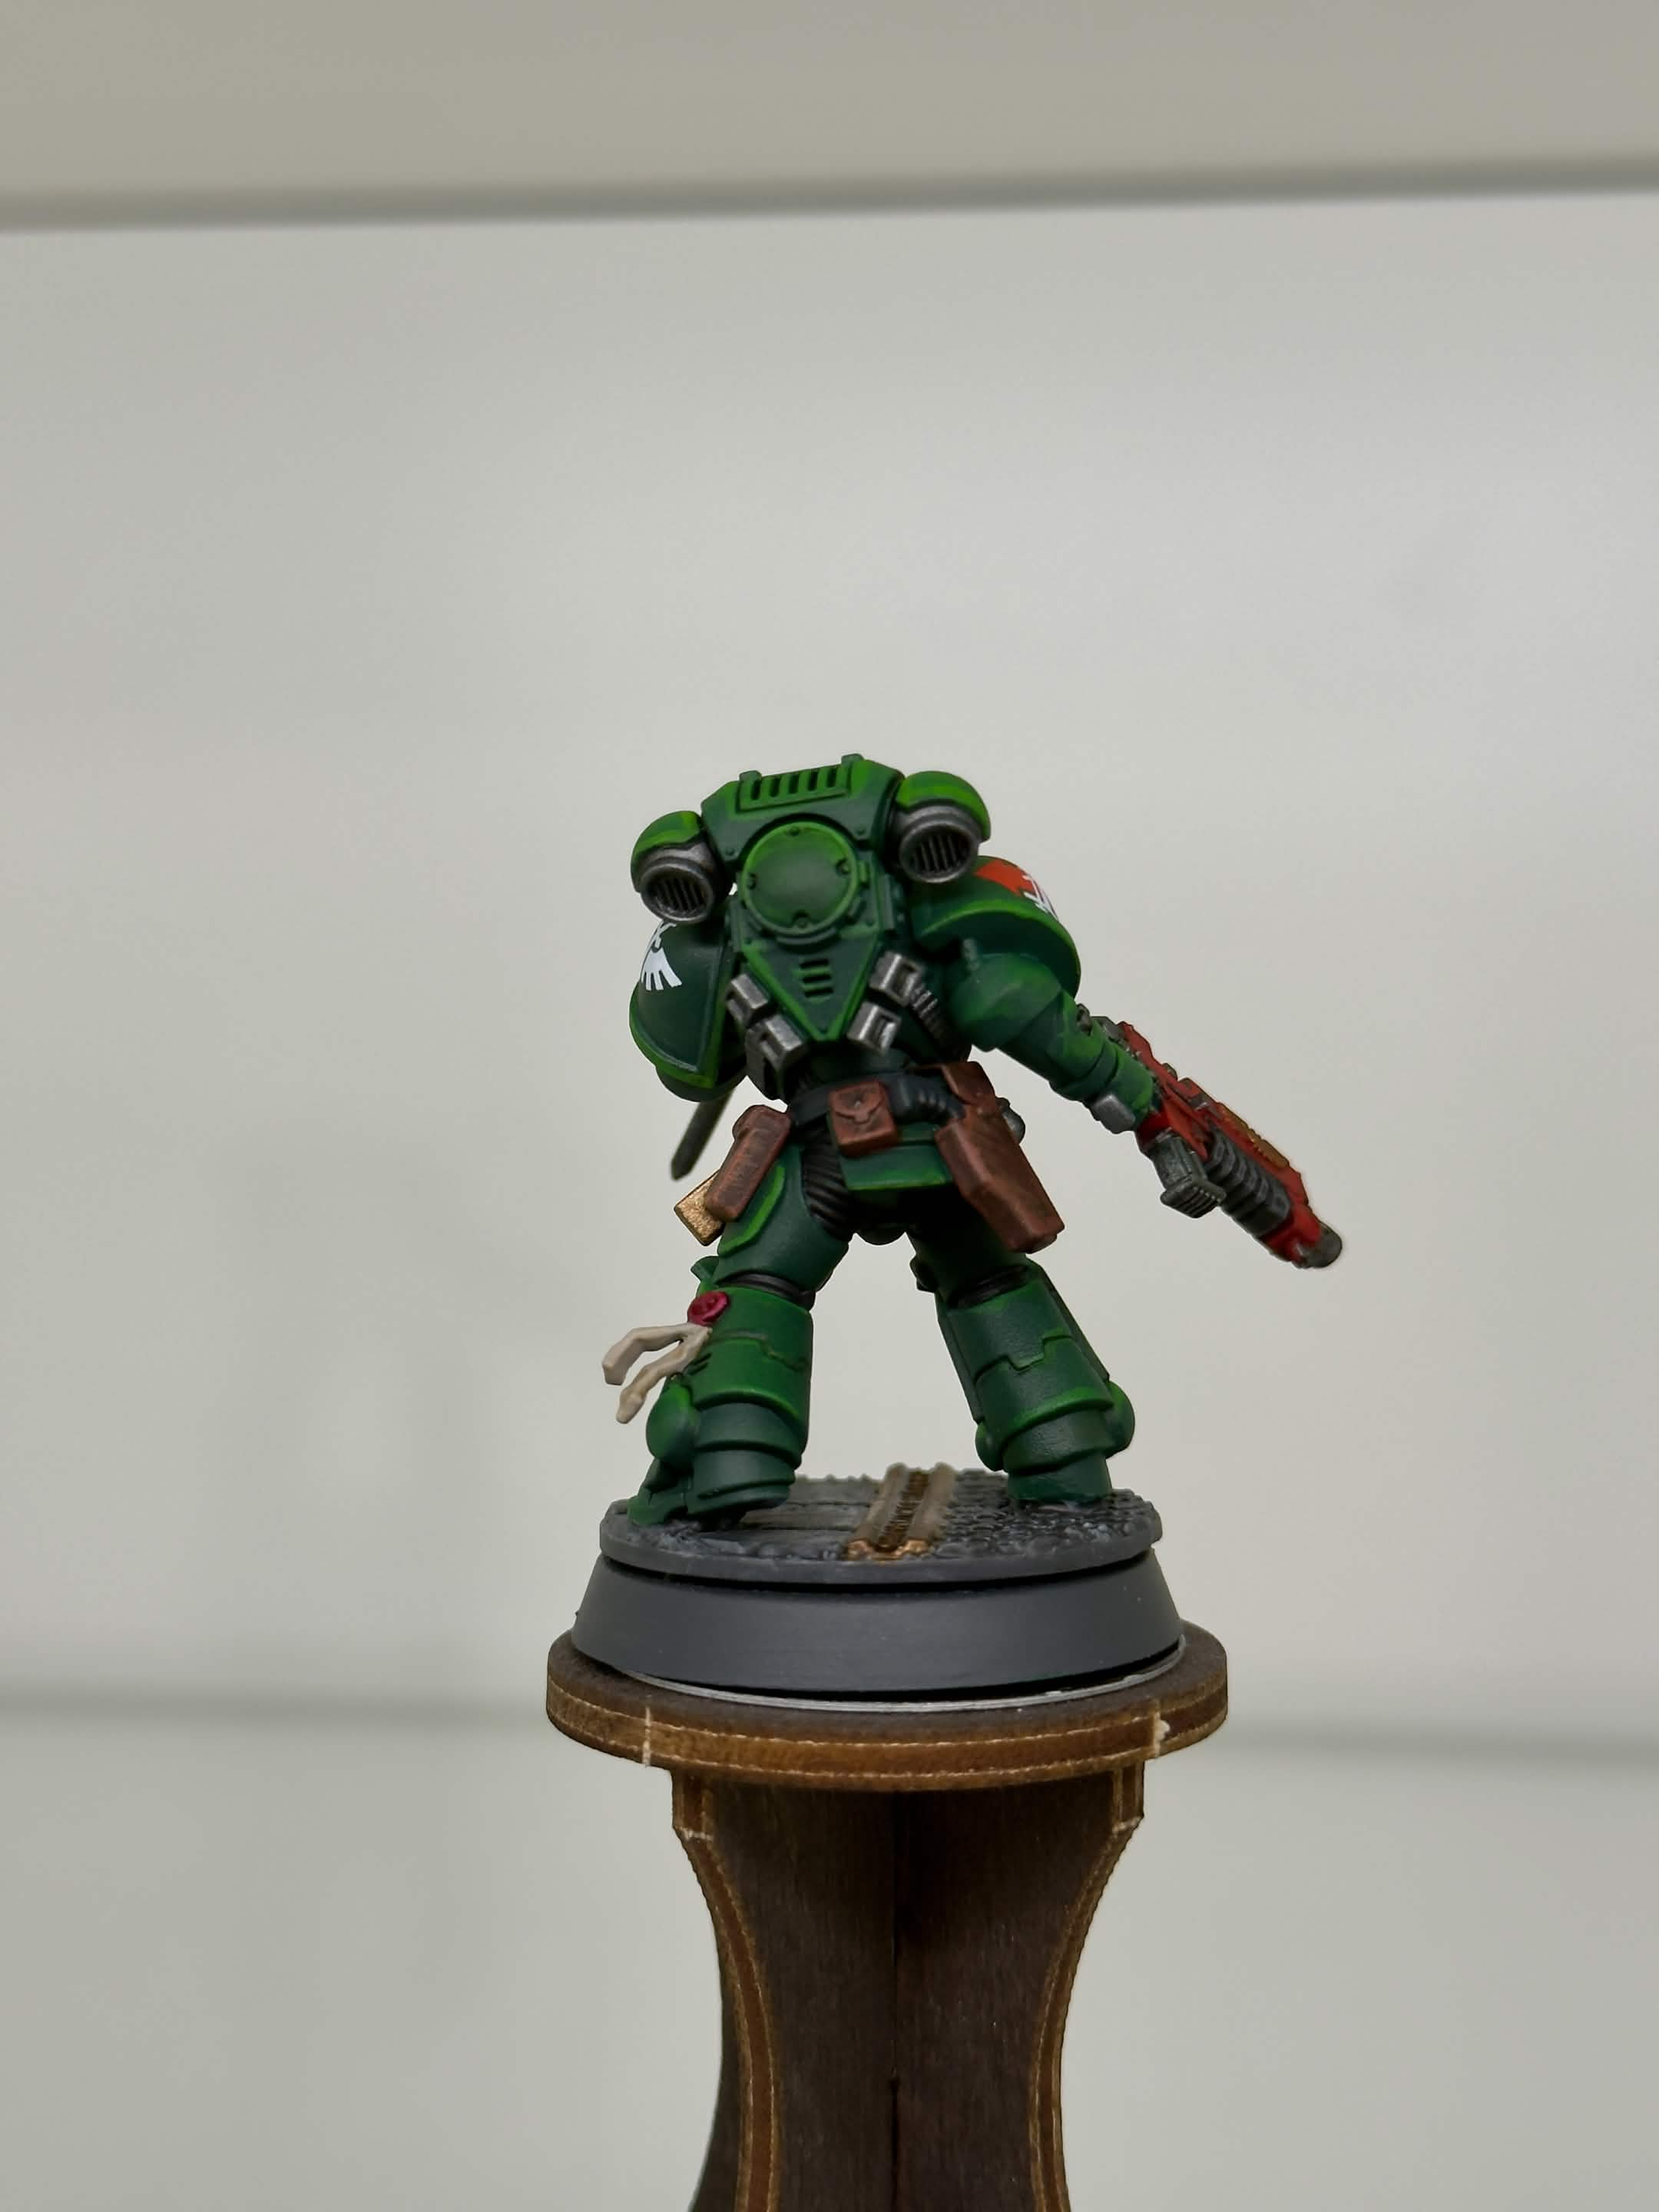
03 / Rear
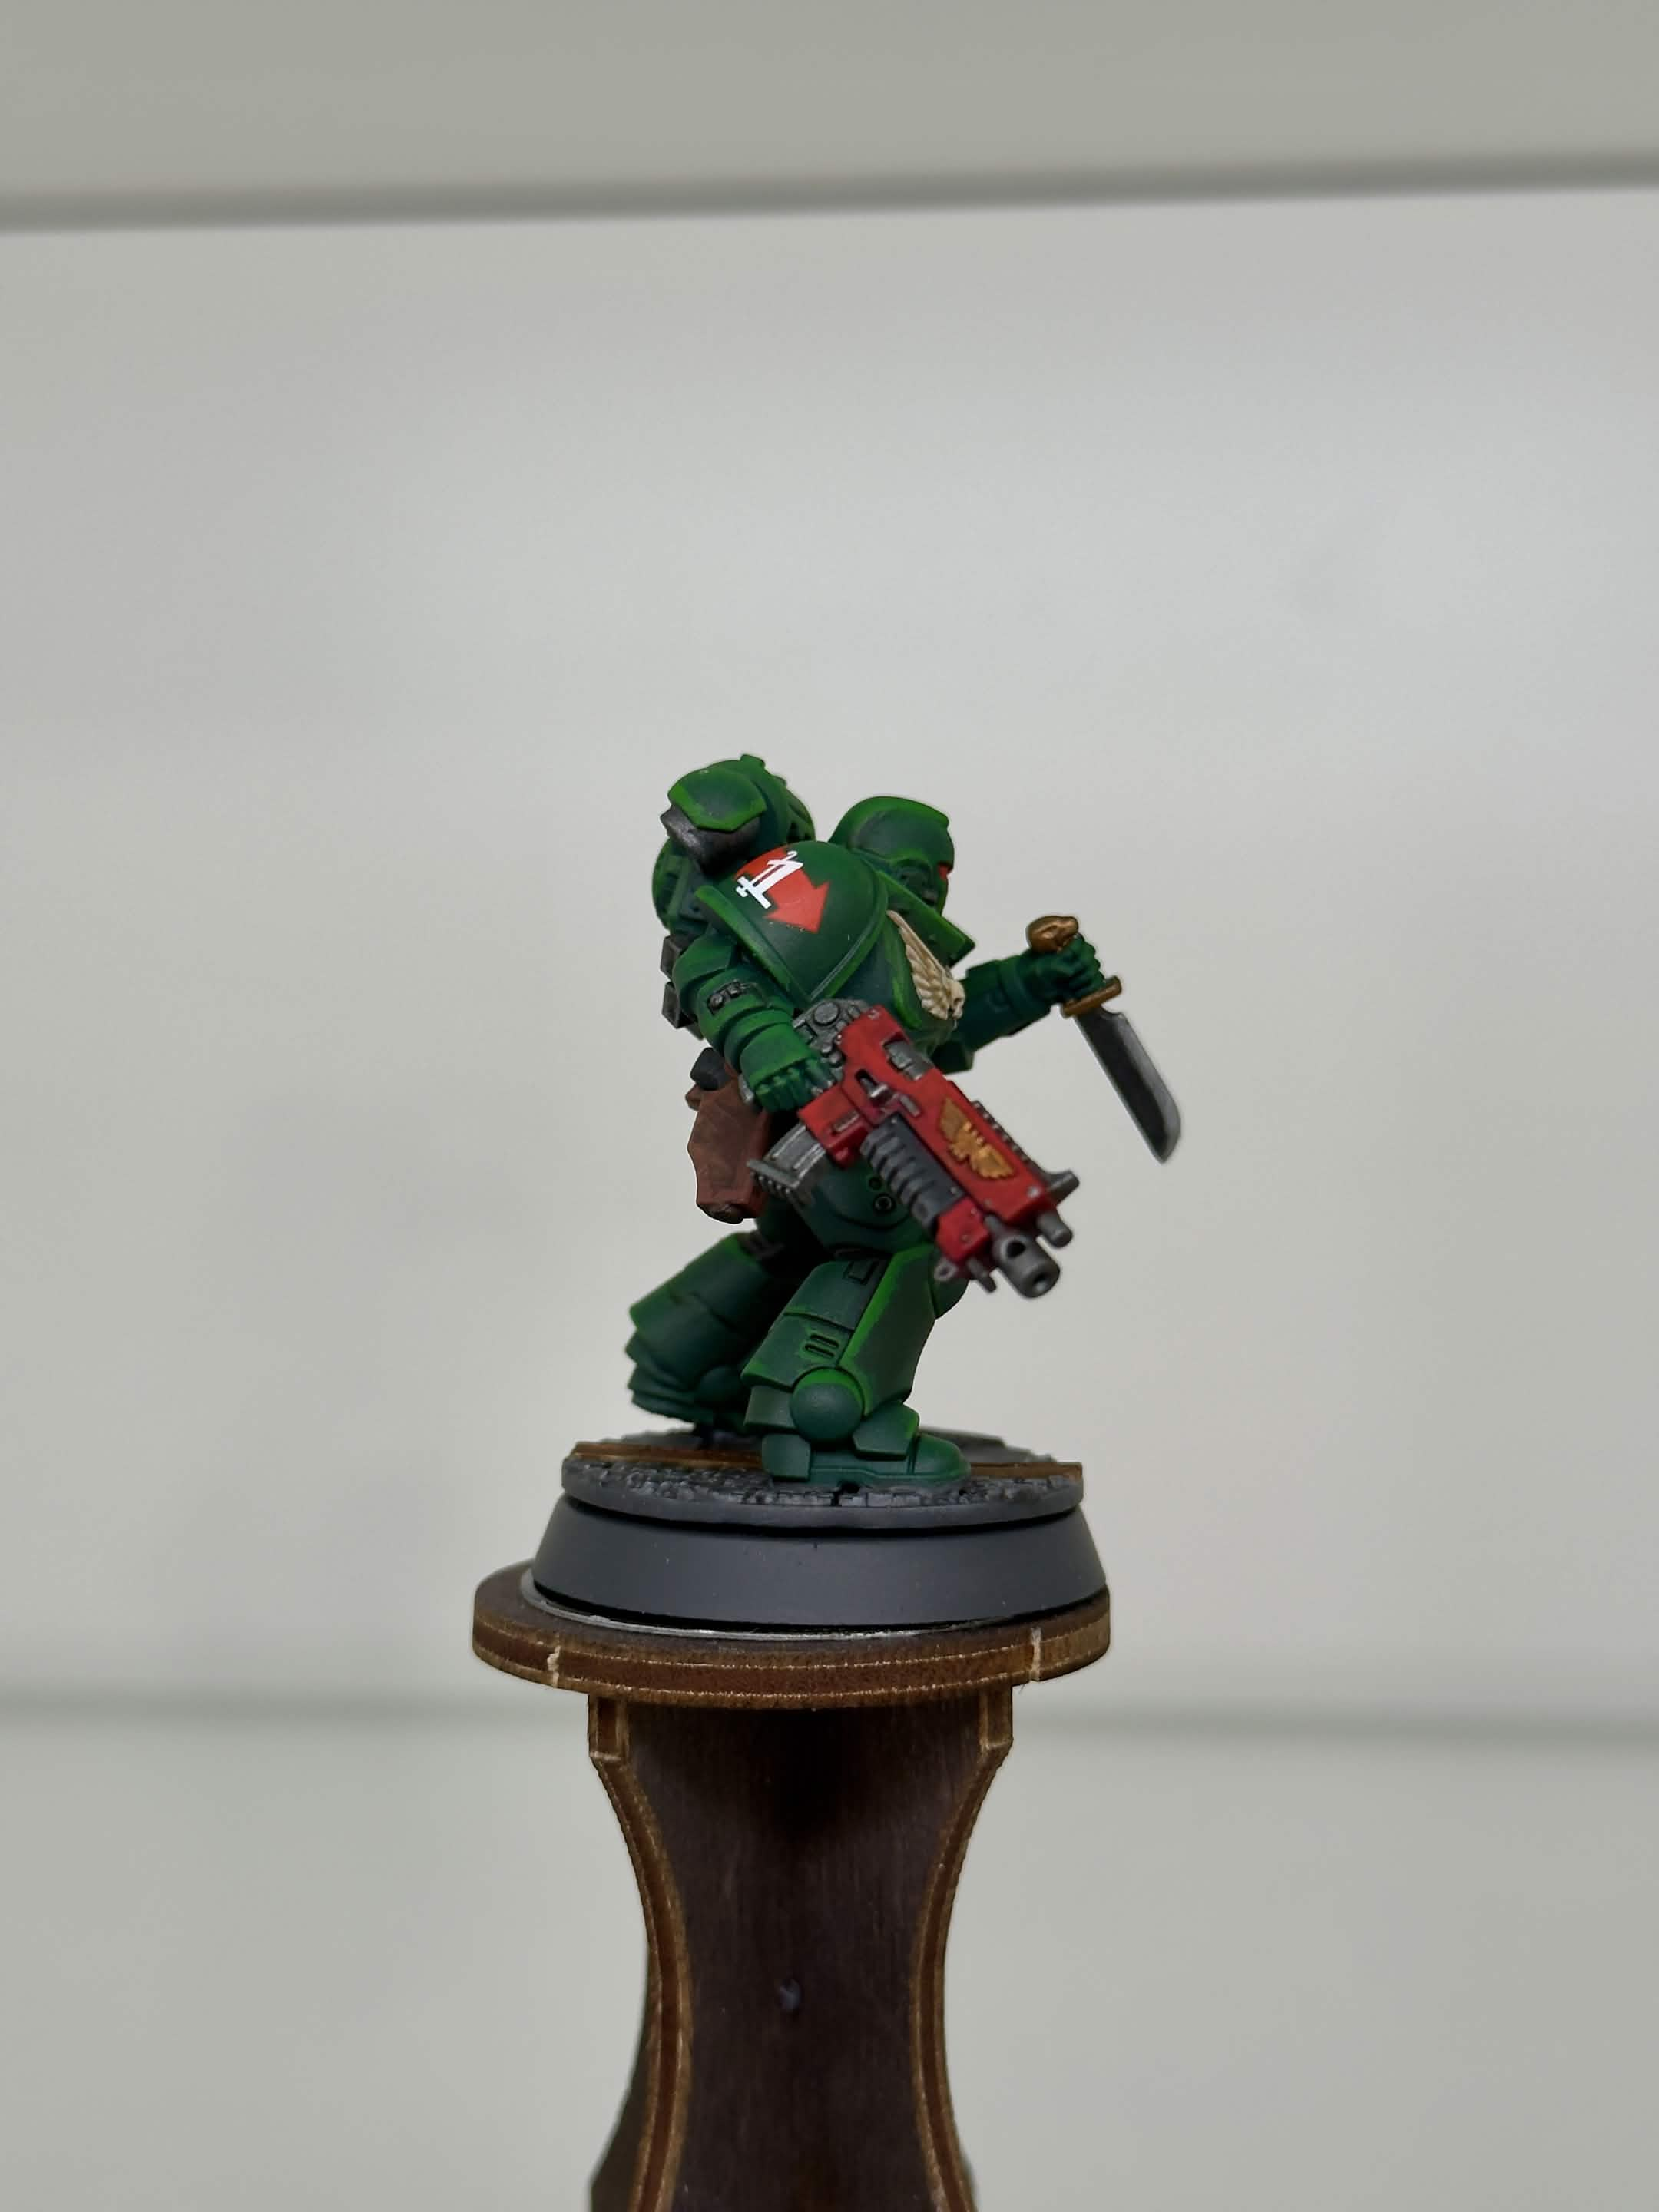
04 / Right
Reference model · Select a view to open the full photograph. See the finished Intercessor and Eradicator squads below.
KEEP BESIDE THE PALETTE
Paint tray & bench reference
GREEN ARMOR
Black Green base → 1:1 Black Green / Greenskin Punch zenithal → 2:1 Greenskin Punch / Slime Green volume highlights
STEP 02STEP 08METALLICS
Steel · brass · marine gold
Optional reflective edges after varnish
URBAN GROUND
Army Painter Fanatic Ash Grey → Pro Acryl 1-Step Graphite Grey
Old Gold street details · Eshin Grey rim
1:1
Airbrush dilution
Prepared paint or paint mix : AK Airbrush Thinner
15–20 PSI
1:1
Generous zenithal
AK 3GEN Black Green : AK 3GEN Color Punch Greenskin Punch
2:1
Restrained volume highlights
AK 3GEN Color Punch Greenskin Punch : AK 3GEN Color Punch Slime Green
Bottled mix · also for matching cleanup
1:1
Layered brush edges
AK 3GEN Color Punch Greenskin Punch : AK 3GEN Color Punch Slime Green
Bottled mix
Sergeant variation. Paint and shade the Emperor Gold chest aquila in Step 5, before the red weapons. Batch the helmet ornament, if present, and pauldron rims with the remaining marine gold in Step 7. Keep those rims gold during the green highlights.
Mixing ratios & airbrush notes
Ratios list ingredients in the order shown. The Greenskin Punch / Slime Green mixes are already prepared in labeled bottles. Greenskin Punch is used only in paint mixtures in this recipe.
| Use | Recipe |
|---|---|
| Airbrushed acrylic colors | 1 part prepared paint or paint mix : 1 part AK Airbrush Thinner, usually 15–20 PSI |
| Armor panel lining | AK Precision Panel Liner — Sepia. Use targeted lining on green armor. Reserve Black for forward grips and awkward black details in Step 4. |
| Generous zenithal — airbrush | 1 part AK 3GEN Black Green : 1 part AK 3GEN Color Punch Greenskin Punch |
| Restrained volume highlights — airbrush; matching cleanup later | 2 parts AK 3GEN Color Punch Greenskin Punch : 1 part AK 3GEN Color Punch Slime Green (bottled mix) |
| Layered edge highlights — brush | 1 part AK 3GEN Color Punch Greenskin Punch : 1 part AK 3GEN Color Punch Slime Green |
| Standard aquila tint | 1 part Citadel Contrast Skeleton Horde : 1 part Citadel Contrast Medium or Citadel Lahmian Medium; choose one medium |
| Purity-seal parchment tint | 1 part Vallejo Mummy White : 1 part Vallejo Xpress Medium |
| Marine gold shade — Steps 5 & 7 | 1 part Citadel Shade Reikland Fleshshade : 1 part Citadel Technical Lahmian Medium |
| Red weapon-casing shade | 1 part Citadel Shade Carroburg Crimson : 1 part Citadel Technical Lahmian Medium |
| Gold street shade — Step 3 | Undiluted Citadel Shade Reikland Fleshshade |
| Protective varnish — Step 10 | AK Ultra Matte Varnish; two thin coats, drying between them. A separate initial satin coat is optional, not required. |
Use Army Painter John Blanche Masterclass Ironclad Grey as the default for forward grips, then shade them with AK Precision Panel Liner Black. For other black details, choose Citadel Contrast Black Legion or Ironclad Grey by area; use targeted Black panel liner in awkward spaces where applying Black Legion risks spilling onto the armor. Paint exposed pistol handles with Scale75 Black Metal in Step 7, including those visible above holsters.
For each airbrushed acrylic layer, first combine the paint colors at the listed ratio, then thin the prepared paint mixture 1:1 with AK Airbrush Thinner. This dilution is separate from the paint-color ratio and does not apply automatically to brush highlights. Do not apply the acrylic-color 1:1 thinning rule automatically to varnish. Retain the dilution that works with your specific varnish bottles and airbrush.
Paint & equipment checklist
| Brand / range | Paints & products |
|---|---|
| Colour Forge spray primers | Usual start: Renegade Green, followed by Salamander Green from above. Optional black start: Matt Black or Raven Black in place of Renegade Green; then the same Salamander Green pass. |
| AK 3GEN | Black Green; Hull Red; Silver Grey; Dirty Red; Carmine; Rusty Brass |
| AK 3GEN Color Punch | Greenskin Punch and Slime Green (ingredients for the listed armor mixtures); Beast Brown |
| AK Quick Gen | Old Gold |
| Citadel Contrast | Black Legion; Skeleton Horde; Doomfire Magenta; Flesh Tearers Red |
| Citadel | Eshin Grey (base rim); Wraithbone (optional aquila undercoat) |
| Citadel Shade | Reikland Fleshshade; Carroburg Crimson |
| Citadel Technical | Lahmian Medium; Contrast Medium (alternative for thinning Skeleton Horde on the aquila) |
| Vallejo | Mummy White; Xpress Medium |
| Citadel Dry | Necron Compound (optional silver highlight) |
| Army Painter Fanatic | Deep Grey; Ash Grey; Company Grey or Brigade Grey (brighter alternatives) |
| Army Painter John Blanche Masterclass | Emperor Gold; Ironclad Grey (default for forward grips; optional near-black alternative elsewhere). Both use Fanatic formulations. |
| Scale75 | Black Metal; Heavy Metal (optional silver highlight) |
| Pro Acryl | Bold Titanium White; Gloss Varnish |
| Pro Acryl 1-Step | Graphite Grey |
| AK | Precision Panel Liner — Sepia (green armor; optional leather pin wash) and Black (forward grips; awkward black details); Ultra Matte Varnish (default); Satin Varnish (optional initial coat); Airbrush Thinner |
| Vallejo Pigment FX | Natural Iron Oxide |
| Microscale | Micro Set; Micro Sol |
| Other supplies | Transfers; optional grass tufts, flowers or other ready-made vegetation; PVA or suitable basing glue |
| Tools | Airbrush; detail brushes; basecoating brush; pigment brush; transfer-cutting tools; tweezers; soft brush or tightly wound cotton bud for positioning transfers |
PHASE I / STEPS 01–03
Foundation
PRIME · AIRBRUSH · URBAN BASE
01 Prime & tabletop finish
The usual starting point is a dark green primer with a lighter green highlight.
USUAL PRIMER START
Colour ForgeRenegade GreenColour ForgeSalamander GreenOPTIONAL BLACK START / EITHER PRIMER
Colour ForgeMatt BlackColour ForgeRaven Black- Usual starting point: prime with Colour Forge Renegade Green.
- Spray Colour Forge Salamander Green from above to create a zenithal highlight, leaving lower surfaces darker.
Black-primer alternative: Use Colour Forge Matt Black or Colour Forge Raven Black instead of the initial green primer. Either works for this recipe; follow with the same overhead green primer pass.
This provides a green foundation suitable for tabletop use while the full paint job is pending. It is an intentional stopping point even though the later airbrush layers may cover much of the spray gradient.
02 Airbrush & armor lining
Build the armor volume, then define only its recesses.
PALETTE / THIS STEP
AK 3GENBlack GreenZenithal mix · 1:1Black Green :Greenskin PunchVolume mix · bottled 2:1Greenskin Punch :
Slime GreenAK Precision Panel LinerSepia · green armorAKAirbrush Thinner
Black Green base, zenithal & restrained volume highlights
- Airbrush AK 3GEN Black Green over the green armor, including the belt buckle, thinned 1:1 with AK Airbrush Thinner, usually at 15–20 PSI.
- Mix 1 part AK 3GEN Black Green : 1 part AK 3GEN Color Punch Greenskin Punch. Airbrush a generous zenithal highlight from above over the armor, leaving the lower areas darker.
- Switch to the bottled 2 parts AK 3GEN Color Punch Greenskin Punch : 1 part AK 3GEN Color Punch Slime Green mix. Add restrained but bright volume highlights on prominent points: the tops of shoulders, backpacks, heads, and any other features that call for emphasis.
For both highlight passes, thin 1 part prepared paint mixture : 1 part AK Airbrush Thinner and use the usual 15–20 PSI. Keep the final 2:1 pass focused on the prominent volumes. Reserve the bottled 1:1 Greenskin Punch / Slime Green mix for the layered brush edge highlights in Step 8.
Targeted panel lining
- Let the green armor paint dry, then use AK Precision Panel Liner Sepia. Sepia gives the preferred shadows against this green armor; use it for the armor lining. Black panel liner is reserved for the forward grips and awkward black details described in Step 4.
- Apply small, targeted amounts directly to the dry armor panel lines and cavities, letting the liner flow along the recesses to create defined shadows.
- Do not apply this as an all-over wash. Keep it off the broad green panels so they retain their color.
- Skip the exposed rubber joints during the Sepia armor pass; paint them in Step 4. That step also covers targeted Black panel liner for hard-to-reach black details.
This is an enamel panel liner, so the acrylic paint-thinning ratios do not apply. Allow it to dry before painting over it or applying varnish.
Cleanup if needed: Spirits can be used to lift excess liner with a cotton bud (Q-tip) barely dampened with white spirit and a very gentle touch; avoid scrubbing or soaking the surface. No extra varnish stage is required in this workflow. Alternatively, let stray liner dry and paint over it during Step 8: armor cleanup and highlights. There is no need to perfect every line now.
03 Urban base: ground, gold & rim
Complete all base painting here; add pigment weathering after varnishing in Step 12.
PALETTE / THIS STEP
Army Painter FanaticAsh GreyPro Acryl 1-StepGraphite GreyAK 3GENSilver GreyAK Quick GenOld GoldCitadel ShadeReikland FleshshadeCitadelEshin Grey · rim onlyOPTIONAL / BRIGHTER GROUND UNDERCOAT
Army Painter FanaticCompany GreyArmy Painter FanaticBrigade GreyFinish the ground, gold street features, and rim before the marine’s small details. Work across the squad one color at a time, allowing each layer to dry before the next.
Ground — Ash Grey into Graphite Grey
- Basecoat the primed scenic ground and stone with Army Painter Fanatic Ash Grey. Build even, opaque coverage over the whole surface, including recesses and any green overspray. This is a full basecoat, not a skim or drybrush; no Eshin Grey undercoat is needed.
- Once the Ash Grey is dry, apply Pro Acryl 1-Step Graphite Grey over the scenic ground to establish its grey tone and shading. Let it dry before painting the gold details.
If the ground reads too dark, replace Ash Grey with Army Painter Fanatic Company Grey or Brigade Grey for a brighter foundation. These are alternatives, not extra layers. Avoid Citadel Wraithbone here; it made this ground treatment too bright in previous tests.
Gold street features — complete the full treatment
- Apply thin, opaque coats of AK 3GEN Silver Grey over the entire feature, including its sides, recesses, and lettering. Let the foundation dry.
- Cover the full prepared feature with AK Quick Gen Old Gold and let it dry.
- Shade with undiluted Citadel Shade Reikland Fleshshade. Deep recess shadows help the gold lettering stand out. Keep the shade on the gold feature.
Base rim — Eshin Grey
Paint the rim with an even coat of Citadel Eshin Grey. Keep the rim clean; touch it up later only if subsequent painting or weathering marks it.
Base painting complete. Leave pigment weathering for Step 12, after the protective varnish coats. Any stray marks on the green armor can be corrected together in Step 8.
PHASE II / STEPS 04–07
Shared color batches
BLACK · BONE · RED · METALS
04 Black details & leather
Complete every matching joint, grip, strap, and pouch.
PALETTE / THIS STEP
Citadel ContrastBlack LegionArmy Painter John Blanche MasterclassIronclad GreyAK Precision Panel LinerBlackArmy Painter FanaticDeep GreyAK 3GENHull RedAK 3GEN Color PunchBeast BrownAK Precision Panel LinerSepia · optional leatherForward grips — Ironclad Grey & Black liner
- Basecoat forward grips (foregrips) with Army Painter John Blanche Masterclass Ironclad Grey as the default. Batch any other details using Ironclad Grey at the same time.
- Let the acrylic basecoat dry, then shade the forward grips with AK Precision Panel Liner Black, working small amounts into the grip texture and recesses. Keep the liner confined to the grip.
Other black details & awkward spaces
Use Citadel Contrast Black Legion for exposed rubber armor joints, sword and knife handles, and other non-metallic black grips where its flow is helpful. Army Painter John Blanche Masterclass Ironclad Grey remains an acceptable near-black grey alternative when a softer black suits the area. Batch matching areas by the chosen paint.
Hard-to-reach black details: where brushing Black Legion into a cramped space risks making a mess on the surrounding green armor, use a small, targeted application of AK Precision Panel Liner Black instead. Keep it on the intended black detail to reduce avoidable armor cleanup. Use Sepia for the green armor panel lines.
Allow the liner to dry before painting over it. Where appropriate, highlight the black or near-black details with Army Painter Fanatic Deep Grey. If any liner strays, use the optional gentle spirits correction in Step 2 or paint over the dried mark during the shared armor cleanup in Step 8.
Pistol handles: leave exposed pistol handles for Scale75 Black Metal in Step 7, including handles protruding from holsters. Keep the leather holster in the leather batch below.
Leather — optional Sepia pin wash
- Basecoat all leather straps, belts, holsters, and bags with AK 3GEN Hull Red.
- Optional: once the Hull Red is dry, add a targeted AK Precision Panel Liner Sepia pin wash to seams, folds, and recesses where extra contrast would help. Keep it localized rather than washing the entire leather surface. Use this extra pass when the desired finish warrants it; skip it for a simpler model. Let the liner dry before highlighting.
- Add subtle highlights with AK 3GEN Color Punch Beast Brown. The restrained contrast is intentional.
05 Aquilas, seals & lenses
Complete the chest aquilas before the weapons: bone for standard marines, gold for sergeants. Batch the remaining pale foundations and tints here.
PALETTE / THIS STEP
AK 3GENSilver GreyPro AcrylBold Titanium WhiteCitadel ContrastSkeleton HordeVallejoMummy WhiteVallejoXpress MediumCitadel ContrastDoomfire MagentaCitadel ContrastFlesh Tearers RedAQUILA MEDIUM / CHOOSE ONE
Citadel TechnicalContrast MediumCitadel TechnicalLahmian MediumOPTIONAL / AQUILA UNDERCOAT ONLY
CitadelWraithboneSERGEANTS ONLY / GOLD AQUILA
Army Painter John Blanche MasterclassEmperor GoldCitadel ShadeReikland FleshshadeCitadel TechnicalLahmian MediumAK 3GEN Silver Grey — all matching foundations
Apply thin, opaque coats of AK 3GEN Silver Grey to:
- The chest aquila on standard marines.
- All purity-seal parchment.
- All purity-seal wax.
Aquila alternative: Citadel Wraithbone may replace AK 3GEN Silver Grey on the aquila only. Keep AK 3GEN Silver Grey on the purity seals.
Build smooth coverage carefully, especially on the aquila, so thinned paint does not spill onto the green chest.
Sergeant aquilas — finish the gold before the weapons
For sergeants only, skip the Silver Grey or Wraithbone undercoat and Skeleton Horde treatment on the chest aquila. Complete its gold here, before painting the weapon casings in Step 6.
- Basecoat the chest aquila with Army Painter John Blanche Masterclass Emperor Gold. Work carefully around any weapon crossing the chest, then let the gold dry.
- Shade lightly with 1 part Citadel Shade Reikland Fleshshade : 1 part Citadel Technical Lahmian Medium. Avoid pooling; this wash strongly tints the gold. Let the shade dry before painting the nearby weapon.
Why now: Weapons often obstruct the aquila. Painting it first lets Step 6 cover any accidental gold on the casing, avoiding gold marks on finished red weapons. The sergeant’s helmet ornament and pauldron rims stay in the Step 7 gold batch.
White eye foundations
Paint the eye lenses neatly with Pro Acryl Bold Titanium White and let them dry.
Tint the prepared details
- Standard aquila: Mix 1 part Citadel Contrast Skeleton Horde : 1 part Citadel Contrast Medium or Citadel Lahmian Medium, choosing either medium. Apply over the dry pale undercoat to shade and tint the aquila to the bone tone that complements the Deathwing scheme.
- Purity-seal parchment: Mix 1 part Vallejo Mummy White : 1 part Vallejo Xpress Medium. Apply over the dry AK 3GEN Silver Grey undercoat on all parchment.
- Apply Citadel Contrast Doomfire Magenta to the seal wax.
- Apply Citadel Contrast Flesh Tearers Red over the dry white lenses.
06 Red casings & company knees
Use one red batch for the weapons and 3rd Company markings.
PALETTE / THIS STEP
AK 3GENDirty RedAK 3GENCarmineCitadel ShadeCarroburg CrimsonCitadel TechnicalLahmian Medium- Basecoat the weapon casings and 3rd Company marking on the model's left kneepad with AK 3GEN Dirty Red.
- Highlight both with AK 3GEN Carmine. The weapon highlights can be broad and rough; keep the knee marking neatly defined.
- Shade the weapon casings with a 1:1 mix of Citadel Shade Carroburg Crimson and Citadel Technical Lahmian Medium for a light, uniform result.
The knee uses the same AK 3GEN Dirty Red and AK 3GEN Carmine color pairing. The casing wash is not a required part of the knee recipe.
Paint the larger red casings before their metallic fittings to minimize later metal touch-ups. For company-marking placement, consult the supplied Dark Angels marking reference. Left and right refer to the model's own sides.
07 Steel, brass & gold
Paint matching metal details across the marine.
PALETTE / THIS STEP
Scale75Black MetalAK 3GENRusty BrassArmy Painter John Blanche MasterclassEmperor GoldCitadel ShadeReikland FleshshadeCitadel TechnicalLahmian MediumOPTIONAL / SILVER HIGHLIGHTS & WEAR
Scale75Heavy MetalCitadel DryNecron CompoundScale75 Black Metal
Apply an even coat of Scale75 Black Metal to all appropriate exposed steel details:
- Gun barrels and metallic weapon hardware.
- All exposed pistol handles, including handles protruding from holsters. Keep the surrounding leather holsters in the Hull Red treatment from Step 4.
- Other metal handles and fittings separate from the black or near-black grips painted in Step 4.
- Grenades and similar metal details.
- Backpack lower vents and upper exhausts: paint the vent interiors and exposed metal around the rounded exhaust housings.
- Helmet tubes entering the mask and accessible ports at the rear of the helmet.
Keep the belt buckle green with the armor. Keep the upper armor shell of each backpack exhaust green. Use the rear and side reference photos to identify this boundary.
Scale75 Black Metal normally needs no additional shade in this recipe. For brighter highlights or wear marks, use Scale75 Heavy Metal or Citadel Dry Necron Compound over the basecoat. For reflective edge accents that stay above the matte finish, save that optional pass for Step 13, after all varnishing.
Blades and chainsword teeth: Default to Scale75 Black Metal. Add a brighter metal over that basecoat only where highlights or wear patterns call for it, using Scale75 Heavy Metal or Citadel Dry Necron Compound.
AK 3GEN Rusty Brass
Paint bullet shells, magazines, and other projectile ammunition with AK 3GEN Rusty Brass.
Army Painter John Blanche Masterclass Emperor Gold — remaining marine gold
Use Army Painter John Blanche Masterclass Emperor Gold on:
- Knife and sword pommels and guards.
- Imperial symbols on weapons.
- Appropriate relics on the belt.
- Any other marine ornaments intended to be gold.
For sergeants only, add the helmet ornament or marking, if present, and pauldron rims to this batch. The chest aquila was already painted and shaded in Step 5; leave it finished.
Army Painter John Blanche Masterclass Emperor Gold is the preferred gold for this recipe, even if it appears reddish brown in the bottle.
Citadel Shade Reikland Fleshshade — marine gold
Mix 1 part Citadel Shade Reikland Fleshshade : 1 part Citadel Technical Lahmian Medium. Apply it lightly to the remaining Army Painter John Blanche Masterclass Emperor Gold details on the marine. Avoid heavy pooling; this wash strongly tints the gold.
The sergeant chest aquila was finished in Step 5, and the base’s Old Gold details were finished in Step 3. Leave both finished areas alone during this batch.
PHASE III / STEPS 08–13
Highlights, markings & finish
ARMOR EDGES · TRANSFERS · VARNISH · WEATHERING
08 Armor cleanup & edge highlights
Repair stray marks, then bring attention to the head and shoulders.
PALETTE / THIS STEP
AK 3GENBlack GreenMatching cleanup · bottled 2:1Greenskin Punch :Slime GreenBrush edges · bottled 1:1Greenskin Punch :
Slime Green
Repair stray marks
- Paint over dried stray panel liner and other marks in dark, lower armor areas with AK 3GEN Black Green.
- Use the bottled 2 parts AK 3GEN Color Punch Greenskin Punch : 1 part AK 3GEN Color Punch Slime Green mix where it matches a brighter area. Choose Black Green or the 2:1 mix according to the blemish’s position and surrounding color.
Why cleanup comes here: The base and detail colors are now finished, so correct stray shading and paint marks together in one armor-color batch before adding the edge highlights. This avoids repeatedly touching up the same areas as you work through earlier steps. The belt buckle follows the green armor treatment for cleanup and any edge highlights.
Layered brush edge highlights — bottled 1:1 mix
Use the bottled 1 part AK 3GEN Color Punch Greenskin Punch : 1 part AK 3GEN Color Punch Slime Green mix for the layered brush edge highlights. Build the highlights in controlled layers along upward-facing green armor edges. Keep the lines narrow, crisp, and strong enough to read on the tabletop, with emphasis toward the head and shoulders.
Include the green pauldron rims, upper helmet rim, tops of the helmet's ear details, and other upward-facing edges visible in the reference photos.
Sergeant exception: Keep gold pauldron rims gold; do not line them with the green mix.
09 Waterslide transfers
Apply the symbol, layer the number, and seal the settled decals.
PALETTE / THIS STEP
Pro AcrylGloss VarnishMicroscaleMicro SetMicroscaleMicro SolApply the chapter or Battleline transfer first, then layer the squad number where needed. The timing windows below are practical checkpoints; surface readiness determines when to continue.
Prepare with Pro Acryl Gloss Varnish
- Make sure the paint is dry and thoroughly mix the Pro Acryl Gloss Varnish.
- Apply one thin, smooth coat over the complete shoulder face, inside the trim. Airbrushing is convenient for a squad; a brush works for an individual shoulder.
- Let the gloss dry until the surface is stable and no longer tacky before adding decal solutions. Check the surface rather than relying only on elapsed time.
Use Pro Acryl Gloss Varnish for both clear coats in this transfer stage. Continue with two thin coats of AK Ultra Matte Varnish in Step 10; a separate initial satin coat is optional, not required. Attach any vegetation in Step 11 and let its glue dry. Step 12 then uses a light final application of pure AK Ultra Matte Varnish after pigments.
Place the Battleline or chapter transfer
- Cut the transfer out and wet its backing until it slides freely. About 10 seconds of soaking is a starting point, not a reason to force it off the paper.
- Apply a small amount of Microscale Micro Set, slide the transfer into place, and align it carefully.
- Gently wick away excess liquid. While positioning, a damp soft brush or tightly wound cotton bud can help settle it.
- Wait about 5–10 minutes, until the transfer is no longer floating or easily shifting.
Conform the first transfer
- Apply one light treatment of Microscale Micro Sol, using as few brush strokes as possible.
- Leave it alone while it softens. Do not press, reposition, or touch a softened or wrinkled transfer.
- Check after 30–60 minutes. Continue only when the transfer is dry, flat, and no longer soft. Repeat Microscale Micro Sol only where needed, allowing each application to dry.
Layer the squad number
For a squad number placed over the Battleline symbol:
- Apply a small amount of Microscale Micro Set and place the number directly over the settled lower transfer. No intermediate gloss coat is needed in this workflow.
- Position and wick gently without scrubbing the lower transfer.
- Wait about 5–10 minutes, until the number stops floating.
- Use Microscale Micro Sol only if needed to conform the number. Leave it untouched, and inspect after 30–60 minutes. Extend the wait if either transfer remains wet or soft.
Dry, clean if needed, and seal
- After the final decal solution, give the transfers a few hours before sealing when practical; 3–4 hours is a same-day checkpoint, not a guaranteed dry time. They must be completely dry, settled, and no longer soft.
- If visible adhesive or solution residue remains, gently remove it with a soft brush barely dampened with clean water. Do not rub across the transfers. Let the area dry completely; 30–60 minutes is a useful checkpoint after light cleaning. Skip this step if there is no residue.
- Apply one thin, continuous coat of Pro Acryl Gloss Varnish over the complete shoulder face to seal the transfers and even the surface.
- Let the sealing gloss dry until the surface is stable and no longer tacky before proceeding to Step 10.
Use small amounts of Microscale Micro Set and Microscale Micro Sol rather than saturating the shoulder. Favor natural drying; if using a hairdryer or air blower, keep it low and gentle and do not let airflow disturb a softened transfer.
The Microscale Micro Sol instructions likewise emphasize leaving the softened decal undisturbed until dry.
10 Protective varnish
AK Ultra Matte is the default; satin is an optional precaution.
PALETTE / THIS STEP
CitadelEshin GreyAKUltra Matte VarnishAKSatin Varnish · optionalInspect the base rim and touch up Citadel Eshin Grey only if needed; the initial rim coat was completed in Step 3. Let all paint, transfers, and sealing gloss dry before varnishing.
OPTIONAL / INITIAL SATIN COAT
If desired, apply one thin, even all-over coat of AK Satin Varnish and let it dry before the Ultra Matte coats below. This is an optional precaution, not a required layer, including for models handled by the shoulders during games.
Default protection — AK Ultra Matte
- Thoroughly mix the bottle of AK Ultra Matte Varnish. Use it as the default protective finish, without mixing in satin.
- Airbrush the first thin, consistent all-over coat. Aim for a continuous film that lands lightly wet; avoid pooling or a dry, dusty spray. Let it dry before continuing.
- Apply a second thin, consistent coat of AK Ultra Matte Varnish. Let this coat dry before attaching optional vegetation in Step 11, then adding pigments in Step 12. Work across the squad coat by coat, allowing each model to dry between applications.
Drying checkpoint: Check each coat after about 10–20 minutes in this humidity-controlled basement, with relative humidity kept below roughly 45–50%. Continue only when the surface is dry, stable, and no longer tacky; allow longer whenever needed. This is a working pause, not full cure.
11 Grass, flowers & foliage · optional
Attach vegetation before pigment weathering and the final Ultra Matte pass.
OPTIONAL / THIS STEP
Basing detailsGrass tufts · flowers · foliageAttachmentPVA or suitable basing glueToolsTweezersOnce the protective coats from Step 10 are dry, attach any grass tufts, flowers, and similar ready-made vegetation. Let the glue dry fully before pigment weathering and the final Ultra Matte pass in Step 12.
- Dry-fit a few tufts or flowers with tweezers. Leave the finished stonework and gold street lettering visible where possible.
- Choose a clean, firm contact point on the finished base. Clear any loose dust from that small spot so the glue bonds directly to the base.
- Apply a small drop of PVA or suitable basing glue beneath the tuft or flower and press its base into place with tweezers. Keep glue out of the fibers and petals; follow the adhesive instructions for the material.
- Let the glue dry fully before continuing to Step 12. The controlled final Ultra Matte pass will include the vegetation; avoid soaking the tufts or flowers.
Painted scenic pieces: resin plants or other additions that need priming and painting belong with the earlier base-painting work. This step is for ready-made vegetation and similar finishing details.
12 Battle dust & final matte
Tie the feet into the base and finish with a controlled matte coat.
PALETTE / THIS STEP
Vallejo Pigment FXNatural Iron OxideAKUltra Matte Varnish- Once the protective coats from Step 10 and any vegetation glue from Step 11 are dry, apply Vallejo Pigment FX Natural Iron Oxide to selected base areas to suggest dark battle dust, ash, and scorched debris.
- Add smaller amounts to the feet and shins to tie the marine into the base.
- Use gentle airbrush airflow to remove excess pigment until the armor color and weathering are balanced.
- After pigments, thoroughly mix pure AK Ultra Matte Varnish and apply light, thin passes. Aim for an evenly wetted film: lightly wet, without soaking the model or leaving a dry, dusty spray.
Preserve the pigment texture: use a light final application to secure the pigments and establish the matte finish. Avoid saturating the pigment or building a heavy varnish layer over it. Keep the spray light over attached grass and flowers too; do not soak them.
Include the metallic areas: keep the main metallic paint beneath the protective varnish. AK Ultra Matte will subdue its shine; restore selected reflective edges afterward in optional Step 13.
- Let the final varnish dry and become stable and non-tacky before the optional metallic edge highlights in Step 13. Leave about 24 hours after the final varnish coat before gaming or transport in this workflow; the added paint and glue must also be dry.
13 Metallic edge highlights · optional
Restore small flashes of reflected light once all varnishing is complete.
OPTIONAL / THIS STEP
Scale75Heavy MetalCitadel DryNecron CompoundArmy Painter John Blanche MasterclassEmperor Gold · matching gold edgesAK 3GENRusty Brass · matching brass edgesA few reflective edges can make the surrounding, subdued surface read as metal. Keep the broad metallic areas varnished and matte; use this optional pass only where you want a glint.
- Wait until all varnishing is complete, including the light pigment-fixing pass in Step 12, and the finish is dry, stable, and no longer tacky.
- For steel, use Scale75 Heavy Metal for fine edge highlights on blade edges, gun hardware, and raised mechanical details. Citadel Dry Necron Compound is an alternative for carefully catching exposed edges; keep it off the surrounding armor.
- For corresponding gold or brass details, use small accents of the existing Emperor Gold or Rusty Brass. Follow the material already painted; batch matching metallic accents across the squad.
- Keep the highlights narrow and selective, with a few tiny points on corners. Let them dry and leave them above the varnish. Another overall Ultra Matte coat would dull these fresh reflections again.
Protection: the underlying metallic paint retains its varnish layer. These small, fresh highlights are unvarnished; touch them up if they wear.
Ready for the table.
Allow about 24 hours after the final varnish coat before gaming or transport. Any optional metallic highlights and basing glue must also be dry.
THE RECIPE ON THE TABLE
Finished units
Use these finished squads as references for color balance, highlights, and the overall finish. Select either photo to open it at full size.
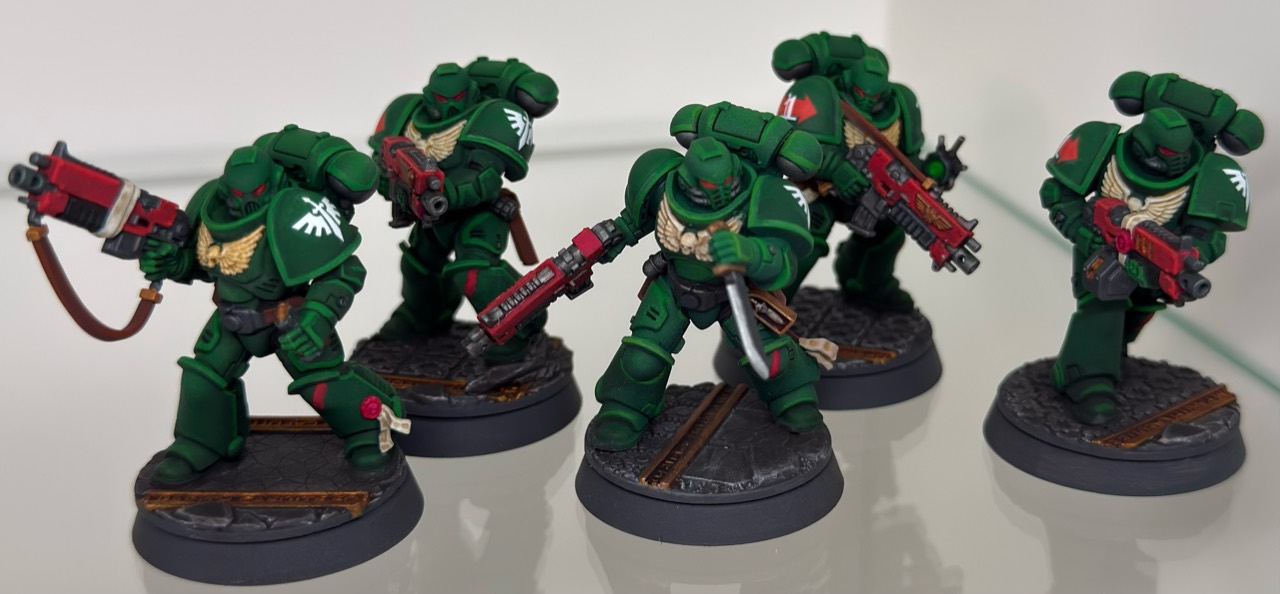
Intercessors
The finished five-model squad, showing the recipe across different poses and equipment.
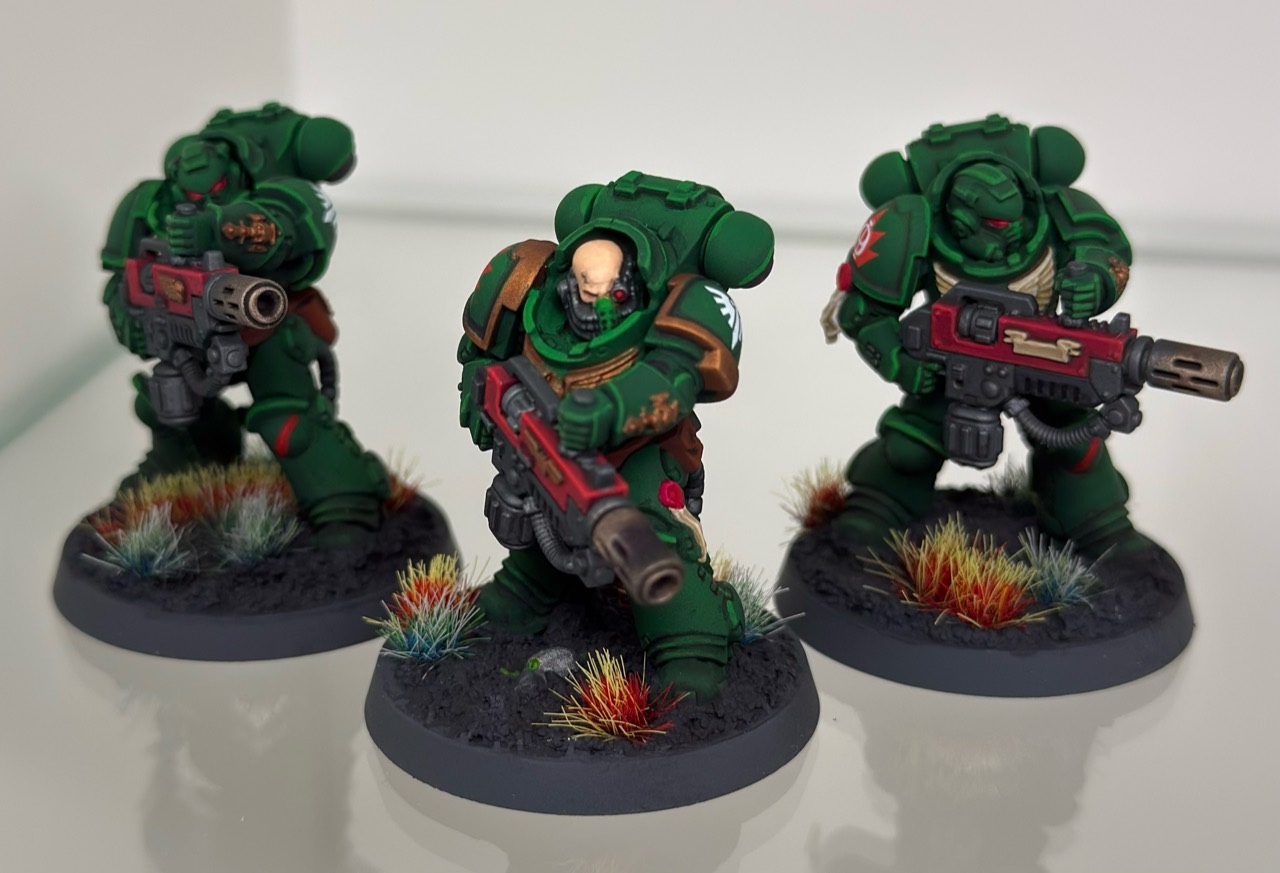
Eradicators · same painting process
These three Eradicators were painted using the same process described in this Intercessor guide. They provide another reference for how the finished scheme looks across a unit.
Batch map
Use this to group repeated colors across the model and squad. Follow the numbered steps for the full painting sequence.
Shared-color checklist
- Scenic ground — Step 3: opaque Army Painter Fanatic Ash Grey across the full ground, then Pro Acryl 1-Step Graphite Grey. Use Citadel Eshin Grey on the rim only, with later touch-up only if needed.
- Forward grips — Step 4: Army Painter John Blanche Masterclass Ironclad Grey → AK Precision Panel Liner Black. Use Black Legion or Ironclad Grey for other black joints and grips, choosing by area. Batch targeted Black liner into awkward black details where applying Black Legion risks spilling onto the green armor. Let the liner dry, then add Deep Grey highlights only where appropriate.
- Leather — Step 4: AK 3GEN Hull Red → optional AK Precision Panel Liner Sepia in seams and folds → AK 3GEN Color Punch Beast Brown highlights. Batch all matching leather, including holsters; let each layer dry.
- AK 3GEN Silver Grey: complete the street foundations in Step 3, then batch standard aquilas, parchment, and wax in Step 5.
- Citadel Contrast Skeleton Horde: standard aquilas together, thinned 1:1 with Citadel Contrast Medium or Citadel Lahmian Medium. Choose one medium.
- Vallejo Mummy White: all purity-seal parchment together, thinned 1:1 with Vallejo Xpress Medium over the Silver Grey undercoat.
- AK 3GEN Dirty Red / AK 3GEN Carmine: weapon casings and 3rd Company knees together.
- Scale75 Black Metal — Step 7: all exposed pistol handles, including those protruding from holsters, plus matching weapon, armor, backpack, and helmet hardware, blades, and chainsword teeth. Add brighter metal over the basecoat only where highlights or wear patterns call for it.
- Army Painter John Blanche Masterclass Emperor Gold: sergeant chest aquilas first in Step 5, before the red weapons; all remaining marine gold, including sergeant helmet ornaments and pauldron rims, in Step 7.
- Gold street details — Step 3: AK 3GEN Silver Grey → AK Quick Gen Old Gold → undiluted Citadel Shade Reikland Fleshshade. Finish the entire feature in this step.
- Marine gold shade: use Citadel Shade Reikland Fleshshade mixed 1:1 with Citadel Technical Lahmian Medium on sergeant aquilas in Step 5 and remaining marine gold in Step 7.
- AK Precision Panel Liner Sepia: green armor panel lines in Step 2; optional leather pin wash after Hull Red in Step 4. Black liner is assigned to forward grips and awkward black details, not the green armor lining.
- Armor colors: include the belt buckle with the green armor. Airbrush Black Green across the squad, then the generous 1:1 Black Green / Greenskin Punch zenithal, then restrained 2:1 Greenskin Punch / Slime Green volume highlights. Later, batch necessary cleanup with Black Green or the matching 2:1 mix, followed by layered brush edges using the bottled 1:1 Greenskin Punch / Slime Green mix.
- Varnishing: two thin coats of AK Ultra Matte Varnish across the squad, drying between coats. A separate initial satin coat is optional, not required. After these coats dry, attach any vegetation and let the glue dry. Add pigments, then use a light final application of pure AK Ultra Matte Varnish; avoid soaking the vegetation.
- Optional vegetation — Step 11: attach grass, flowers, and foliage with PVA or suitable basing glue on clean, firm contact points. Let the glue dry fully before pigments and the final Ultra Matte pass in Step 12.
- Optional metallic edges — Step 13: after all varnish and pigment fixing, batch small reflective highlights by metal color. Keep the main metallic paint protected underneath; leave these fresh accents above the varnish.