
Dark Angels Intercessor — Painting Recipe
DARK ANGELS / 3RD COMPANY · AIRBRUSH + BRUSH
Green armor.
Bone details. Red weapons.
Weathered urban ground.
A squad painting recipe organized around shared colors. Within each step, complete each paint across the matching details—and across the squad—before moving on.
13 STEPS / 3 PHASES
THE FINISHED MODEL / FOUR VIEWS
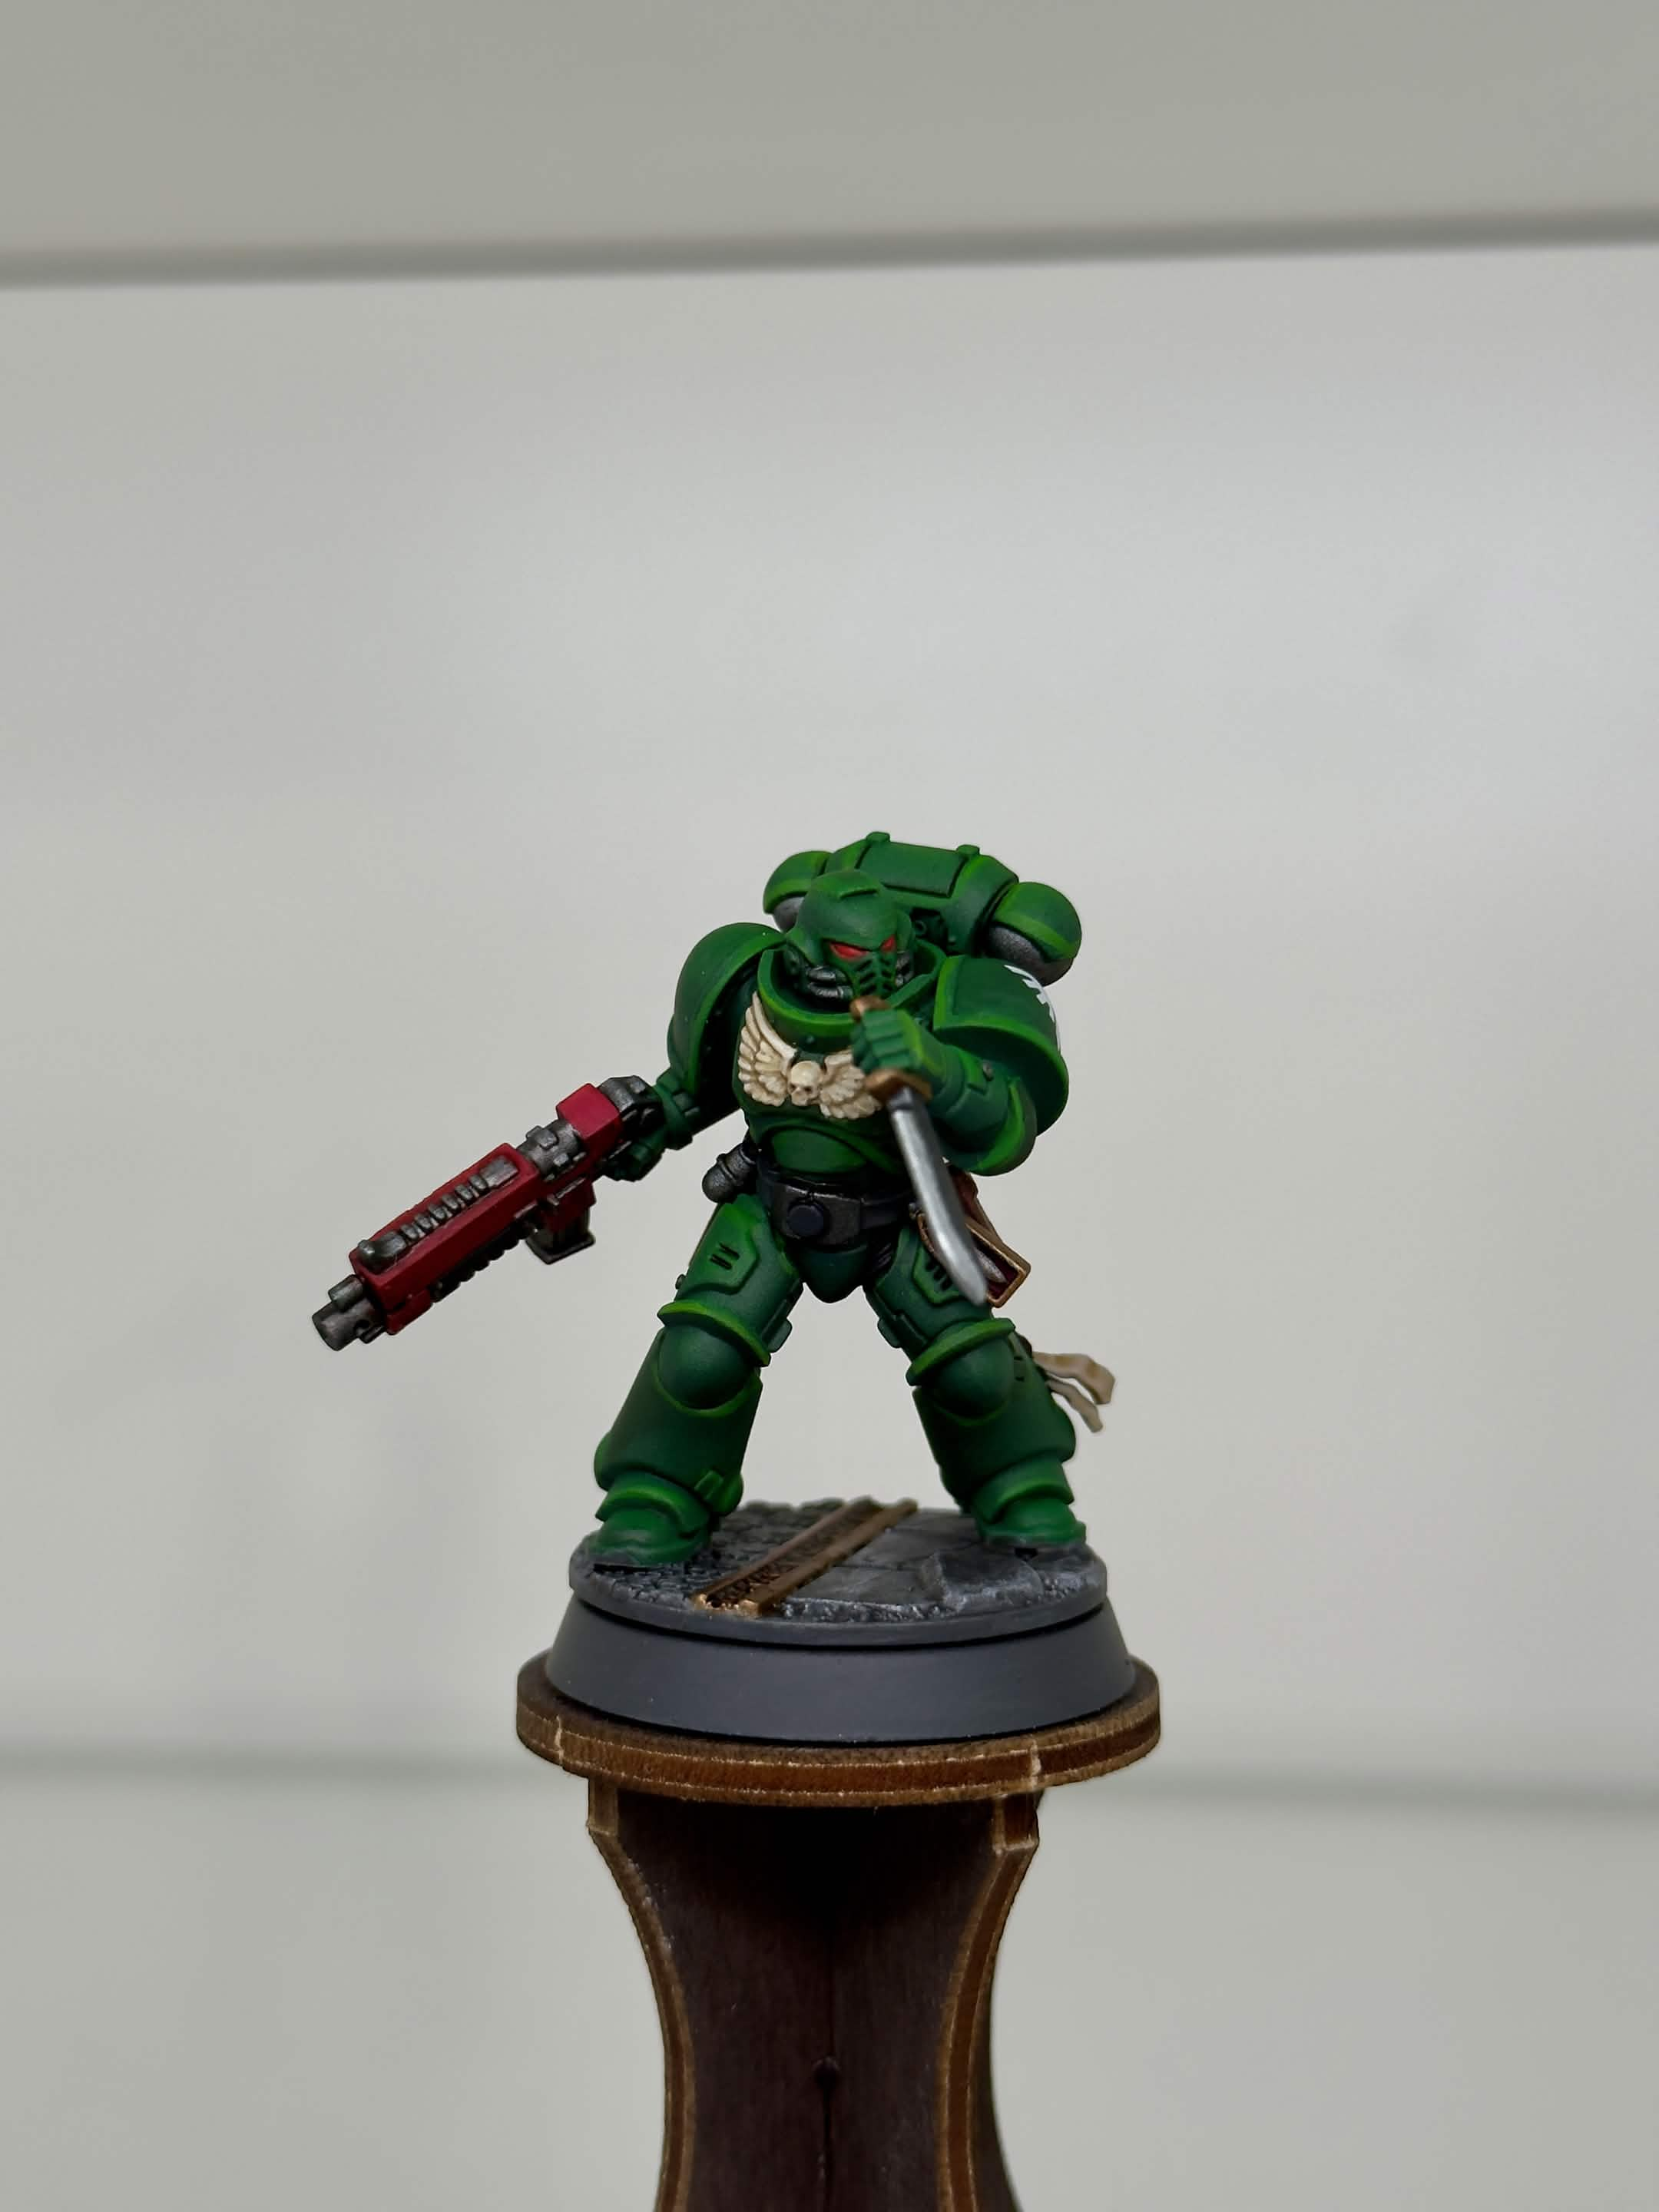
01 / Front
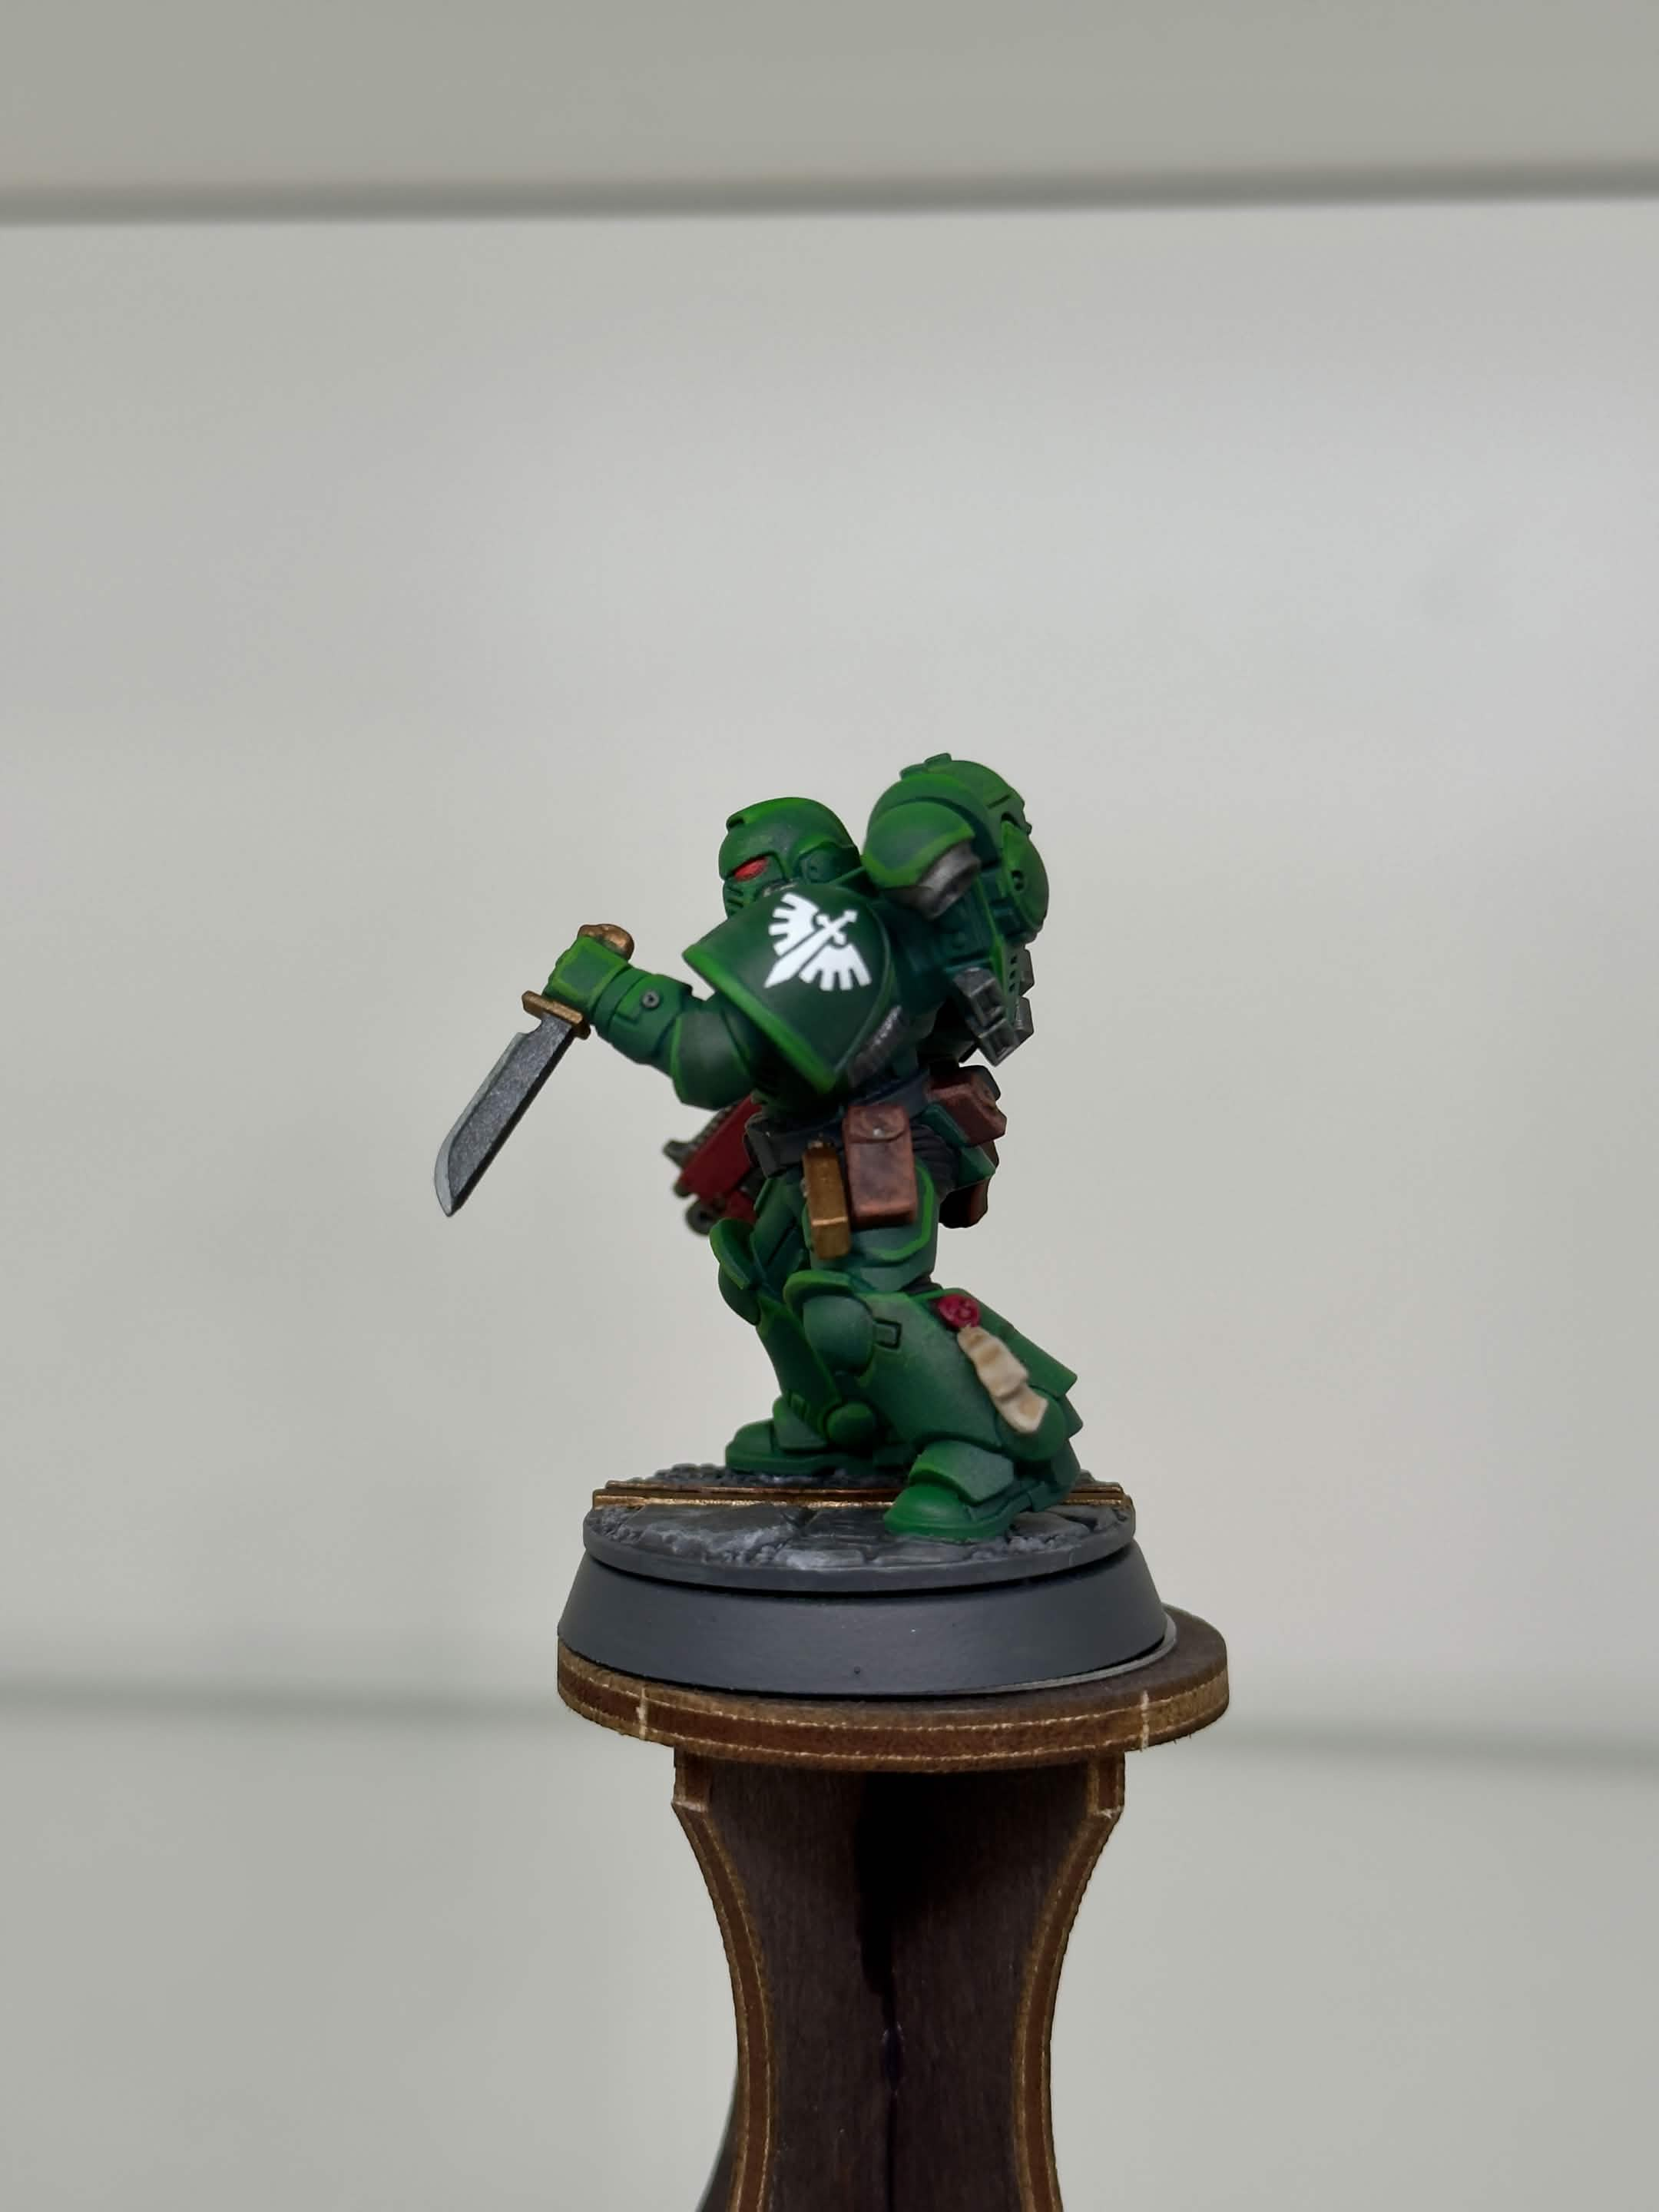
02 / Left
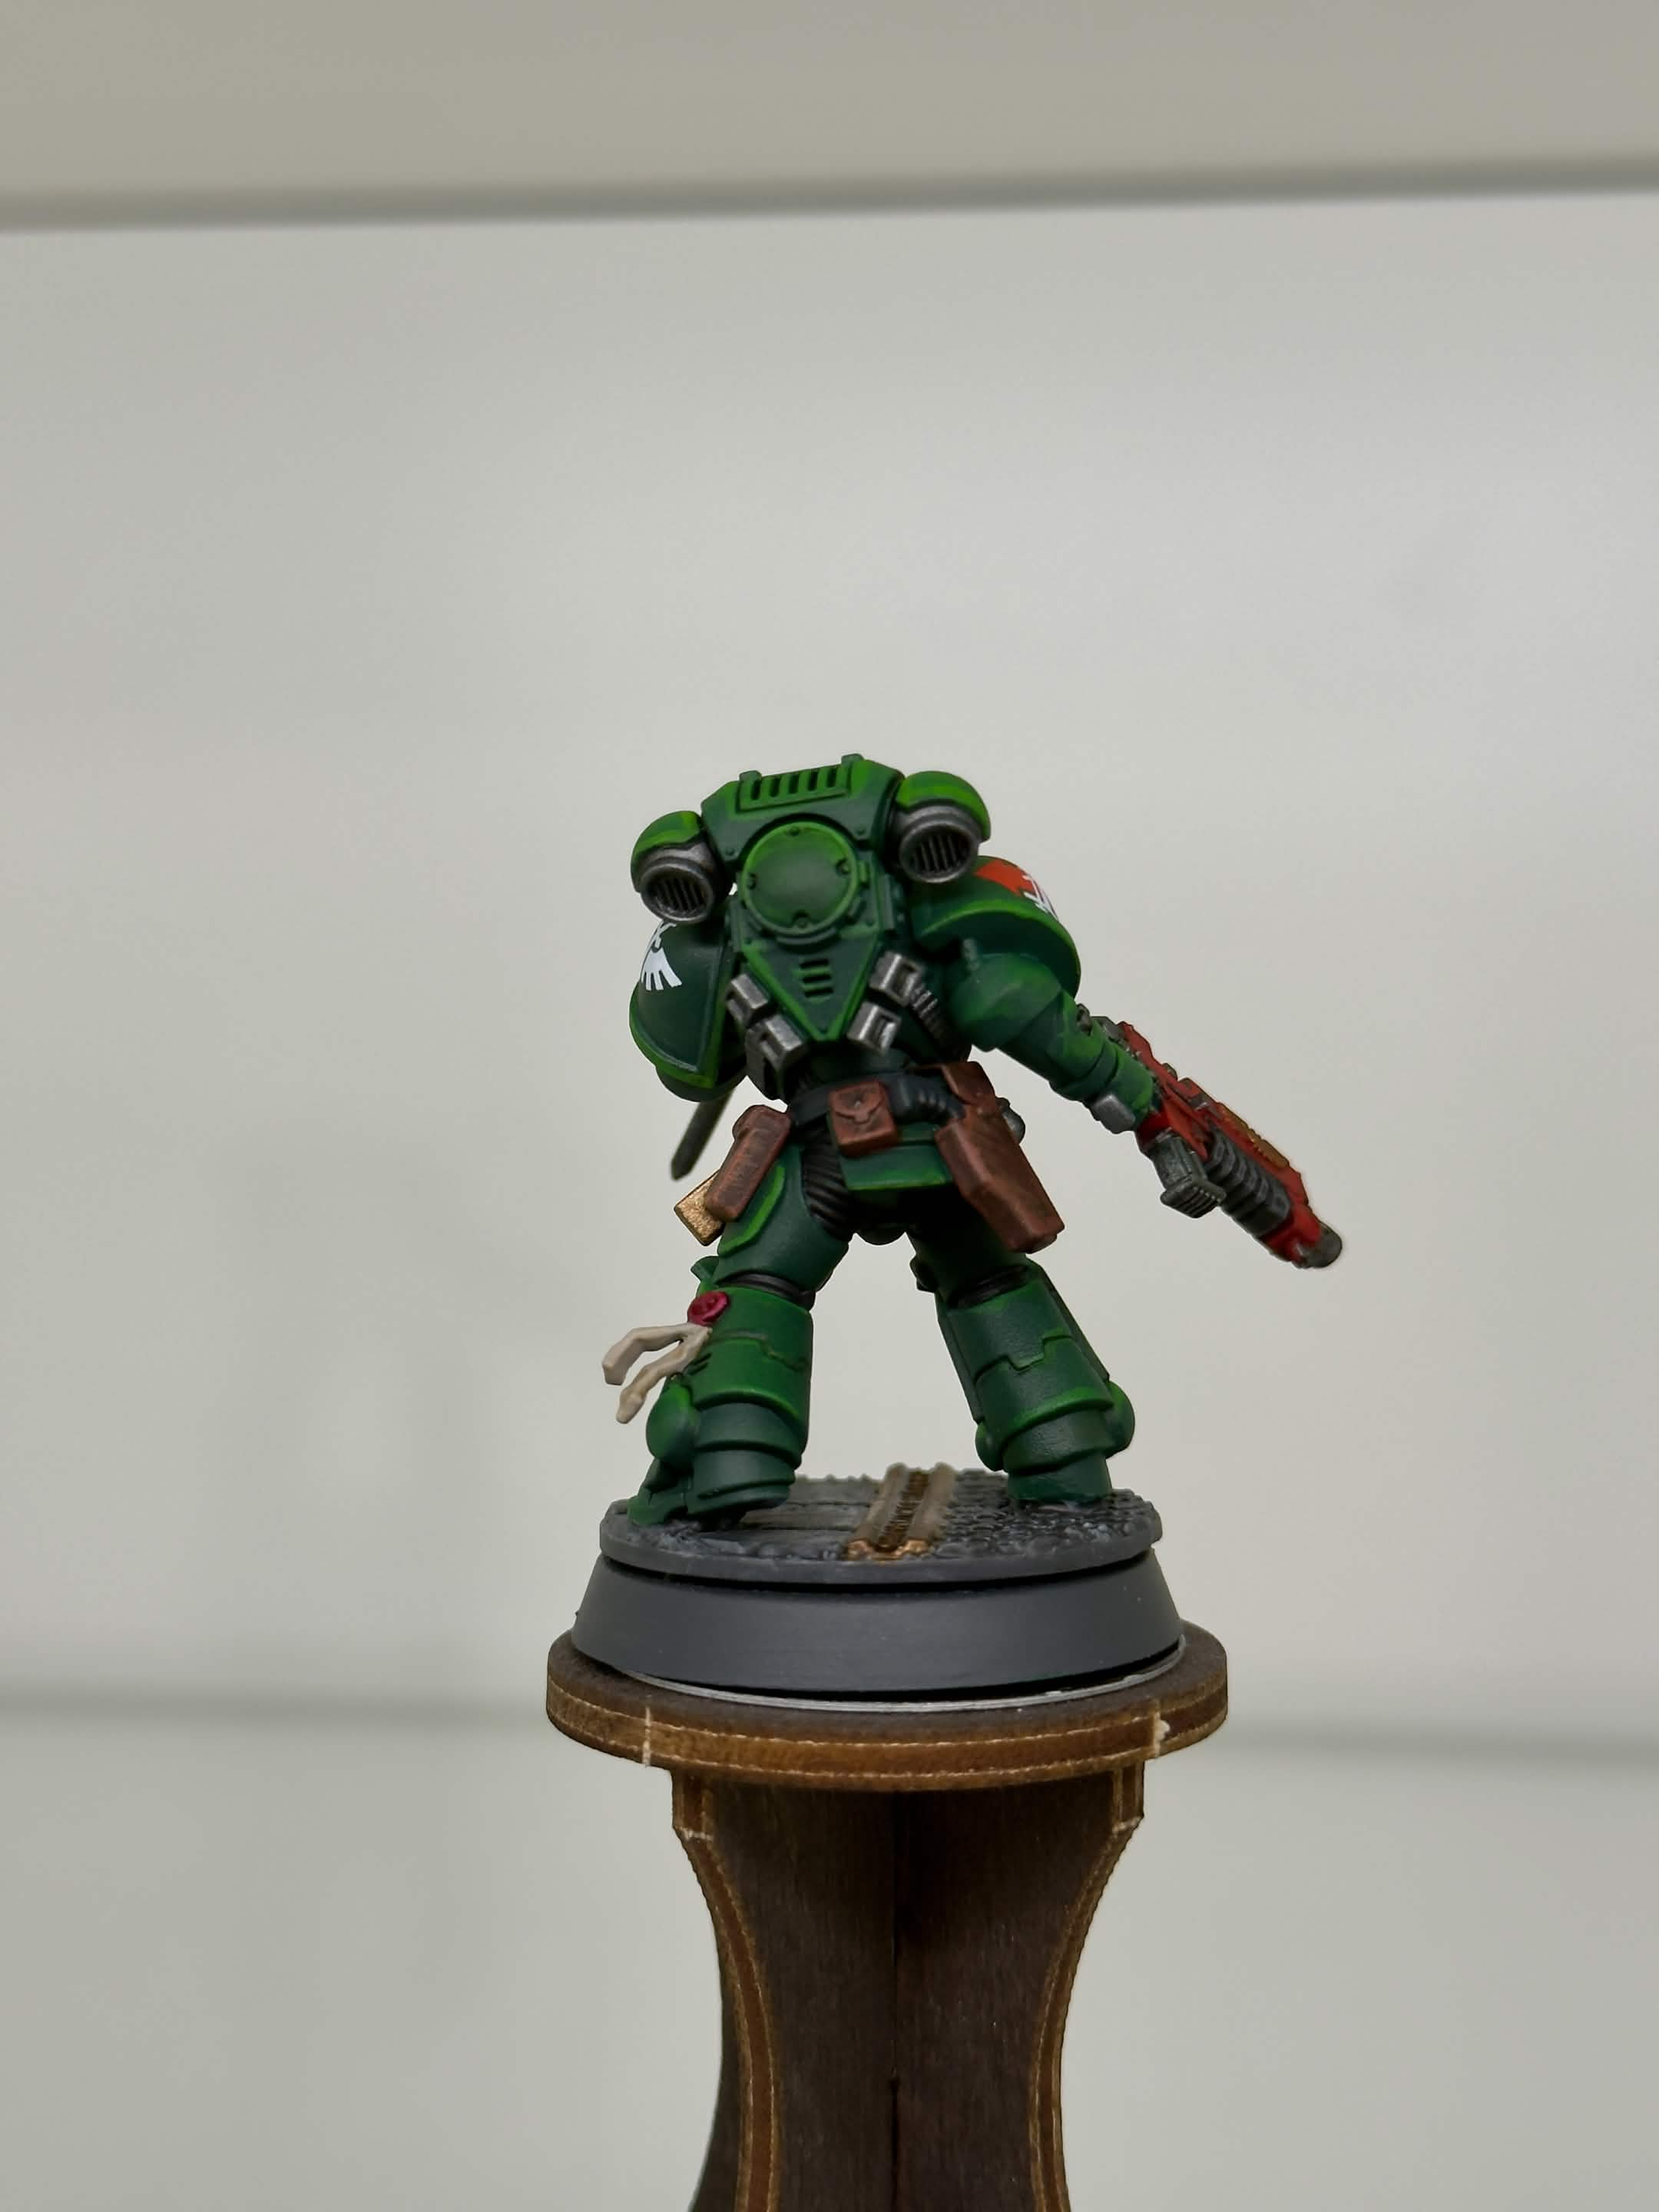
03 / Rear
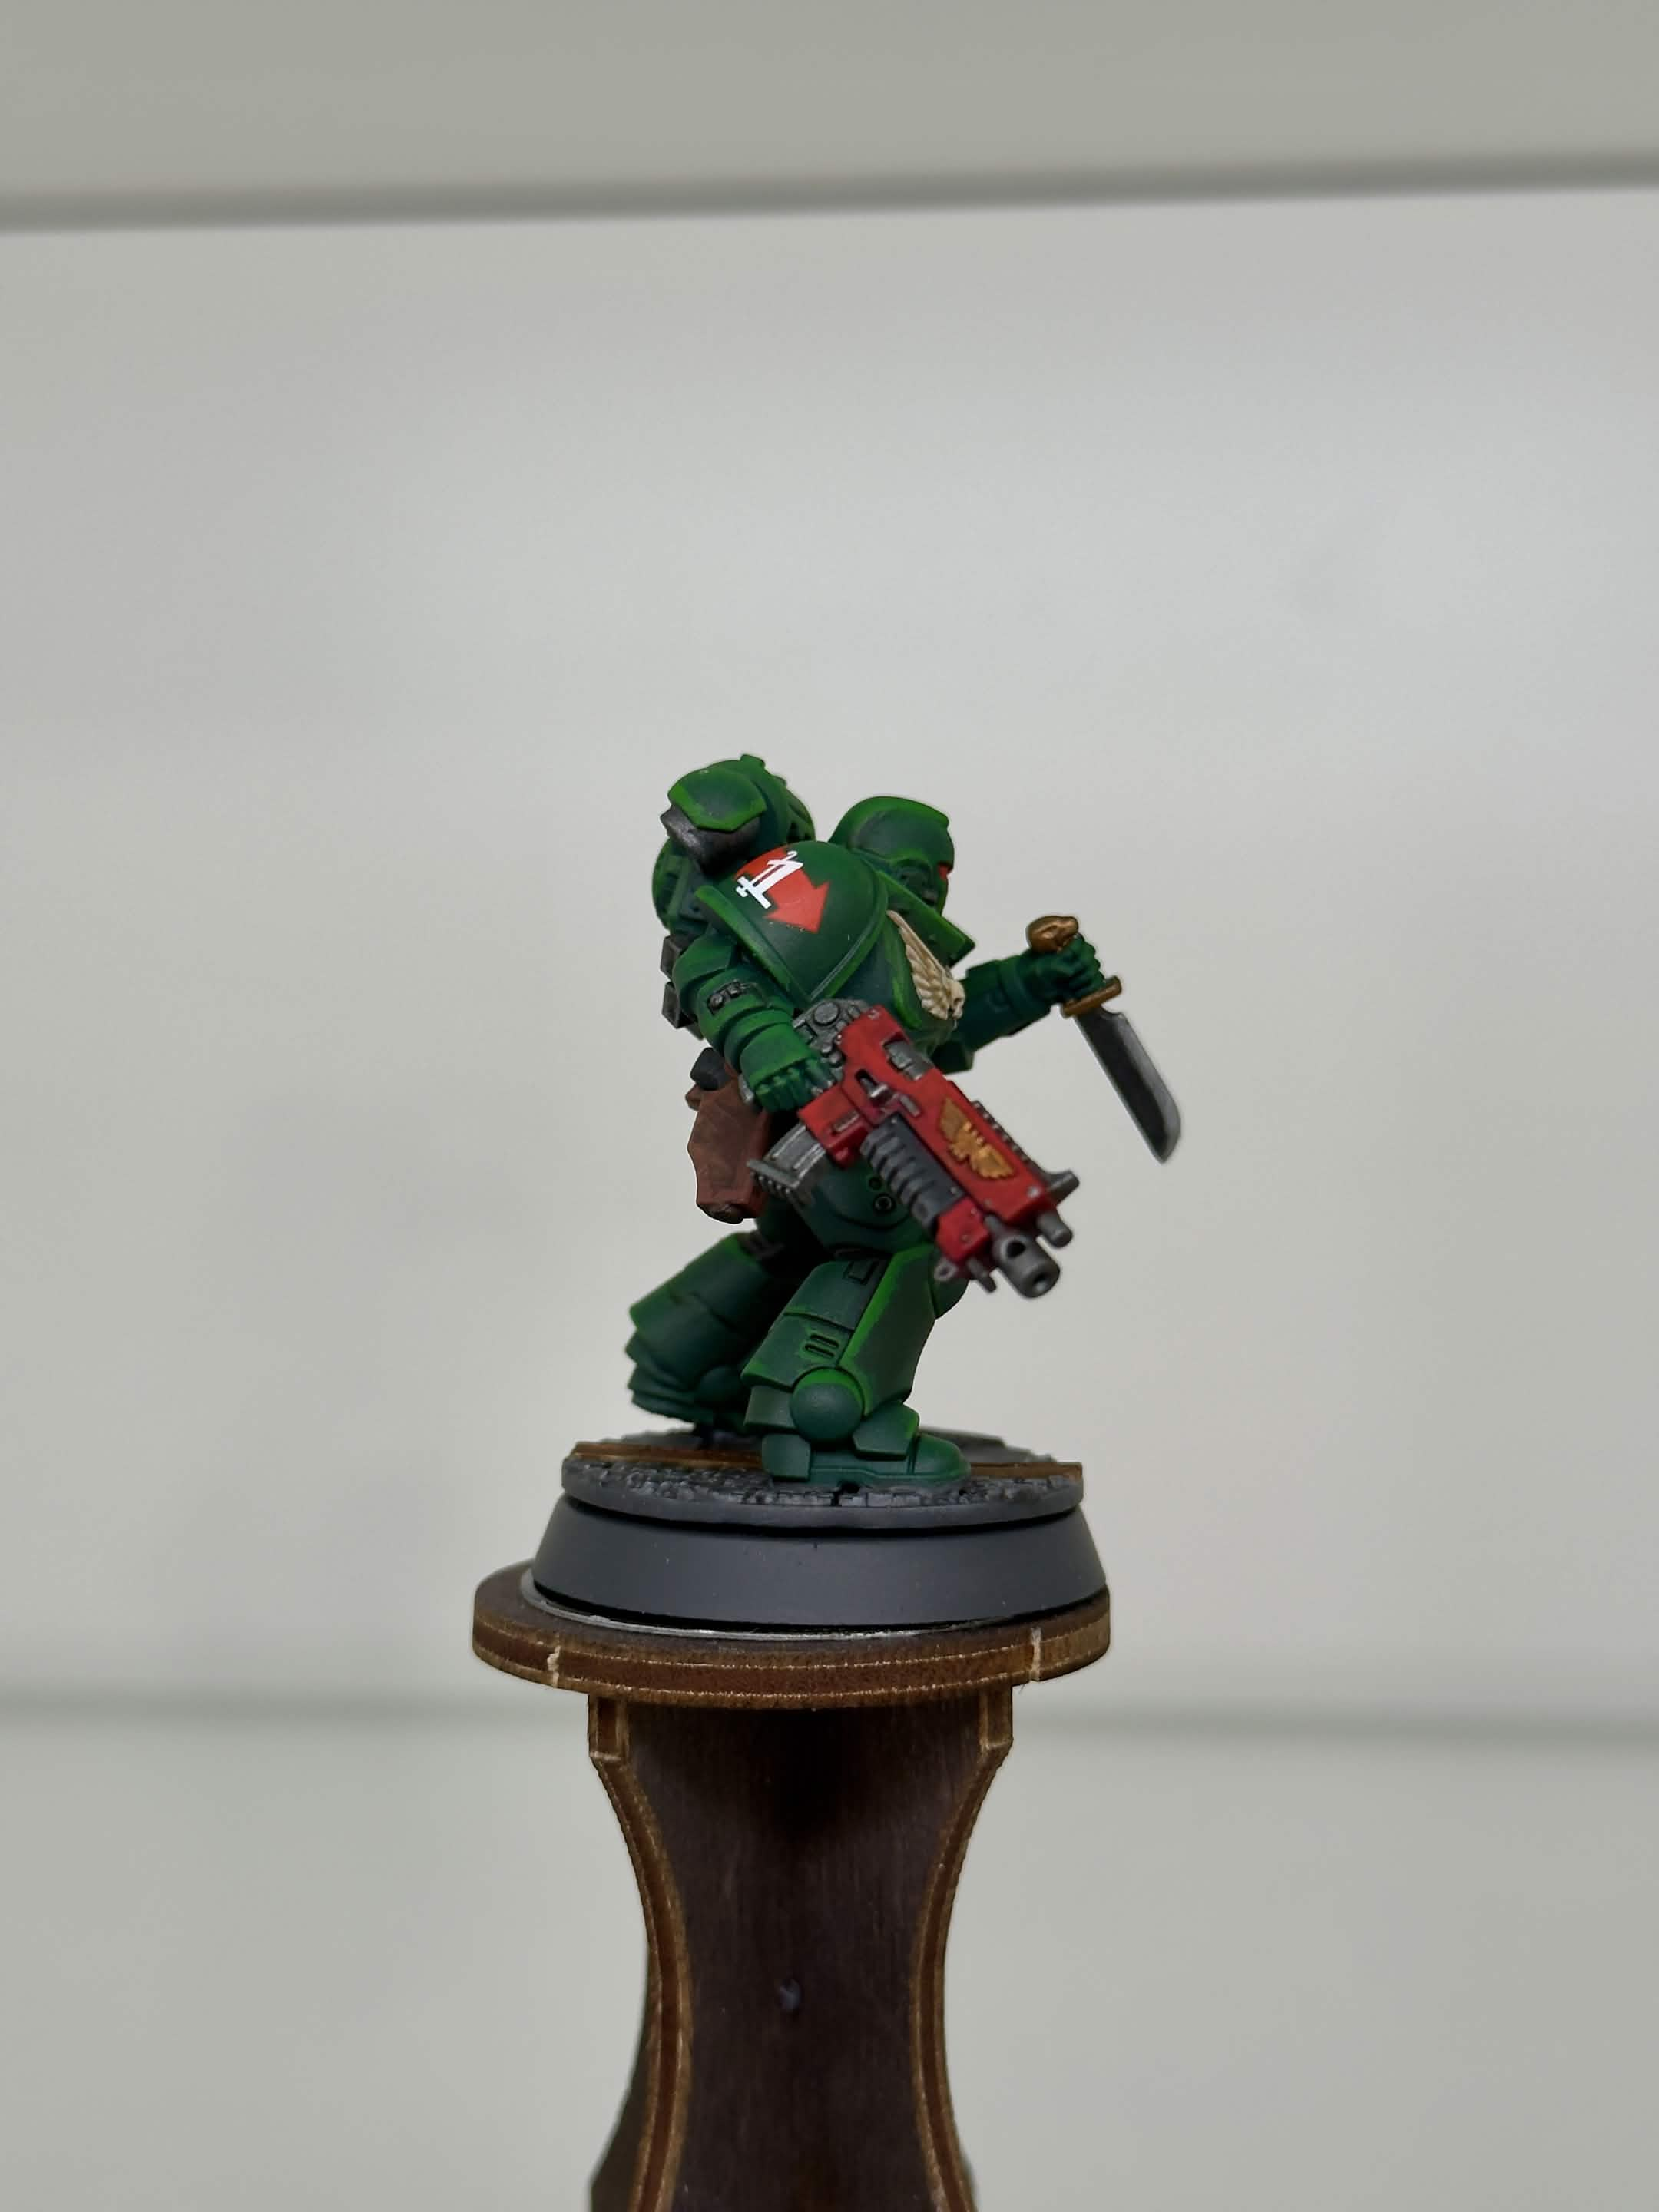
04 / Right
Reference model · Select a view to open the full photograph. See the finished Intercessor and Eradicator squads below.
KEEP BESIDE THE PALETTE
Paint tray & bench reference
GREEN ARMOR
Black Green base → 1:1 Black Green / Greenskin Punch zenithal → 2:1 Greenskin Punch / Slime Green volume highlights
STEP 02STEP 08BONE & SEALS
Aquilas & optional bone shield stripes: Ushabti Bone → targeted Seraphim Sepia → restrained Screaming Skull highlights
Oath paper: Light Earth → Dark Brown recesses → Afro Shadow writing
METALLICS
Steel · brass · Vallejo TMM Imperial Gold
Shade: 1:1 Imperial Gold Shade / Xpress Medium
After varnish: Base / Light highlights, 1:1 → 1:2
URBAN GROUND
Army Painter Fanatic Ash Grey → Pro Acryl 1-Step Graphite Grey
Old Gold street details · Eshin Grey rim
1:1
Airbrush dilution
Prepared paint or paint mix : AK Airbrush Thinner
15–20 PSI
1:1
Generous zenithal
AK 3GEN Black Green : AK 3GEN Color Punch Greenskin Punch
2:1
Restrained volume highlights
AK 3GEN Color Punch Greenskin Punch : AK 3GEN Color Punch Slime Green
Bottled mix · also for matching cleanup
1:1
Layered brush edges
AK 3GEN Color Punch Greenskin Punch : AK 3GEN Color Punch Slime Green
Bottled mix
Sergeant identification. Sergeants follow the normal recipe for their unit in every area. Their sole rank marker is a tilt shield with a red skull decal, applied in Step 9. Greenwing shields default to green, with an optional vertical bone stripe down the center. Deathwing reverses the colors: a shield matching the bone armor, with an optional vertical green center stripe. Helmets, chest devices, rims, and other details retain the normal unit treatment.
Optional white symbols · Step 7. Heavy Titanium White → undiluted Templar White for blue-grey recess shading on selected chapter wings and weapon emblems.
Mixing ratios & airbrush notes
Ratios list ingredients in the order shown. The Greenskin Punch / Slime Green mixes are already prepared in labeled bottles. Greenskin Punch is used only in paint mixtures in this recipe.
| Use | Recipe |
|---|---|
| Airbrushed acrylic colors | 1 part prepared paint or paint mix : 1 part AK Airbrush Thinner, usually 15–20 PSI |
| Armor panel lining | AK Precision Panel Liner — Sepia. Use targeted lining on green armor. Reserve Black for forward grips and awkward black details in Step 4. |
| Generous zenithal — airbrush | 1 part AK 3GEN Black Green : 1 part AK 3GEN Color Punch Greenskin Punch |
| Restrained volume highlights — airbrush; matching cleanup later | 2 parts AK 3GEN Color Punch Greenskin Punch : 1 part AK 3GEN Color Punch Slime Green (bottled mix) |
| Layered edge highlights — brush | 1 part AK 3GEN Color Punch Greenskin Punch : 1 part AK 3GEN Color Punch Slime Green |
| Aquilas & optional bone shield stripes | Citadel Seraphim Sepia, used undiluted in the recesses only over dry Citadel Ushabti Bone; keep the raised surfaces in Ushabti Bone, then add restrained Citadel Screaming Skull highlights |
| Oath paper recesses & writing | AK Precision Panel Liner Dark Brown in recesses over dry AK 3GEN Light Earth; let dry, then add writing with AK 3GEN Color Punch Afro Shadow |
| Marine gold shade — Step 7 | 1 part Imperial Gold Shade : 1 part Vallejo Xpress Medium. Smallest batch: 1 drop shade + 1 drop Xpress Medium = 2 drops total. Let the shade dry. |
| Marine gold cleanup — Step 7 | Imperial Gold Airbrush (77.163) for selective midtone cleanup after shading, only where needed. |
| Marine gold highlights — Step 13 | 1:1 Imperial Gold Base : Imperial Gold Light for general highlights; 1:2 Base : Light for selected brighter final accents. Apply after all varnishing. |
| Gold street shade — Step 3 | Undiluted Citadel Reikland Fleshshade |
| Optional white symbols — Step 7 | Pro Acryl Heavy Titanium White (S21), followed by undiluted Vallejo Xpress Color Templar White (72.401). Let the white basecoat dry first. |
| Protective varnish — Step 10 | AK Ultra Matte Varnish; two thin coats, drying between them. A separate initial satin coat is optional, not required. |
Use Army Painter John Blanche Masterclass Ironclad Grey as the default for forward grips, then shade them with AK Precision Panel Liner Black. For other black details, choose Citadel Contrast Black Legion or Ironclad Grey by area; use targeted Black panel liner in awkward spaces where applying Black Legion risks spilling onto the armor. Paint exposed pistol handles with Scale75 Black Metal in Step 7, including those visible above holsters.
For each airbrushed acrylic layer, first combine the paint colors at the listed ratio, then thin the prepared paint mixture 1:1 with AK Airbrush Thinner. This dilution is separate from the paint-color ratio and does not apply automatically to brush highlights. Do not apply the acrylic-color 1:1 thinning rule automatically to varnish. Retain the dilution that works with your specific varnish bottles and airbrush.
Paint & equipment checklist
| Brand / range | Paints & products |
|---|---|
| Colour Forge spray primers | Usual start: Renegade Green, followed by Salamander Green from above. Optional black start: Matt Black or Raven Black in place of Renegade Green; then the same Salamander Green pass. |
| AK 3GEN | Black Green; Hull Red; Light Earth (oath paper); Silver Grey (street foundation and seal wax); Wine Red; Rusty Brass |
| AK 3GEN Color Punch | Greenskin Punch and Slime Green (ingredients for the listed armor mixtures); Beast Brown; Afro Shadow (oath-paper writing) |
| AK Quick Gen | Old Gold |
| Citadel Contrast | Black Legion; Doomfire Magenta; Flesh Tearers Red |
| Citadel | Eshin Grey (base rim); Ushabti Bone (aquilas and optional bone shield stripes); Screaming Skull (restrained bone highlights) |
| Vallejo True Metallic Metal | Imperial Gold Base (77.123); Shade (77.143); Airbrush (77.163, optional cleanup); Light (77.103, optional final highlights) |
| Citadel Shade | Reikland Fleshshade (street gold); Seraphim Sepia (bone recesses) |
| Vallejo | Xpress Medium; Xpress Color Templar White (72.401, optional white symbols; use undiluted) |
| Citadel Dry | Necron Compound (optional silver highlight) |
| Army Painter Fanatic | Deep Grey (optional black-detail highlights); Ash Grey; Company Grey or Brigade Grey (brighter ground alternatives) |
| Army Painter John Blanche Masterclass | Ironclad Grey (default for forward grips; optional near-black alternative elsewhere) |
| Scale75 | Black Metal; Heavy Metal (optional silver highlight) |
| Pro Acryl | Bold Titanium White (eye lenses); Matt Cexwish Heavy Titanium White (S21, optional white symbols); Bold Pyrrole Red (casing, knee, and eye-lens highlights); Gloss Varnish |
| Pro Acryl 1-Step | Graphite Grey |
| AK | Precision Panel Liner — Sepia (green armor; optional leather pin wash), Dark Brown (oath-paper recesses), and Black (forward grips; awkward black details); Ultra Matte Varnish (default); Satin Varnish (optional initial coat); Airbrush Thinner |
| Vallejo Pigment FX | Natural Iron Oxide |
| Microscale | Micro Set; Micro Sol |
| Other supplies | Transfers; tilt shields and red skull decals for sergeants; optional grass tufts, flowers or other ready-made vegetation; PVA or suitable basing glue |
| Tools | Airbrush; detail brushes; basecoating brush; pigment brush; transfer-cutting tools; tweezers; soft brush or tightly wound cotton bud for positioning transfers |
PHASE I / STEPS 01–03
Foundation
PRIME · AIRBRUSH · URBAN BASE
01 Prime & tabletop finish
The usual starting point is a dark green primer with a lighter green highlight.
USUAL PRIMER START
Colour ForgeRenegade GreenColour ForgeSalamander GreenOPTIONAL BLACK START / EITHER PRIMER
Colour ForgeMatt BlackColour ForgeRaven BlackUsualPrimestartingthepoint: prime withmodel.
Colour Forge Renegade Green.
Use this dark green primer as the usual starting point.SprayHighlight from above.
Colour Forge Salamander Green
Sprayfromanaboveto create aoverhead zenithal highlight, leaving the lower surfaces darker.
Black-primer alternative:
Replace Usethe initial green primer with Colour Forge Matt Black or Colour Forge Raven Black instead of the initial green primer.. Either works for this recipe;works; follow with the same overhead green primer pass.
Tabletop
Thisstopping provides apoint:
The green foundation is suitable for tabletop use while the full paint job is pending.
02 Airbrush & armor lining
Build the armor volume, then define only its recesses.
PALETTE / THIS STEP
AK 3GENBlack GreenZenithal mix · 1:1Black Green :Greenskin PunchVolume mix · bottled 2:1Greenskin Punch :
Slime GreenAK Precision Panel LinerSepia · green armorAKAirbrush Thinner
BlackAirbrush Greenthe base,green zenithal & restrained volume highlightsarmor
AirbrushApply the dark foundation.
AK 3GEN Black Greenover
Cover the green armor, including the belt buckle and the sergeants’ pauldron rims and tiltshields,shields.thinnedThin1:1withpart paint : 1 part AK Airbrush Thinner,;usuallyuseatthe usual 15–20 PSI.MixBuild a generous overhead highlight.
1 part AK 3GEN Black Green : 1 part AK 3GEN Color Punch Greenskin Punch.
Airbrushathegenerouspreparedzenithal highlightmix from above over the armor, leaving the lower areas darker.SwitchPicktoout thebottledbrightest volumes.
2 parts AK 3GEN Color Punch Greenskin Punch : 1 part AK 3GEN Color Punch Slime Greenmix.—Addbottled volume mix
Keep this pass restrained butbrightbright.volume highlightsFocus onprominent points:the tops of shoulders, backpacks, heads, andanyotherotherprominent features thatcall forneed emphasis.
For both highlight passes, thinpasses:
Thin 1 part prepared paint mixture : 1 part AK Airbrush Thinner and use the usual 15–20 PSI. This dilution is separate from each paint-to-paint ratio above.
Keep the finalbrush 2:1edge passmix focusedfor on the prominent volumes. later:
Reserve the bottled 1:1 Greenskin Punch /: Slime Green mix for the layered brush edge highlights in Step 8.8.
TargetedLine panelthe liningarmor recesses
- Let the
greenacrylic armorpaint dry, then usedry.
AK Precision Panel Liner Sepia.
UseSepiathisgivesenamel liner for the preferred shadows againstthisthe greenarmor;armor.useTheitacrylicforpaint-thinningtheratiosarmorabovelining.doBlacknotpanelapplylinertois reserved for the forward grips and awkward black details described in Step 4.it. - Apply small, targeted
amountsamounts.
Place the liner directlyto the dry armorin panel lines andcavities,cavities.lettingLetthe linerit flow along the recessesto createfor definedshadows.
Skip the exposed rubber joints
This is an
Wait before painting over it or applying varnish.
Cleanup ifStray needed: Spiritsmarks can dry and be usedpainted over during Step 8: armor cleanup and highlights; there is no need to liftperfect every line now.
Optional spirits correction:
Lift excess liner with a cotton bud (Q-tip) barely dampened with white spiritspirit. andUse a very gentle touch; avoid scrubbing or soaking the surface. No extra varnish stage is required in this workflow.
03 Urban base: ground, gold & rim
Complete all base painting here; add pigment weathering after varnishing in Step 12.
PALETTE / THIS STEP
Army Painter FanaticAsh GreyPro Acryl 1-StepGraphite GreyAK 3GENSilver GreyAK Quick GenOld GoldCitadel ShadeReikland FleshshadeCitadelEshin Grey · rim onlyOPTIONAL / BRIGHTER GROUND UNDERCOAT
Army Painter FanaticCompany GreyArmy Painter FanaticBrigade GreyFinish the ground, gold street features, and rim before the marine’s small details. Work across the squad one color at a time, allowingletting each layer to dry before the next.
GroundScenic —ground Ash& Grey into Graphite Greystone
Army Painter Fanatic Ash Grey
Cover the
Pro Acryl 1-Step Graphite Grey
Apply over the
IfOptional brighter foundation:
Replace the ground reads too dark, replace Ash Greybasecoat with Army Painter Fanatic Company Grey or Army Painter Fanatic Brigade Grey forif athe brighterresult foundation.reads too dark. These are alternatives, not extra layers.
Previous test:
Avoid Citadel Wraithbone here; it made this ground treatment too bright in previous tests.bright.
Gold street features
Apply thin, opaque coats of
AK 3GEN Silver Grey
Apply thin, opaque coats over theentire feature, including itssides, recesses, lettering, andlettering.remaining surfaces. Let the foundation dry.
AK Quick Gen Old Gold
Cover the full prepared feature and let it dry.
Use
Base rim — Eshin Grey
Citadel Eshin Grey
Touch up later only if subsequent painting or weathering marks it.
Base painting complete.complete:
Leave pigment weathering for Step 12,12, after the protective varnish coats. AnyCorrect any stray marks on the green armor can be corrected together in Step 8.8.
PHASE II / STEPS 04–07
Shared color batches
BLACK · BONE · RED · METALS
04 Black details & leather
Complete every matching joint, grip, strap, and pouch.
PALETTE / THIS STEP
Citadel ContrastBlack LegionArmy Painter John Blanche MasterclassIronclad GreyAK Precision Panel LinerBlackArmy Painter FanaticDeep Grey · optional highlightsAK 3GENHull RedAK 3GEN Color PunchBeast BrownAK Precision Panel LinerSepia · optional leatherForward grips — Ironclad Grey & Black liner
Army Painter John Blanche Masterclass Ironclad Grey
Use this as the
AK Precision Panel Liner Black
Wait
Other black details & awkward spaces
Use
- Paint the non-metallic black areas.
Citadel Contrast Black Legion
Useforwhere its flow helps on exposed rubber armor joints, sword and knife handles, and other non-metallic blackgripsgrips.whereBatchitsmatchingflowareasisbyhelpful.the chosen paint.
Army Painter John Blanche Masterclass Ironclad Grey
Hard-to-reachcramped black details:details. where brushing Black Legion into a cramped space risks making a mess on the surrounding green armor, use a small, targeted application of
AK Precision Panel Liner Black
Use instead.a small, targeted application where brushing Contrast into the space risks marking the surrounding green armor. Keep it on the intended black detaildetail. to reduce avoidable armor cleanup. Use Sepia for theThe green armor panel lines.
lines use AK Precision Panel Liner Sepia.
Highlight black details if appropriate.Army Painter Fanatic Deep Grey
Allow
PistolExposed pistol handles:
Leave leave exposed pistol handlesthese for Scale75 Black Metal in Step 7, including handles protruding from holsters. Keep the leather holsterholsters in the leather batch below.
Leather — optional Sepia pin wash
AK 3GEN Hull Red
Cover the straps, belts, holsters, and
AK Precision Panel Liner Sepia
After the basecoat dries, add a targeted pin wash
AK 3GEN Color Punch Beast Brown
Keep
05 Aquilas, seals & lenses
CompletePaint allthe chest aquilas and any optional bone centershield stripes onfirst. GreenwingThen tilt shields before the weapons. Batch Ushabti Bone, targeted Seraphim Sepia, and restrained Screaming Skull highlights across these bone details. Keep Silver Grey forfinish seal wax, then complete the oath paperparchment, and eye lenses.
PALETTE / THIS STEP
AK 3GENLight Earth · oath paperCitadel LayerUshabti BoneCitadel ShadeSeraphim Sepia · recesses onlyCitadel LayerScreaming Skull · restrained highlightsAK Precision Panel LinerDark Brown · oath paperAK 3GENSilver Grey · seal waxPro AcrylBold Titanium WhiteAK 3GEN Color PunchAfro ShadowCitadel ContrastDoomfire MagentaCitadel ContrastFlesh Tearers RedAquilasChest aquilas & optional bone shield stripes
Citadel Ushabti Bone
Apply thin, opaque coats of Citadel Ushabti Bone to all chest aquilas and any chosen vertical bone center stripes on the green tilt shields. Batch these foundations across the squad. Work carefully around weapons crossing the chest and let the paint dry.
Use undiluted Citadel Seraphim Sepia
Use inundiluted. Apply small, controlled amounts alongbetween the feather separationsfeathers and around central details. On an optionala bone shield stripe, shade only physical recesses crossing theit. stripe. Do not wash the whole aquila or shieldstripe. stripe. KeepLeave the raised faces in Ushabtithe Bone;bone wickbasecoat.
Wick any shade off
Citadel Screaming Skull
Pick out selected raised feather ridges, the central device, and any upper-facing edges crossing an optional bone shield stripestripe. with Citadel Screaming Skull. Keep the highlights narrow and leaveLeave most visible bone in Ushabtiits Bone.basecoat. Use a controlled pointed brush near the armor;armor. completeComplete this bone batch before the weapons and protective varnish.
SilverPrepare Greythe — purity-seal wax
AK 3GEN Silver Grey
Basecoat all purity-seal wax with thin, opaque
Oath paper — Light Earth, Dark Brown & writing
Basecoat all purity-Purity-seal oath paperwith- Basecoat the paper.
AK 3GEN Light Earth.
Build smooth, opaque coverage on all oath paper with thincoatscoats.and letLet it dry.
AK Precision Panel Liner Dark Brown
Apply precisely to the folds and recesses of the dry
Touch up the paper basecoat if needed before adding the writing.
AK 3GEN Color Punch Afro Shadow
Paint tiny, broken lines and short
Batch any stray marks on the surrounding green armor into the shared cleanup in Step 8.8.
Sergeants — normal recipe, red skullSergeant tilt shields
UseSame unit recipe; one rank identifier.
Sergeants, including veteran sergeants, use the normal unit recipe in every area, includingfor the helmet, chest aquila, pauldron rims, weapons, and every other details.area. AddTheir sole sergeant rank identifier is a tilt shield withbearing a red skull waterslide decal as.
Greenwing:
Paint the sole sergeant rank identifier. This also applies to veteran sergeants.
For Greenwing, paint the tilt shield green with the armor.armor. An optional vertical bone center stripe down the center uses the Ushabti Bonebone treatment above. ApplyFinish painting and highlighting the shield before applying the red skull decal in Step 9, after painting and highlighting.
Deathwing:
Invert the shield.
Deathwingpattern: the shield uses the inverse shield pattern: the same bone color as its armorarmor, by default,optionally with ana optional vertical green center stripe,stripe, plus the red skull decal. TheThis shield convention does not chooseselect a new Deathwing armor recipe.
Purity-Color the purity-seal wax — Doomfire Magenta
Citadel Contrast Doomfire Magenta
Cover the dry
Eye lenses
Basecoat the eye lenses neatly with
Pro Acryl Bold Titanium White.
BasecoatLetthe eye lenses and let the white dry.
Citadel Contrast Flesh Tearers Red
Apply over the white lenses and let it dry.
Add
06 Red casings & company knees
Basecoat the bolter casings and 3rd Company knees together, then batch their red highlights with the eye lenses.
PALETTE / THIS STEP
AK 3GENWine RedPro AcrylBold Pyrrole RedWork across the squad one paint at a time. Paint the larger red casings before their metallic fittings to minimize later metal touch-ups.
- Basecoat the red areas.
AK 3GEN Wine Red
Cover the weapon casings and the 3rd Company marking on themodel'model’s left kneepad.withLetAKthe3GENbasecoatWine Red.dry. - Highlight
thesecasingsredandareascompanywithknees.
Pro Acryl Bold Pyrrole Red,
LeaveleavingtheWinedarkerRedbasecoat visible in the deeper areas. The weapon highlights can be broad; keep the knee marking neatly defined.
Add small highlights
Company-marking
Work acrossplacement:
Consult the
Paint the larger red casings before their metallic fittings to minimize later metal touch-ups. For company-marking placement, consult the supplied Dark Angels marking reference. Left and right refer to the model'model’s own sides.
07 Steel, brass & gold
Paint matching metal details across the marine, then any selected white symbols.
PALETTE / THIS STEP
Scale75Black MetalAK 3GENRusty BrassVallejo True Metallic MetalImperial Gold Base · 77.123Vallejo True Metallic MetalImperial Gold Airbrush · 77.163 · cleanup as neededVallejo True Metallic MetalImperial Gold Shade · 77.143VallejoXpress MediumOPTIONAL / SILVER HIGHLIGHTS & WEAR
Scale75Heavy MetalCitadel DryNecron CompoundOPTIONAL / WHITE SYMBOLS
Pro Acryl · Matt CexwishHeavy Titanium White · S21Vallejo Xpress ColorTemplar White · 72.401 · undilutedSteel details
- Basecoat the exposed steel.
Scale75 Black Metal
Apply an even coatofScale75 Black Metalallgunappropriate exposed steel details: Gun barrels andbarrels, metallic weaponhardware.hardware, grenades, and similar metal details. Paint other metal handles and fittings separately from the black or near-black grips in Step 4.
Include handles protruding from holsters. Keep the surrounding leather holsters in the AK 3GEN Hull Red treatment from Step 4.
Paint the
boundaries.
Keep the belt buckle green withand the armor. Keep the upper armor shell of each backpack exhaust green.green. Use the rear and side reference photos to identify thisthe exhaust boundary.
Scale75blades Blackand Metalchainsword teeth.
Use the same steel basecoat. It normally needs no additional shade in this recipe. For
Scale75 Heavy Metal or Citadel Dry Necron Compound
Apply over the
Brass ammunition
- Paint the ammunition.
.Blades and chainsword teeth:Default toScale75 Black Metal. Add a brighter metal over that basecoat only where highlights or wear patterns call for it, usingScale75 Heavy MetalorCitadel Dry Necron Compound.
AK 3GEN Rusty Brass
UsePainton bullet shells, magazines, and other projectileammunitionwithAK 3GEN Rusty Brass.
Vallejo TMM Imperial Gold — remainingRemaining marine gold
- Basecoat
Usethe selected gold ornaments.
Vallejo True Metallic Metal Imperial Gold Base (77.123)
Painton: Knifeknife and sword pommels andguards.
Sergeants use the same gold placements as their peers. Their rank marker is the red skull decal on the tilt shield; the helmet, chest aquila, pauldron rims, and other details follow the normal unit recipe.ornaments. Let the gold basecoat dry before shading.
After all varnishing, add optional dry.
Imperial Gold Shade — shade, then clean up only as needed
Shade the dry gold with gold.
1 part Imperial Gold Shade : 1 part Vallejo Xpress Medium.
Avoid pooling and let itthe shade dry.
Imperial Gold Airbrush (77.163)
Clean
Sergeants: use the same gold placements as their peers. Helmets, chest aquilas, pauldron rims, and other details follow the normal unit recipe. The red skull decal on the tilt shield is the rank marker; apply it in Step 9.
BoneKeep the batches separate: bone aquilas and any optional bone shield stripes were completed in Step 5, red casings and knees in Step 6, and the base’s Old Gold details in Step 3.
Gold Thehighlights sergeant’scome redlater: skullafter decalall belongs invarnishing, Step 9.13 Marineuses goldoptional highlights1:1 followImperial allGold varnishingBase in/ StepLight 13.highlights, then 1:2 Base / Light for selected brighter final accents.
Optional white chapter &and weapon symbols
ForUse this selectively for chapter wings or other sculpted symbols chosen to be white instead of gold, use this treatment selectively—gold—for example, a Chaplain’s pistol emblem or Azrael’s combi-bolter symbol.
BasecoatBuildwitha smooth, opaque white basecoat.
Pro Acryl Matt Cexwish Heavy Titanium White (S21), building smooth, opaque coverage.
Let it dry.ApplyAdd blue-grey recess shading.undilutedVallejo Xpress Color Templar White (72.401)
Apply undiluted over the whitesymbolsymbol,tocontrolcreate blue-grey shading in the recesses. Control poolingpooling, and let it dry before varnishing.
Complete these symbols here, before the protective varnish. Keep the standard bone aquila and the eye lenses’ separate Pro Acryl Bold Titanium White recipe in Step 5. White symbols do not receive the metallic accents in Step 13.
PHASE III / STEPS 08–13
Highlights, markings & finish
ARMOR EDGES · TRANSFERS · VARNISH · WEATHERING
08 Armor cleanup & edge highlights
Repair stray marks, then bring attention to the head and shoulders.
PALETTE / THIS STEP
AK 3GENBlack GreenMatching cleanup · bottled 2:1Greenskin Punch :Slime GreenBrush edges · bottled 1:1Greenskin Punch :
Slime Green
Repair stray marks
The
- Repair dark, lower armor
areas withareas.
AK 3GEN Black Green.
2 parts AK 3GEN Color Punch Greenskin Punch :
1 part AK 3GEN Color Punch Slime Green
Use the bottled 2:1 mix where it
Why cleanup comes here: The base and detail colors are now finished, so correct stray shading and paint marks together in one armor-color batch before adding the edge highlights. This avoids repeatedly touching up the same areas as you work through earlier steps. The belt buckle follows the green armor treatment for cleanup and any edge highlights.
Layered brush edge highlights — bottled 1:1 mix
- Use the bottled edge-highlight mix.
1 part AK 3GEN Color Punch Greenskin Punch :
1 part AK 3GEN Color Punch Slime Greenmix for thelayered brush edge highlights.
Buildthe highlights incontrolled layers along upward-facing green armor edges. Keep the lines narrow, crisp, and strong enough to read on the tabletop,with emphasis towardemphasizing the head and shoulders. - Include
Includethe small green details.
Highlight the green pauldronrimsrims, belt buckle, and helmets on allmarinesmarines.and the green areas of the sergeants’ tilt shields. HighlightInclude the upper helmet rim and eardetailsdetails. - Finish
normally.the sergeants’ tilt shields.
Use the same cleanup and highlights on their green areas. Keep the green mix off any optional boneshieldstripe.Greenwing sergeants:Complete the same armor cleanup and highlights as the squad.Finish all shield painting and highlightingthe tilt shieldbeforeapplying itsthe red skull decal in Step 9.
09 Waterslide transfers
Apply the symbol, layer the number, and seal the settled decals.
PALETTE / THIS STEP
Pro AcrylGloss VarnishMicroscaleMicro SetMicroscaleMicro SolApply the chapter or Battleline transfer first, then layer the squad number where needed. ApplyBatch the sergeants’ red skull decals towith theirthese painted tilt shields during this same transfer batch.transfers. The timing windowstimes below are practicalcheckpoints: checkpoints;continue when the surface readinessis determines when to continue.ready.
Sergeant tilt shields — red skull decal
Use a red skull waterslide decal on each sergeant’spainted tilt shield. ForGreenwing Greenwing,shields thehave defaulta green field is green with an optional vertical bone center stripe; forDeathwing Deathwing,shields the default field matchesmatch the bone armor with an optional vertical green center stripe. These shieldBoth variations sharemean the same rank meaning. Apply the skull usingrank.
Use the preparation, placement, conforming, drying, and sealing process below.below for the skull. Squad numbers retain their normal unit placement.
Prepare withthe complete decal area
- Check the paint and mix the clear coat.
Pro Acryl Gloss Varnish
Make sure the paint is dry and thoroughly mix the varnish.Pro Acryl Gloss Varnish.
Cover the complete shoulder face
Let the gloss dry
Use Pro Acryl Gloss Varnish for both clear coats in this transfer stage. Continue with two thin coats of AK Ultra Matte Varnish in Step 10; a separate initial satin coat is optional, not required. Attach any vegetation in Step 11 and let its glue dry. Step 12 then uses a light final application of pure AK Ultra Matte Varnish after pigments.
Place the Battlelinechapter or chapterBattleline transfer
Wet
Microscale Micro Set
Apply a small amount, slide the transfer into place, and align it carefully.
A damp soft brush or tightly wound cotton bud can help settle
Check after about 5–10 minutes
Conform the first transfer
Microscale Micro Sol
Use as few brush strokes as possible.
Do not press, reposition, or touch
Continue only when
Layer the squad numbernumber, where needed
For a squad number placed over the Battleline symbol:
- Place
Applydirectly over the settled lower transfer.
Use a small amount of Microscale Micro Set.
Do
Use Microscale Micro Sol only
Dry, clean if needed, and seal
- Allow
After the final decal solution, give the transfersa few hours before sealing whenpracticalpractical.;
3–4 hours after the final decal solution is a same-daycheckpoint
Use a soft brush barely dampened with clean
Pro Acryl Gloss Varnish
Apply one thin, continuous coat
Continue
Handling: before proceeding to Step 10.
Useuse small amounts of Microscalethe Microdecal Set and Microscale Micro Solsolutions rather than saturating the decal area. Favor natural drying;drying. ifIf using a hairdryer or air blower, keep it low and gentlegentle, andwithout do not let airflow disturbdisturbing a softened transfer.
The Microscale Micro Sol instructions likewisealso emphasize leaving the softened decal undisturbed until dry.
Finishing order: both clear coats here use Pro Acryl Gloss Varnish. Step 10 adds two thin coats of AK Ultra Matte Varnish; a separate initial satin coat is optional. Attach any vegetation in Step 11 and let the glue dry. Step 12 adds pigments, then a light final application of pure AK Ultra Matte Varnish.
10 Protective varnish
AK Ultra Matte is the default; satin is an optional precaution.
PALETTE / THIS STEP
CitadelEshin Grey · rim touch-ups onlyAKUltra Matte VarnishAKSatin Varnish · optionalCheck the finished paintwork
- Inspect the base
rim andrim.touch upCitadel Eshin Grey — touch-ups only if needed; the
The initial rim coat was completed in Step 3. - Let all
paint,surfaces dry.
Paint, transfers, and sealing gloss must be dry before varnishing.OPTIONALOptional/initialINITIALsatinSATIN COATcoatIf desired, apply one thin, even all-over coat of AK Satin Varnish.
and letLet it dry before theUltra Mattematte coats below. This is an optional precaution,not a required layer,including for models handled bythetheir shoulders duringgames.games; it is not a required layer.Default
protectionprotection:— AKtwo Ultra Matte coats- Thoroughly mix the
bottlevarnish.
PureofAK Ultra Matte Varnish.
Useitthis as the default protective finish, without mixing in satin. - Airbrush the first thin, consistent all-over
coatcoat..
Aim for a continuous film that lands lightlywet;wet.avoidAvoid poolingor aand dry, dusty spray. Letitthe coat dry before continuing. - Apply
athe second thin, consistentcoat of AK Ultra Matte Varnishcoat.. Let this coat dry before attaching optional vegetation in Step 11, then adding pigments in Step 12.
Work across the squad coat by coat, allowing each model to dry between applications. Let this coat dry before optional vegetation in Step 11 and pigments in Step 12.
Drying
checkpoint:Check each coat after about 10–20 minutes in this humidity-controlled basement, with relative humidity kept below roughly 45–50%. Continue only when the surface is dry, stable, and no longer
tacky;tacky.allowAllow longer wheneverneeded.needed;Thisthis is a working pause, not full cure. - Thoroughly mix the
11 Grass, flowers & foliage · optional
Attach vegetation before pigment weathering and the final Ultra Matte pass.
OPTIONAL / THIS STEP
Basing detailsGrass tufts · flowers · foliageAttachmentPVA or suitable basing glueToolsTweezersOnceAfter the protective coats from Step 10 are dry, attach any grass tufts, flowers, andor similar ready-made vegetation.vegetation. Let the glue dry fully before pigment weathering and the final Ultra Mattematte pass in Step 12.
- Dry-fit the vegetation.
Use tweezers to position a few tufts orflowers with tweezers.flowers. Leavethefinished stonework and gold street lettering visible where possible. ChoosePrepare a clean, firm contactpointpoint.on the finished base.
Clearanyloose dust fromthatthe small contact spot so the glue bonds directly to the finished base.ApplyAttach with a small drop of glue.
PVA or suitable basing glue
Apply beneath the tuft or flower and press its base into place with tweezers. Keep glue out ofthefibers andpetals;petals, and follow the adhesive instructions for the material.- Let the glue dry
fully before continuingfully.
Continue to Step12.12 only when it is dry. The controlled final Ultra Matte passwill includeincludes the vegetation; avoid soakingthetufts or flowers.
Painted scenic pieces: resin plants orand other additions thatneeding need primingprimer and paintingpaint belong with the earlier base-painting work. This step is for ready-made vegetation and similar finishing details.
12 Battle dust & final matte
Tie the feet into the base and finish with a controlled matte coat.
PALETTE / THIS STEP
Vallejo Pigment FXNatural Iron OxideAKUltra Matte VarnishOnceApply the battle dust
- Check the preceding layers are dry.
The protective coats from Step 10 and any vegetation glue from Step 11aremustdry,beapplydry. - Dust selected areas of the base.
Vallejo Pigment FX Natural Iron Oxideto selected base areas to suggest
Suggest dark battle dust, ash, and scorched debris. - Add smaller amounts to the feet and shins to tie the marine into the base.
- Remove
- excess pigment.
Use gentle airbrush airflow
to remove excess pigmentuntil the armor color and weathering are balanced.- Check the preceding layers are dry.
Secure the pigment and finish matte
AfterMixpigments,thethoroughlyvarnishmixand apply a light final pass.purePure AK Ultra Matte Varnishand apply
Apply light, thinpasses. Aimpasses for an evenly wettedfilm:film. It should land lightlywet,wet without soaking the model or leavingadry, dusty spray.- Preserve the pigment
texture:texture and vegetation.
Useuse athis lightfinalapplication to secure thepigmentspigment and establish the matte finish. Avoid saturatingthepigment or building a heavy varnishlayer over it.layer. Keep the spray light over attached grass andflowers too;flowers; do not soak them. - Include the metallic
areas:areas.keep
Keep the main metallic paint and shading beneath the protective varnish. Step 13 optionally restores selected reflections after this finalUltra Mattepass.
Only
Before Leavegaming or transport: leave about about 24 hours after the final varnish coat before gaming or transport in this workflow;workflow. theAny added paint and glue must also be dry.
13 Optional metallic reflections & edges
Optionally restore selected metallic reflections after the final Ultra Matte coat.
PALETTE / RE-LAYERING & FINAL EDGES
Scale75Black Metal · optional steel re-layeringScale75Heavy Metal · optional steel edgesCitadel DryNecron Compound · optional steel edgesVallejo True Metallic MetalImperial Gold Base · 77.123Vallejo True Metallic MetalImperial Gold Light · 77.103AK 3GENRusty Brass · optional re-layering & edgesUse a lightly loaded pointed brush and short, controlled strokes. Preserve the shaded, aged gold andgold; avoid drybrushing the assembled aquila.
WaitCheckuntilthat all varnishing iscompletecomplete., including
Include the light pigment-fixing pass in Step12,12.and theThe finishismust be dry, stable, and no longer tacky.Optional —Optional: restore selected steel and brassshine:shine.re-layer selected, easily accessible faces with
Scale75 Black Metal or AK 3GEN Rusty Brass.
Re-layer selected, easily accessible faces with their matching metal. Preserve recess shadows and wanted weathering. Let theseselectedlayers dry.OptionalOptional: add general goldhighlights:highlights.mix
1 part Imperial Gold Base (77.123) :
1 part Imperial Gold Light (77.103)
Applyfor general highlights onto raised edges and upper-facing details of the remaining gold ornaments. Keep the shading visible and let the highlights dry.OptionalOptional: add brighter goldaccents:points.step up to
1 part Imperial Gold Base :
2 parts Imperial Gold Light
Useforthe 1:2 mix sparingly on selected sharp corners, feather tips, and small upper-facing points.Use this 1:2 mix sparingly.OptionalOptional: add steel and brassaccents:edge accents.use
Scale75 Heavy Metal or Citadel Dry Necron Compound forselected steel edges, andsteel;
AK 3GEN Rusty Brass for matching brass edges.
Keeptheseaccents offthesurrounding armor and batch them by metal color.- Keep the highlights narrow and
selectiveselective., with
Use a few tiny points on corners. Let them dry and leave them above the varnish. Anotheroverallall-over Ultra Matte coat would dull these freshreflections again.reflections.
Protection: the underlying metallic paintmetal retains its varnish layer. Any freshFresh re-layered areas and edge highlights sit above the varnish and are unvarnished; touch them up if they wear.
Ready for the table.
Allow about 24 hours after the final varnish coat before gaming or transport. Any optional metallic re-layering, gold edge highlights, other metallic accents, and basing glue must also be dry.
THE RECIPE ON THE TABLE
Finished units
Use these finished squads as references for color balance, highlights, and the overall finish. Select either photo to open it at full size.
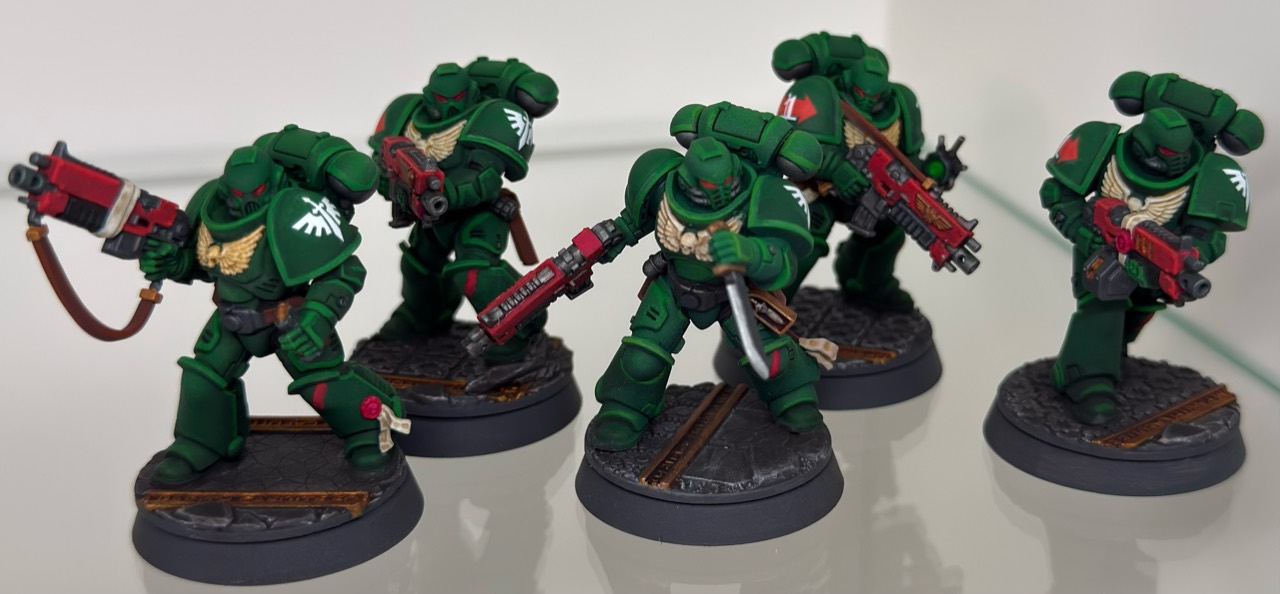
Intercessors
The finished five-model squad, showing the recipe across different poses and equipment.
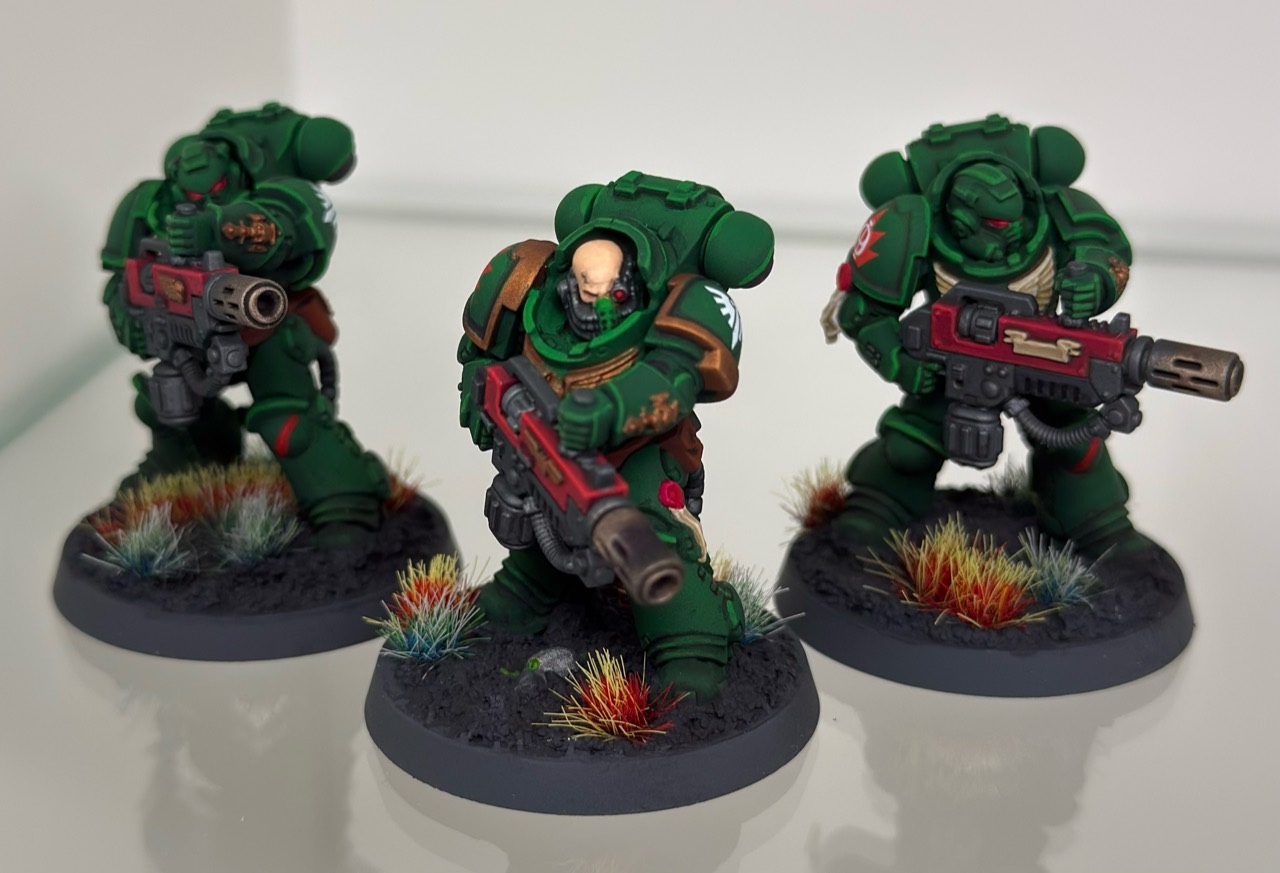
Eradicators · same painting process
These three Eradicators show the earlier gold-sergeant scheme. The photographed gold rank trim is historical. Current sergeants follow the normal unit recipe in every area and are identified by a tilt shield with a red skull decal, with the optional shield stripes described above.
Batch map
Use this to group repeated colors across the model and squad. Follow the numbered steps for the full painting sequence.
Shared-color checklist
- Scenic ground — Step 3: opaque Army Painter Fanatic Ash Grey across the full ground, then Pro Acryl 1-Step Graphite Grey. Use Citadel Eshin Grey on the rim only, with later touch-up only if needed.
- Forward grips — Step 4: Army Painter John Blanche Masterclass Ironclad Grey → AK Precision Panel Liner Black. Use Black Legion or Ironclad Grey for other black joints and grips, choosing by area. Batch targeted Black liner into awkward black details where applying Black Legion risks spilling onto the green armor. Let the liner dry, then add Deep Grey highlights only where appropriate.
- Leather — Step 4: AK 3GEN Hull Red → optional AK Precision Panel Liner Sepia in seams and folds → AK 3GEN Color Punch Beast Brown highlights. Batch all matching leather, including holsters; let each layer dry.
- AK 3GEN Silver Grey: complete the street foundations in Step 3, then batch purity-seal wax in Step 5. Use Ushabti Bone for the aquilas and any optional bone shield stripes.
- AK 3GEN Light Earth — Step 5: basecoat all purity-seal oath paper together. Once dry, shade its folds and recesses with AK Precision Panel Liner Dark Brown.
- Citadel bone batch — Step 5: basecoat all aquilas and any optional bone shield stripes with Ushabti Bone, apply undiluted Seraphim Sepia only in the recesses, then add restrained Screaming Skull highlights. Keep Ushabti Bone visible across the raised faces. Let each layer dry and finish before the weapons.
- AK 3GEN Color Punch Afro Shadow — Step 5: add fine simulated writing across all oath paper after the Dark Brown panel liner has dried.
- Eye lenses — Steps 5–6: prepare Pro Acryl Bold Titanium White → Citadel Contrast Flesh Tearers Red in Step 5, letting each layer dry. Add small Pro Acryl Bold Pyrrole Red highlights with the casing and knee batch in Step 6.
- AK 3GEN Wine Red / Pro Acryl Bold Pyrrole Red — Step 6: basecoat the weapon casings and 3rd Company knees with Wine Red, then batch Bold Pyrrole Red highlights across these areas and the eye lenses. The sergeant shield skull is a decal applied in Step 9.
- Scale75 Black Metal — Step 7: all exposed pistol handles, including those protruding from holsters, plus matching weapon, armor, backpack, and helmet hardware, blades, and chainsword teeth. Add brighter metal over the basecoat only where highlights or wear patterns call for it.
- Optional white symbols — Step 7: selected chapter wings and weapon emblems: Pro Acryl Heavy Titanium White (S21) → undiluted Vallejo Xpress Color Templar White (72.401) for blue-grey recess shading. Finish before varnishing.
- Imperial Gold base — Step 7: basecoat the remaining selected marine gold with Vallejo TMM Imperial Gold Base (77.123). Sergeants follow normal unit gold placement; their rank identifier is the red skull decal on the tilt shield.
- Gold street details — Step 3: AK 3GEN Silver Grey → AK Quick Gen Old Gold → undiluted Reikland Fleshshade. Finish the entire feature in this step.
- Marine gold shade & cleanup: use 1 part Imperial Gold Shade : 1 part Vallejo Xpress Medium. Once dry, clean up selected midtones with Imperial Gold Airbrush (77.163) only where needed.
- AK Precision Panel Liner Sepia: green armor panel lines in Step 2; optional leather pin wash after Hull Red in Step 4. Black liner is assigned to forward grips and awkward black details, not the green armor lining.
- Armor colors: include the belt buckle, all pauldron rims, and the sergeants’ tilt shields with the green armor. Airbrush Black Green across the squad, then the generous 1:1 Black Green / Greenskin Punch zenithal, then restrained 2:1 Greenskin Punch / Slime Green volume highlights. Sergeants’ helmets use the same green treatment. Later, batch necessary cleanup with Black Green or the matching 2:1 mix, followed by layered brush edges using the bottled 1:1 Greenskin Punch / Slime Green mix. Keep any bone shield stripe in its separate bone batch.
- Varnishing: two thin coats of AK Ultra Matte Varnish across the squad, drying between coats. A separate initial satin coat is optional, not required. After these coats dry, attach any vegetation and let the glue dry. Add pigments, then use a light final application of pure AK Ultra Matte Varnish; avoid soaking the vegetation.
- Optional vegetation — Step 11: attach grass, flowers, and foliage with PVA or suitable basing glue on clean, firm contact points. Let the glue dry fully before pigments and the final Ultra Matte pass in Step 12.
- Final metal batch — Step 13: after all varnish and pigment fixing are dry and non-tacky, optionally restore selected steel or brass faces. Highlight marine gold with 1:1 Imperial Gold Base : Light, then 1:2 Base : Light for selected brighter accents. Add optional steel or brass edges. Leave fresh layers above the varnish; do not add another all-over coat.